Sunday, November 29, 2015
Beginning to See
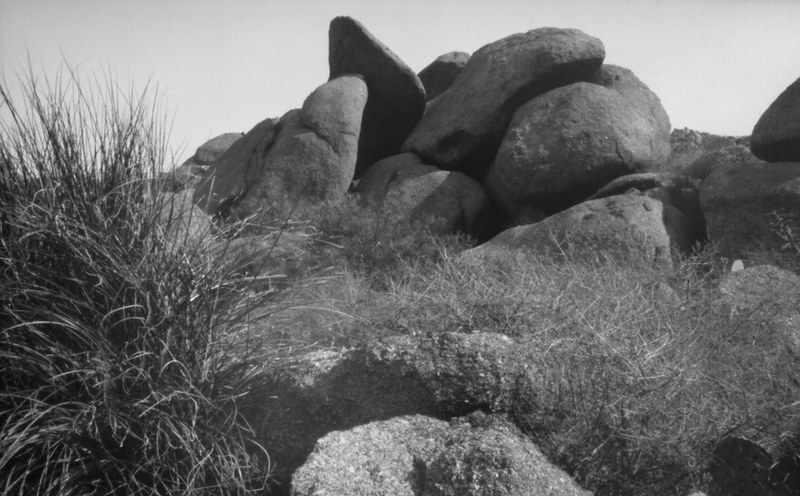
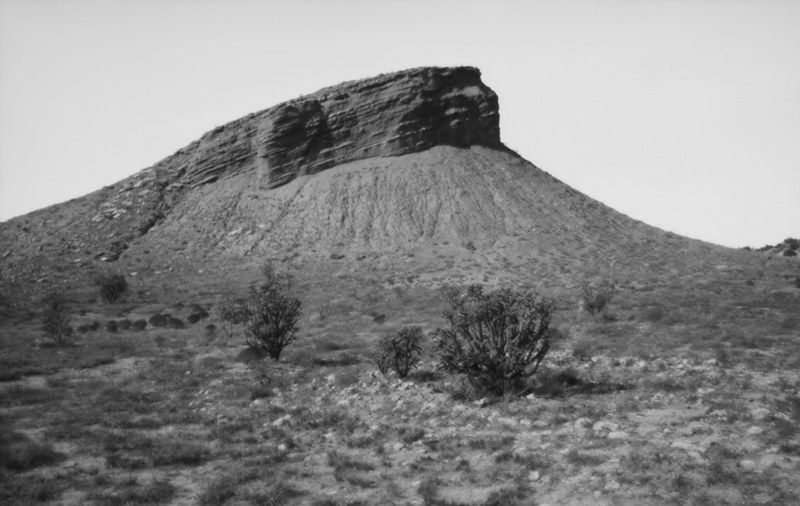
(F/300, 5"x8" falling plate pinhole camera, pre-flashed grade 2 paper negative.)
With premeditated intention I packed my truck with pinhole box camera, handmade wooden tripod and light meter, on that day back in November of 2005 - ten years ago - the goal being a familiar location in the Ojito Wilderness, only to find the unexpected along the way.
I find myself often heading out to some photogenic locale with my imagination preset to what I expect to find, so mentally focused on my intended destination that I become less observant to the world round about me along the way. The problem with being stuck in this tunnel-vision mode is missing out on all the fresh discoveries that are vital to a continually renewed creativity; one returns home to find nothing of substance has been gained for all that effort.
But on this day, something bade me to stop, pull over and explore this butte that I'd passed many times previously on my drives out on Cabezon Road through the Ojito.
This was one of the regular landmarks I'd learned to recognize from my previous trips; how the road makes a bend to the left, then the right, then a long, winding stretch toward the west that passes this butte, then up and down several swales and on past a large cattle pond, and onward.
It's the journey along the way, at least as much as the destination, that's most important. I am reminded of this truism every time I see this image, a kind of Note to Self: Drop all pretense, open your eyes and begin to see the world anew.
Wednesday, November 25, 2015
DIY Tripods
One of the things that's so enjoyable about pinhole photography is the maker aspect of it, either adapting commercially made cameras with makeshift pinhole lenses or making one's own camera from scratch. If you're like me, after a few years of successful camera building a person begins to think wider afield than just cameras. In my case, the size and weight of some of my larger cameras required me to use a heavy Bogen tripod, that still lacked adequate resistance to vibration. So I began to wonder if it were possible to make a tripod with the requisite sturdiness, in a package lighter than a commercially-fashioned unit.
My journey into handmade tripods I've documented with an informational video on the two handmade tripods described herein:
Large Tripod:
I first built an over-designed, heavier-than-needed tripod, where the legs were each built from two 1"x2" pieces screwed together to form a "T-beam" structure, with a massive hexagonal head, connected to the legs via brass door hinges. Despite my best intentions, and because of the slight slop in the door hinges, the result was that the larger box cameras were still too wobbly atop this nearly six foot-tall structure. So I put it aside for several years and instead tackled a much smaller, lighter tripod (described below).
However, I always had a nagging feeling in the back of my mind that I could do better with that large tripod, and so later I took it apart, lightened the legs (each now a single piece of 1"x2" spruce), and made a lighter top platform with angle brackets connecting the legs (similar to the smaller tripod, but with extra bracing). The result (see the photo above) is a unit over five feet tall that weighs in at only five pounds, yet can support the largest box camera in my inventory. Let's look at some of the details.
You'll notice that each leg is connected to the under side of the top plate with a pair of angle brackets, with bolts and knobs (for tension adjustment) connecting each leg to the brackets, plus three additional brackets, bent to 120 degrees, connecting each leg bracket to its neighbor for additional support. Notice too the pair of bubble levels included as an aid in leveling up the head.
The single biggest design issue I faced was how to keep the legs spread out, yet stable, permitting minor adjustments to compensate for uneven ground. Merely tightening the knobs atop each leg would provide inadequate support, given the long leverage of each leg. The solution was a novel idea I call a "tensioning loop," that employs a loop of cord strung through three screw eyes attached to the inside surfaces of each leg. The loop is free to slip through each eyelet, while pulling the legs taught provides the tension necessary to keep them stable.
In principle, this design reminds me of Buckminster Fuller's concept of tensegrity, which relates to having discrete tension and compression members in a system, each optimized to do their job as efficiently as possible.
How well does it work? Due to the lack of play in the leg hinge points, the tripod is very stable and wobble-free with a large pinhole box camera mounted atop; while the load-bearing ability is amazing: witness my attempt, in the video, to hang all of my 200+ pounds from the tripod head, resulting in only a bit of creaking in the joints under load. Not bad for a five pound tripod.
To protect the bottom of the legs from rotting and degradation through contact with the ground, I've attached metal brackets to the bottom corners, as such:
Small Tripod:
After the debacle of my first large tripod, I thought I'd start again with a much more modest design, one optimized for smaller box cameras. I'd developed this habit of building many of my projects from ready-made items found in hardware and craft stores. I would often wander through such a place, designing a project in my head right then and there as I saw what was available and figured out how it could be utilized. So one day, as I was wandering the aisles at the Home Depot hardware store, I came across these 48" long Brazilian hardwood dowels, 7/8" in diameter. These were much lighter and stronger than the typical pine dowels sold in craft stores, and much more resistant to warping. Then, wandering through the plumbing section, I came across these copper pipe caps that fit snugly on the bottom of the dowels, to serve as feet, whose bottom surface I subsequently slathered with JB Weld epoxy as a protectant.
For the top plate, I already had a piece of 3/4" black walnut at home, which I cut into a truncated triangle, and attached to the legs via angle brackets and hardware. The machine screws hold the legs to the platform via nylon locking nuts, that can be adjusted for proper tension.
I also used the same system of a tension loop and screw eyes in the legs, which has proved to be very efficient and workable.
In practice, and as I demonstrate in the video, the leg positions can be adjusted to provide a slight degree of leveling of the tripod head. I typically point one leg forward, toward the subject, while the back two legs can be adjusted in a variety of ways and combinations to provide both horizontal and vertical movement of the head.
Another idea that works well with these tripods is to add a commercially-made ballhead to the top. This, of course, is limited by the size of the head's adapter plate and how much weight it can sustain, and also the size and weight of the camera itself. For example, my large 12"x12" oak falling plate camera (yet to be described herein) would be too heavy and bulky for the lightweight ballhead shown in the video, which has too small of an adapter plate to provide sufficient support against wobbling and vibration in the breeze. This is one reason why the large tripod has such a large top plate, to provide proper support to large boxes that would otherwise tend to be unstable.
I tried to answer in the video the question of Why build your own tripod, in this day and age where there's never been a better selection of tripods, using high-tech materials like carbon fiber and aluminum. The answer is twofold. First, there's the simple but profound satisfaction that comes from designing and making your own equipment, using your own head and hands. Second, despite their seemingly primitive appearance, such wooden tripods can still outperform the high-tech materials of today, such as carbon fiber. This is born out in weight comparisons between these two handmade tripods and two commercially made examples in my possession. The large tripod, over five feet tall, weighs only five pounds, while its commercial counterpart, a Bogen, weights nine pounds and costs hundreds of dollars, and can't support the same amount of load. The smaller wooden tripod weighs less than two pounds, which is much less than its lightweight Sunpak carbon fiber counterpart. In fact, adding the ballhead from the Sunpak tripod to the wooden version leaves the naked Sunpak unit still heavier than the wooden version.
In all fairness, these tripod designs of mine lack collapsible legs and fully articulating heads (though such heads can be added, as I indicated above). Yet in actual use, out in the field, I don't think they suffer accordingly, since in my experience with commercial collapsible-leg tripods I always keep them extended when in use with box cameras anyway. The only issue can be during transport; though the larger tripod might be a bit of a stretch hauling in my tiny Mazda 2, I usually go on such photo expeditions with a pickup truck, meaning that the size of these tripods just hasn't been a problem.
Though this is a less important issue, I have noticed the disparity between the appearance of an obviously handmade box camera sitting atop a commercially made tripod. But when mounted to a corresponding handmade wooden tripod, the combination seems to be made for each other, like camera and support were designed as a system, rather than cobbled together from discrete parts. It also can communicate to the public that you are especially intent on doing this for some specific reason, not just out of some haphazard experimentation, and that there are specific reasons why you chose to make these tools, rather than purchase ready-made.
As a way of encouraging you, the reader, to consider such a project for yourself, it is important for you to know that neither of these tripod designs require real "woodworking" skills. The 1"x2" spruce legs of the larger unit were purchased as finish-grade lumber, meaning I only had to cut to size, drill the mounting holes and apply a protective finish. Similarly, the top plate was also purchased as finish-grade; it only had to be cut to size, screwed and glued into another such piece to increase its thickness and rigidity, then have holes drilled for the angle brackets and center bolt. All of the mounting hardware was purchased ready-made, the only real modification being the 120-degree brackets between the legs of the large tripod were bent from ordinary angle brackets. So these tripods weren't so much built as assembled from premanufactured parts. You only need to know how to operate a saw and a drill, a paintbrush and a screwdriver. So give it a try, won't you?
Sunday, November 22, 2015
Sandia Foothills Boulders
Albuquerque is a city that abuts the Sandia Mountain range on its eastern edge, along whose foothills are numerous opportunities for hiking, supported by convenient parking areas maintained by the City. This destination represents an opportune subject matter, when the desire to go out-and-about with a pinhole camera suddenly hits, as it did on this day, back in November of 2004.
I grew up in the eastern part of the city, literally in the shadow of the Sandia Mountains. Like many of my peers, we were used to telling directions by the massive presence of the mountain to our east, a lodestone of sorts, directing our inner compasses. Put me in some other town or city absent such a striking landmark and I'd be lost to tell which direction is which. But not in Albuquerque.
Long before I was born, my dad as a young man would hike many miles, from what is now downtown, up through the east mesa to the mountains, often accompanied by his buddies - back when the Great Depression offered little else for young men to do. One story he told was when he and his buddies each brought with them a .22 rifle with which, inspired by the cowboy movies, they had a regular shoot-out, hiding behind these massive granite boulders, ricocheting bullets zinging past their heads. One can't imagine doing such a thing today, it would be considered sheer madness, or downright criminal activity. Back then, it was just clean fun for kids living in a tough world; which activities might also have prepared them to face the trials of the Second World War, just a few short years ahead.
I thought about this story as I hiked the trails meandering around these massive boulders, preparing to do a bit of shooting of a different kind. I had with me the F/300 aluminum 5"x8" falling plate pinhole box camera and tripod, while I was by now also experimenting with paper negatives instead of the orthographic litho film I had been using, and which I was finding difficult to control its contrast.
I had already noticed that conventional multi-grade photo paper could also too easily produce images of excessively high contrast, caused by the blue and UV-intensive daylight activating the paper's high-contrast emulsion. For this reason I had begun experimenting with using RC photo paper of a fixed contrast grade instead, whose contrast was insensitive to the color of light; along with adding a faint, even exposure to the paper in the darkroom ahead of time - what I call a "pre-flash" - which serves to increase the paper's shadow detail without significantly increasing the highlight exposure, thereby serving to limit the excessive image contrast. This particular image was created during that period of intense experimentation.
I can't recall now whether the camera was mounted atop my homemade tripod or the heavier but more flexible Bogen; but I do know that, by judging from the foliage along the left side, the wind must have been very calm that morning, since this was a 45 second exposure. This was but one of a series that I've shot since in this same general area, and no doubt you'll be seeing more of these foothills images herein.
Having such an easy to access locale (about two miles from my house) for experimental scenic photography has proven to be of immense help in ironing out the bugs in my process before embarking on lengthier excursions afield. But even so, I periodically return to the Sandia Foothills, that ever-present lodestone that grounds me to home.
Friday, November 20, 2015
Message Received from Ojito Wilderness
I'm standing in the hot, dry wasteland of the Ojito Wilderness, the sun blindingly bright reflecting off the hard-packed talus. I come here regularly, as it represents a relatively easy-to-access scenic area from nearby Albuquerque, from where I drive north 20 miles to the town of Bernalillo, then on US550 northwest another 20 miles, then onto Cabezon Road, bare dirt and sometimes barely passable, another 5 or 10. The Ojito is BLM (U.S. Bureau of Land Management) managed land, meaning that it's public access. Cabezon road winds west through the Ojito, where it meets the main electrical power transmission and gas lines from the Four Corners area of the State that feed Albuquerque.
There's a particular spot I park at, directly adjacent to Cabezon Road, that doesn't involve getting into loose sand or otherwise risk getting stuck. From there it's a short hike to a scenic area with otherworldy rock formations, that seem to morph and change over the seasons of wind, snow and rain, as if the terrain were some slow-motion monster whose presence one must always heed. Nearby my truck is a shallow trench being eroded away by snow and rain just slightly below ground, as I carefully place my footing, not wanting to fall through into some earthbound abyss.
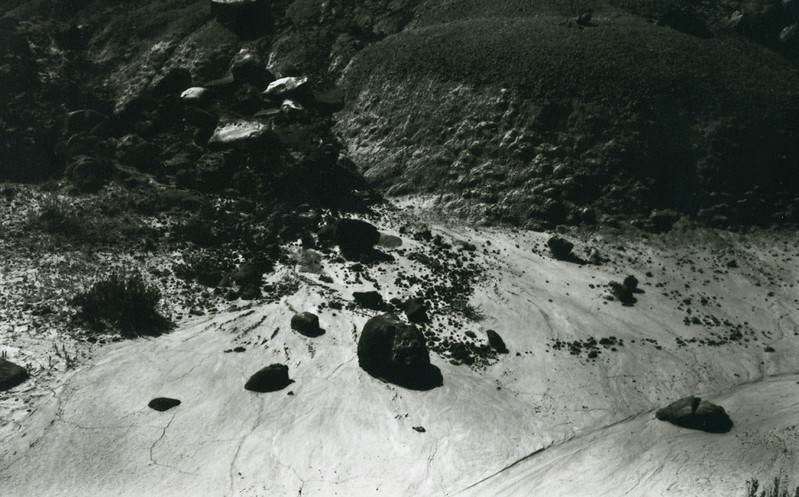
On this day I had the F/300, 5"x8" format falling plate pinhole camera, and the formations of interest were this textured hill and foreground with volcanic-like rocks littering a bright, parched surface. The camera would need to point down to get the composition I wanted.
I used the viewing dots on the sides and top of the box camera to frame the shot, adjusting the tripod as required, then metered the scene using reflective metering with my Gossen Luna-Pro F. Once my exposure was determined, I waited for the breeze to subside before opening the shutter - there's always some air stirring about in this climate.
I finished the batch of film that had been pre-loaded into the camera on other compositions, which involved some tricky hiking down steep slopes of soft sand or talus, but this image I had high hopes to be the best from that day; and I wasn't disappointed. I returned to civilization excited at the prospect of what I had recorded, but also knowing there would be yet another day's opportunity in the Ojito Wilderness.
Technically, I was satisfied to have captured a pretty decent tonal range, getting both dark shadow detail and the tricky highlight of the desert floor.
Yet, there's something otherworldly about this image, as if it could have been from some NASA Mars probe instead of the American southwest. Which serves as reminder that we do live on a planet, Spaceship Earth, orbiting the same star as does Mars; and that this is just as much science as art; the photons of light that struck the crystals of silver halides in this film had their eight minutes of freedom through interplanetary space, then passed uninterrupted through the tiny pinhole aperture, until their flight was ended herein; this being a mere record of the event.
Tuesday, November 17, 2015
Down by the Rio Grande
When in Rome, do as the Romans. And if in NYC, it would be Central Park, no doubt. But this isn't Rome or New York; and so when in Albuquerque, do as the locals - which means either a hike along the foothills of the Sandias, along the eastern boundary of the city, or a walk along the bosque river forest, where the Rio Grande threads its way through the heart of the valley and the more historic parts of town.
This image was created circa 2004, during a period of time right after I had finished the F/300, 5"x8" format, falling plate pinhole box camera (featured in the previous article), and it had yet to be upgraded with the heavier articulating plywood base, meaning that its sharpest images could only be possible in calm weather devoid of wind, that would otherwise vibrate the box enough to degrade the image as it sat atop its tripod.
During this time I was also experimenting with Freestyle Photo's Arista 200 orthochromatic film, which was less contrasty, and with a bit thicker (and hence more durable) base, than their APHS graphic arts film that I'd already been using. But I only used this film for a short period of time, before engaging in a lengthy period of experimentation with paper negatives, that has since been my primary box camera media of choice. I probably have the remaining pack of Arista 200 film still in my film storage cabinet; perhaps I should give it a try once again.
For me, the problem with using large format film, besides the cost, was that, in order to realize a usable image, I'd have to contact print it after developing and drying; whereas with paper negatives (and one of the prime reasons I've stuck with them since) is that they can much more easily be scanned and converted into a positive image, to be conveniently shared online; which harmonized well with the online photographic community that I was a part of at the time, on F295. This brings up the point that I haven't been printing many of these images onto silver paper in the darkroom; the paper negatives have thus represented a convenient intermediary for going from pinhole camera to digital image.
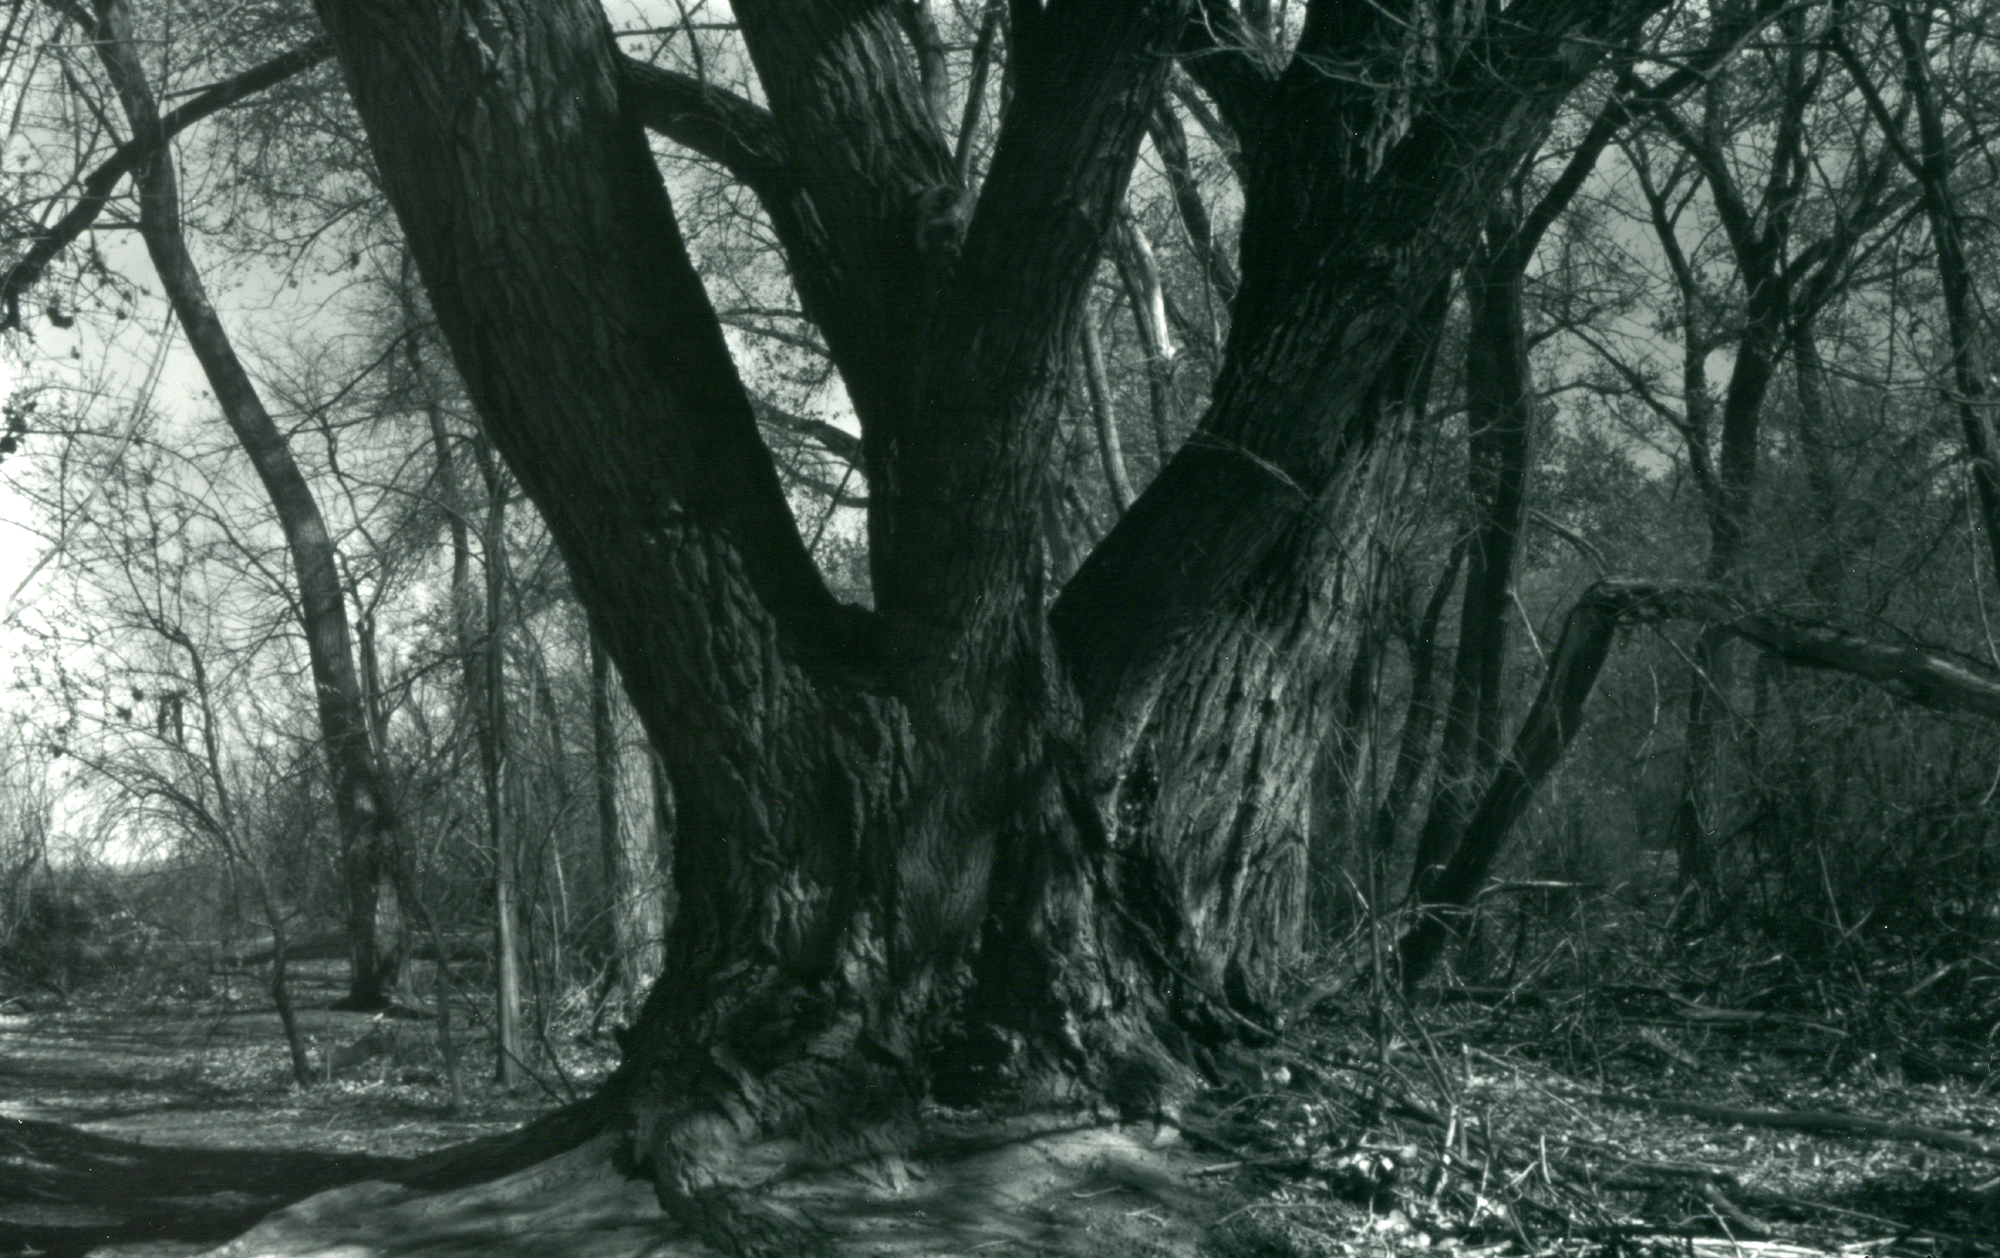
But this image is a scan of a contact print; I've chosen to retain the color tones picked up by the scanning software, rather than converting to strict monochrome, hence the cyan-like hue; which I rather like.
To get down to the forest along the Rio Grande, one parks along a residential neighborhood and walks a few blocks in, with backpack, tripod and box camera in tow. I like to carry these large boxes already mounted atop the tripod, making for a quicker setup if and when a potential image presents itself.
Instead of peering into a ground-glass view screen under a dark cloth, as is the case with the conventional large format photographer, with this camera one frames the scene by sighting along the viewing dots, mounted to the sides and top of the box, deciding where the left- and right-hand limits of the image will be located, as well as where to place the top and bottom edges. In this image, I wanted a bit of the old cottonwood tree's root system to be visible near the bottom edge.
I was pleased to get a decent amount of shadow detail on the tree, more so than what I was getting with the higher-contrast APHS lithographic film I had previously been using; no doubt aided by using HC-110 film developer instead of the paper developer used with the litho film. As for the bright sky behind the trees, I've learned with these 19th century-like, orthochromatic emulsions not to worry about the sky detail, as it will have to be grossly over-exposed in order to get adequate foreground tones.
There were a fair number of hikers out and about along the river that day, and I always wonder what they think about happening upon this primitive-looking kind of box camera, but done up in some shiny, mechanical appearance with its aluminum skin; an anachronism, perhaps. Luckily, I didn't ponder the thought too deeply, as I went further into the bosque in search of more images.
Monday, November 16, 2015
Falling Plate Details
As I indicated when I started this new blog, it will not only include pinhole images but also camera-making articles. And as I alluded to in the previous article, I had begun to employ falling plate cameras as a solution to the problem of taking a camera, of modest weight, out into the field and being able to expose multiple images, absent the additional weight, bulk and expense of multiple sheet film holders.
The first such camera, that pioneered the whole falling plate concept for me (and which I'll cover in a future article) was a large wooden box, employing an 8"x8" square format, built in the late 1990s; while the second such falling plate camera I built was a much smaller sheet metal camera with a 4"x4" format size. Although I did enjoy composing in square format, I had decided that for my third falling plate camera I'd employ a more rectangular format, better suited to landscape images. Since I had begun to purchase sheet film and paper in 8"x10" sizes, it made sense to cut these sheets in half to make negatives of 5"x8" size.
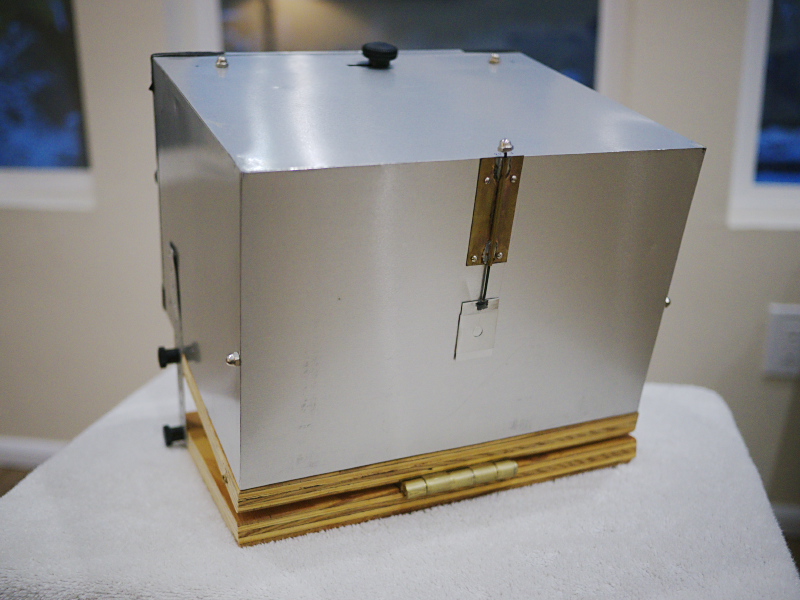
This new camera was constructed of an inner wooden frame, sheathed in aluminum flashing, using JB Weld epoxy for adhesion; thus being very lightweight for its size. This would eventually prove to be an issue regarding stability atop a tripod in windy conditions, which I hadn't yet realized, but would eventually be mitigated with the heavy, hinged plywood base, used to tilt the camera at various angles for use atop a non-adjustable tripod. With this combination of lightweight construction and a heavy, rigid base, the result is a rigid but lightweight large-format box camera.
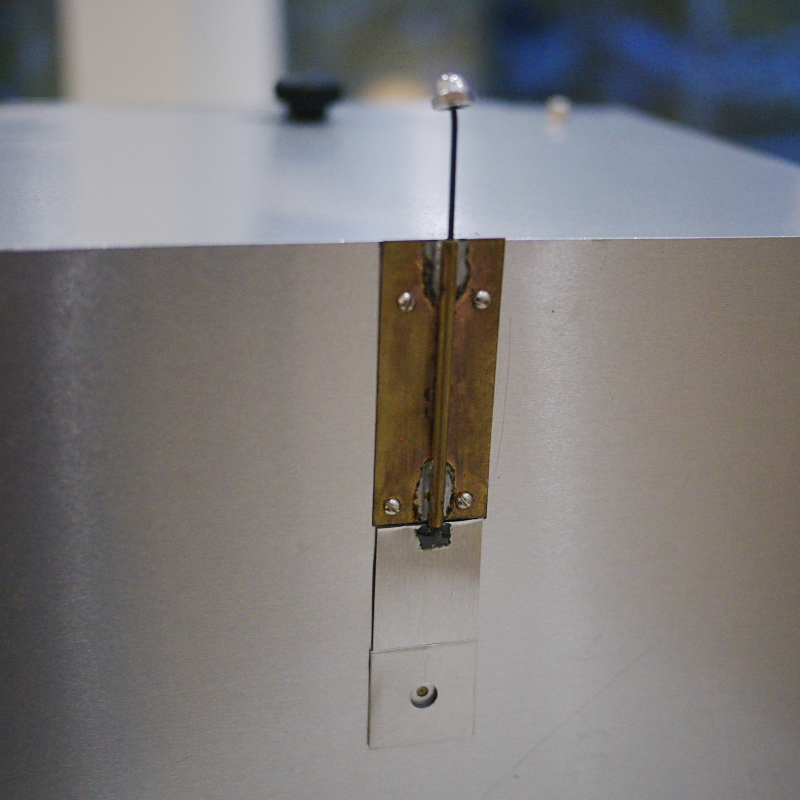
As you can see from the top picture, the shutter is actuated by pulling up on the front viewing nut, which operates a guillotine-style shutter via a wire rod. Here's a closeup of the shutter in the opened position:
The shutter guide is soldered from sheet brass and attached to the camera front with small machine screws, while the attachment of the rod to the aluminum shutter piece is with JB Weld epoxy.
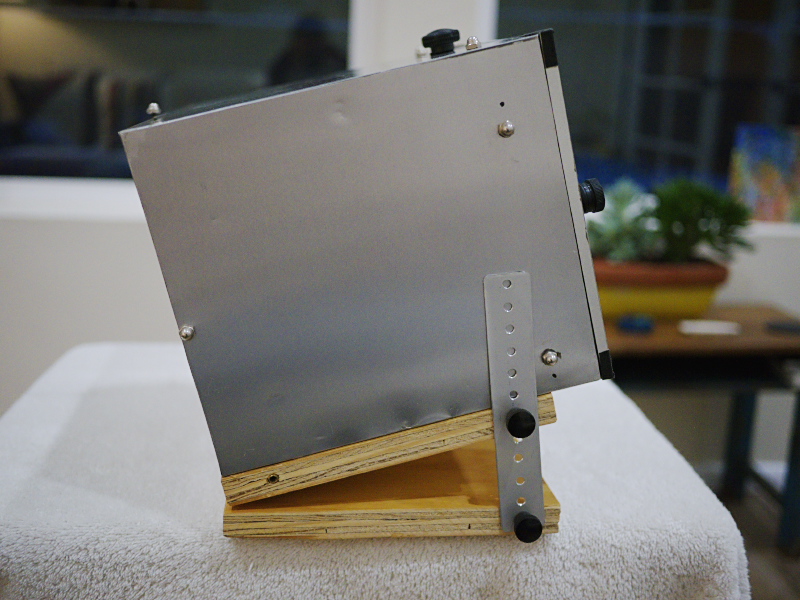
Here's a side view of the camera:
The hinged plate is oriented to point the camera down at an adjustable angle. I had found that for virtually all of my landscape images I tended to locate the horizon in the middle or upper third, hence the reason for the downward-pointing orientation of the camera. I think the reason for this is because I have been using orthochromatic film and paper that is ultra-sensitive to blue and UV light, meaning the skies are usually blown out, leaving little or no detail; what I call a "19th century" look.
You'll also note the triangle of viewing nuts along the side, for determining the vertical limits of the image; there's an equivalent set of nuts atop the camera, for determining the horizontal angle of view (with the front top nut also functioning as the shutter knob). You'll also note a smaller set of ink dots adjacent to each rear viewing nut; these were put in place after I had subsequently enlarged the film format size of this camera. It was originally intended for 5"x8" sized images, but later I figured out that I could fit 6.5"x9" negatives on the same plates; a bit more wasteful of film (since there results in wastage when cut from an 8"x10" sheet) but enabling larger images.
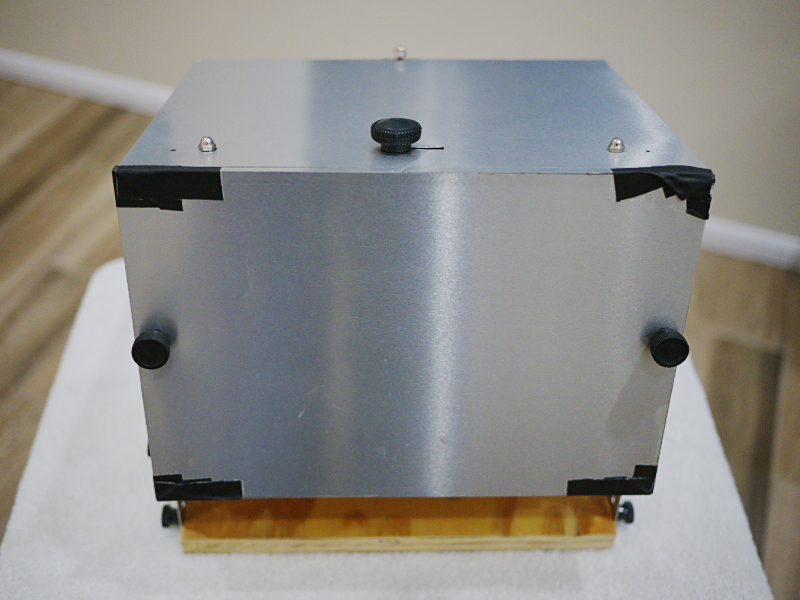
Here's a rear view of the camera:
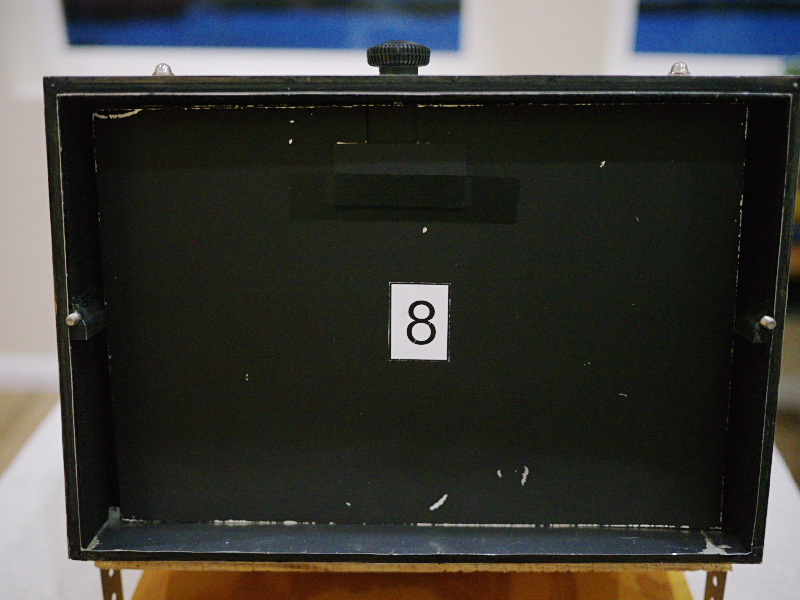
Note the two knobs, used to remove the back panel. Atop the camera are the three viewing nuts, and the film changing knob in the middle, that slides alternately left and right to drop the front film plate after exposure. Note the black gaffers tape in the corners, applied because the thin aluminum strips glued to the edges of the back lid began to come loose after several years of heavy use. Here's a view of the inside with the back lid removed:
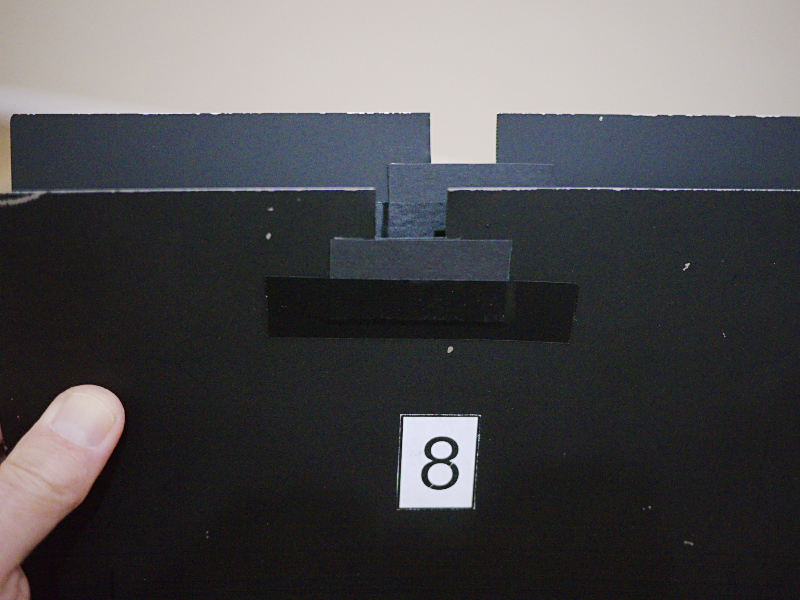
Note that there are eight film plates currently installed. The sheet film or paper is taped to the front side of each plate, using several loops of drafting tape, which are easily removable without harming the film or paper. Not shown is a heavy sheet of galvanized steel, set behind the number 8 plate and used to push the plates forward against the retaining pin, which helps to ensure reliable operation of the film changing mechanism. There's also a thin lip along the bottom edge that the stack of plates pushes against, that's about 1/4" high (seen next to the lower left corner of the number 8 plate). The gap between the top of the plates and the inside ceiling of the camera is less than 1/4", and thus as long as the plates stay firmly pressed against the upper pin and lower lip, they will stay in place.
The plates each have a notch cut in the upper edge, that alternate left and right, thusly:
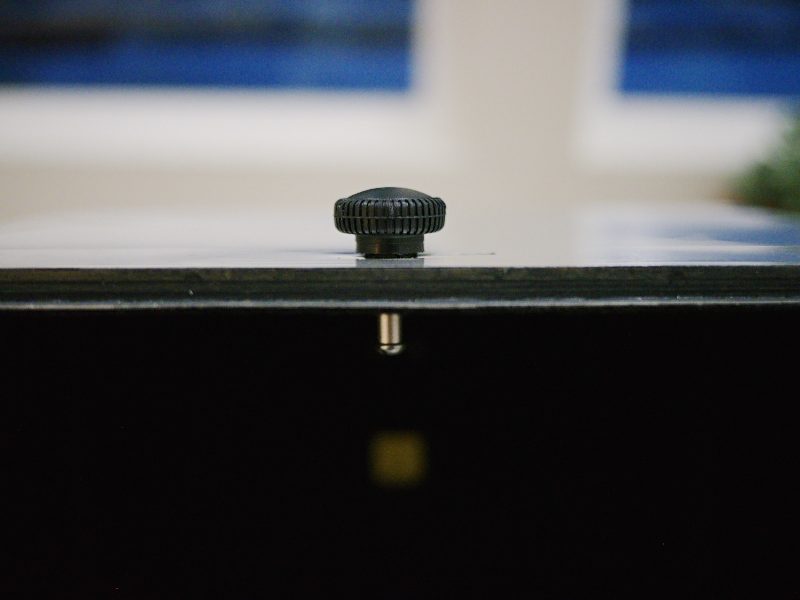
Here you can see the number 8 plate's slot is toward the left, with the number 7 plate behind it and whose notch is toward the right. The changing knob operates a pin that protrudes into the camera, that engages those slots. The thin ceiling of the camera has a light-tight area where a thin piece of wood slides back and forth, to serve as a light baffle for the knob-to-pin penetration. Here's the knob and pin in close-up:
Note that the pin is made of a machine screw and aluminum spacer tube, whose overall length is such that the plates' notches will easily clear the pin when required to fall.
Operating this camera requires first setting the box atop the tripod, and keeping it generally upright as I hike around. With the tripod over my shoulder and pinhole pointing slightly downward, the exposed and unexposed plates will generally stay in their proper places. The problem with the unexposed plates is if they become dislodged from the shelf they normally sit upon; while the problem with the exposed plates is if they become dislodged from the floor of the camera enough to block the view of the pinhole, or prevent subsequent plates from properly falling.
I had learned after much experience that it was easier to carry camera atop tripod with the legs of the tripod already extended and spread out, in case I suddenly needed both hands free and had to set down the load, as it would support itself on the ground without toppling over; I thus found it easiest to carry the tripod with two of its legs straddling my neck.
I'd also carry a light backpack on my shoulders, with light meter and other accessories such as pen, pad, and water bottle. Once the tripod was situated for a shot, I'd hang the backpack from the tripod to increase its stability in the wind.
As I indicated earlier, this camera initially didn't have the heavy wooden hinged base, and therefore would easily flex in the breeze, causing the images to be blurrier than normal. The addition of the heavy base fixed that problem, while also providing for an adjustable vertical angle; because one tripod option I had available was a homemade 48" tall non-collapsing tripod made from tropical hardwood dowels, very light in weight but also lacking an adjustable head. I could adjust its leg positions to get the horizon level, left-to-right, and then adjust the camera base for the vertical angle. This proved to be much easier to carry than my heavy Bogen tripod. I'll make a post about the tripod in a future installment.
Overall, this was one of the better cameras I ever made, as future images from this box will prove.
Thanks for reading.
~Joe
Falling Plate Fundamentals
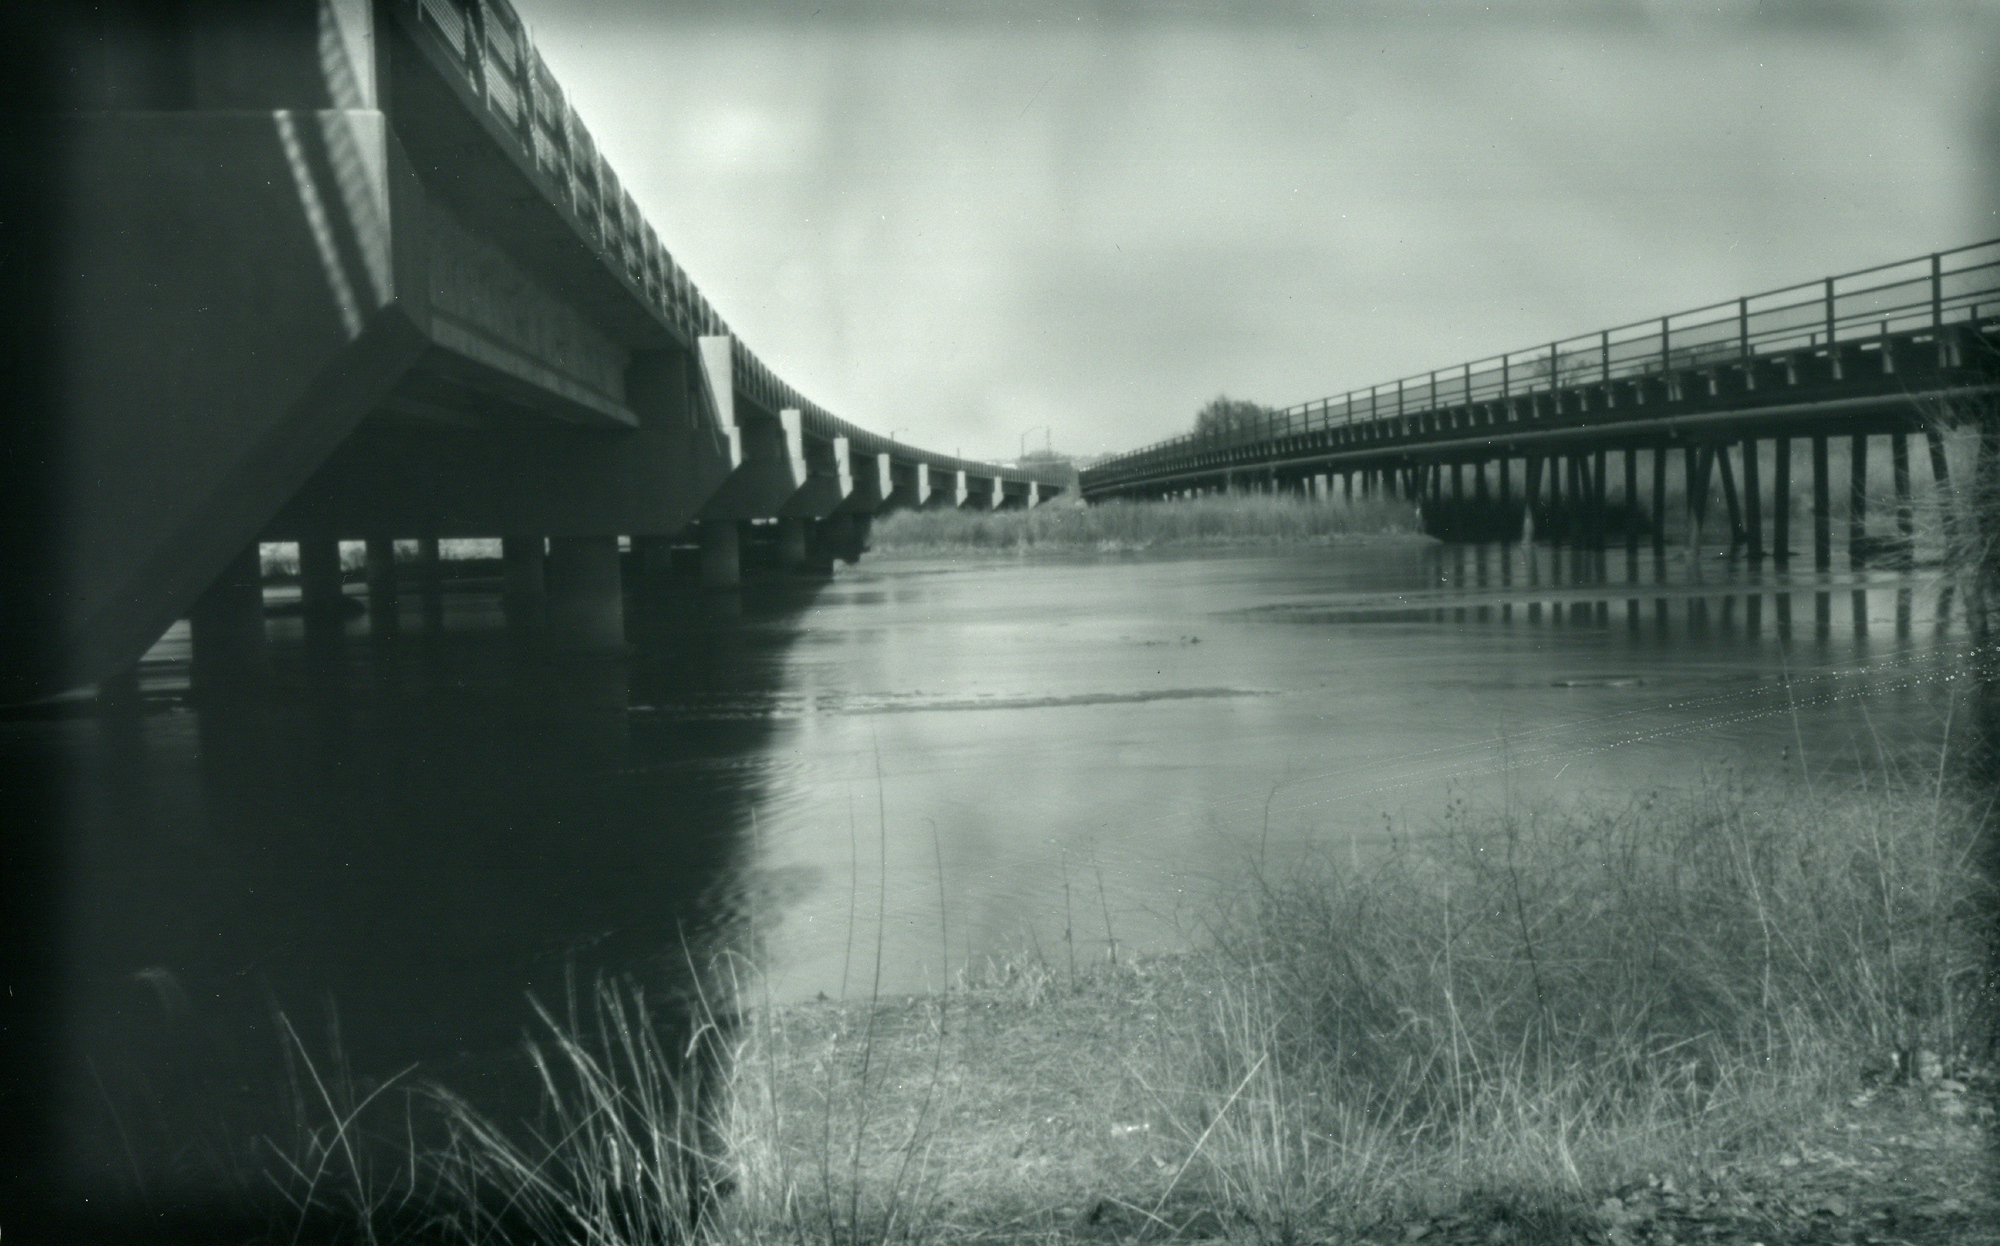
(Contact print of Arista 200 film negative. F/300, 5"x8" falling plate pinhole camera. Alameda Bridge, Rio Grande, near Albuquerque. Circa 2004.)
Let's go back in time, but not all the way to the beginning of my pinhole adventure; instead, we'll go back to 2004, when I had recently completed my third falling plate camera design.
Once a person begins to build and use simple pinhole box cameras, it becomes rather tedious to have available only one sheet of film or paper at a time. True enough, cameras can easily be made that use roll-film, permitting multiple images to be recorded in one outing, but my interests have always been in larger formats. One has to thus settle for making only one image at a time; or bringing multiple pre-loaded cameras; or a changing bag within which to swap out the film; or use sheet film holders. While I did have 4"x5" holders, I wanted larger images, and I didn't want to go to the expense of purchasing a number of larger sized film holders for this bigger sized camera; especially considering that, with a little ingenuity, I could figure out a creative alternative.
I didn't invent the falling plate camera, as they've been around since the 19th century, I later learned. But after much cogitating on the problem, I had reinvented the idea on my own. This version uses a stack of thin aluminum film plates, sitting upright at the rear of the camera, each with a film or paper negative affixed with tape. Each plate has a slot in the top edge, with the slots in the plates alternating left-right-left, etc. A sliding knob on the top of the camera operates a sliding pin, that prevents the front plate from falling until the pin is moved over to coincide with that plate's slot. With a little help, by tipping the camera forward, the front plate will fall face-down to the bottom of the camera, revealing the next plate ready to be exposed.
There are several caveats to this design. Most crucially, the camera has to be carefully handled and transported in an upright orientation, else the already fallen plates will move out of position and jam the operation of the subsequent plates; or the plates yet to be exposed might fall off their narrow ledge at the rear of the camera and jam up the works. Second, because the plates need to fall face down into the bottom floor of the box, the focal length is required to be greater than the height of the film format, precluding cameras with ultra wide angles of view.
Those limitations aside, this design eventually proved, after several modifications, to be quite reliable, and with it I subsequently made many successful images.
The film used in this image was a high-contrast orthographic film that could be handled and processed under darkroom safelights. The challenge, however, was always trying to tame the excessive contrast, especially in bright daylight scenes, since this film was intrinsically contrasty. At this time period I had yet to discover the magic of pre-flashing (to be covered in a future article) and so I was still at the stage of experimenting with techniques of minimal agitation and pulling the negative out of the highly dilute developer after an extended sit time. As a result of insufficient agitation, the sky areas of this image appear blotchy and streaked, while the edges are under-developed. But sometimes such accidents can reveal the unexpected, which I think works well in this example.
Out From Obscurity
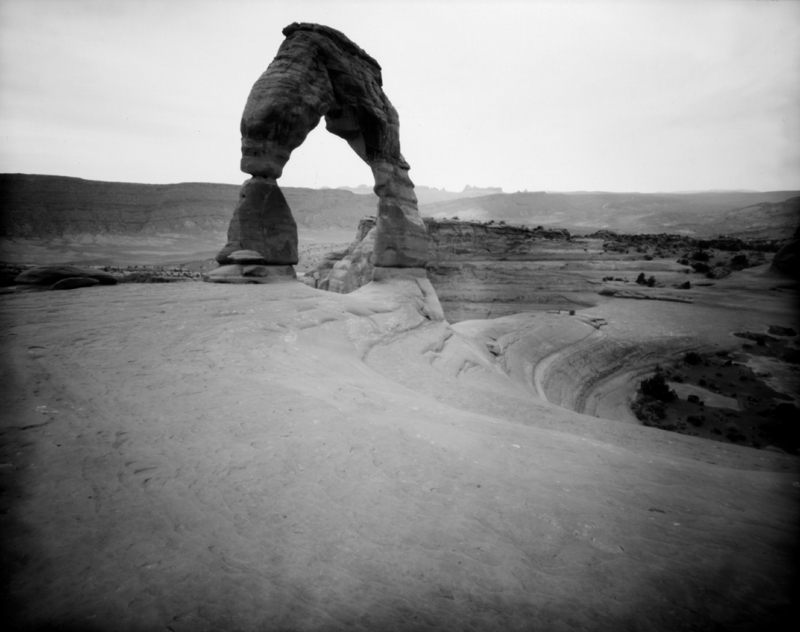
(Delicate Arch, Arches National Park. 8"x10" paper negative.)
There are 3-ring binders full of paper negatives, that I've exposed in handmade pinhole cameras over the last two decades, sitting in storage unseen but by my own imagination. At one time, there was a viable global creative community of pinhole photographers at F295, where many of these images have been shared, but now that discussion forum is gently passing into the digital night and I am left wondering where and how to best share these images with a wider, and newer, audience. Obviously, a blog comes to mind, since I've been blogging continuously since 2006, but that blog, while yet strong and ongoing, has purposefully not been used expressly for the subject of experimental photography. A new venue seemed necessary, which this blog represents.
A few years ago, my wife and I made a vacation trek to Moab, Utah, where we lugged around an 8"x10" foam core pinhole box camera and Bogen tripod. This camera employed a storage compartment, behind the film plane - a slot wide enough to contain dozens and dozens of sheets of photo paper, with a floating divider separating exposed from unexposed sheets.
In operation, I would have to first find someplace to sit down, perhaps a makeshift seating area like a rock or stump, where upon my lap I would set out a large changing bag, into which I'd zip up the large camera. Once my arms were inside the sleeves, I'd open the box's lid, remove the previously exposed negative from the film plane, slide it back into the storage compartment, then remove a fresh sheet and position it carefully at the film plane; then close up the camera, unzip the changing bag and go searching for the next image to make.
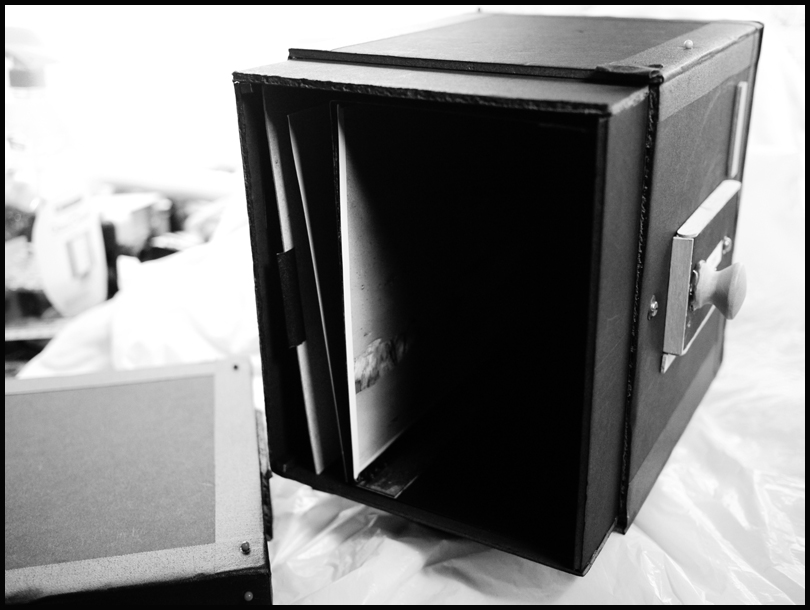
Here's an image of a similar camera I made more recently, to illustrate the concept:
The side-mounted door has been removed, where you can see an example paper negative at the film plane (mounted by magnetic strips) and behind it the storage compartment with movable divider.
I'd mount the camera atop the tripod, using the 1/4-20 bushing on the camera's plywood base, then carry tripod and camera over my shoulder, with day pack on my back, until I found some likely subject or scene. In the case of this image, we had hiked up the slick-rock mountain to Delicate Arch, then had to wait for people to clear out for each image to be exposed - or, if they were constantly moving, they would remain invisible.
Aiming the camera involved sighting along the sides and top of the box, where round plastic push-pins had been mounted to serve as viewing triangles. Primitive, but surprisingly effective.
Using black & white printing paper as an in-camera film is an obscure method of recording photographic images, one that involves first knowing the effective film speed of the paper - gleaned only through experimentation ahead of time - setting that speed into one's light meter; metering the scene; calculating the required exposure time; then making the required exposure.
Pinhole cameras naturally produce images with less sharpness than lens-based cameras; the degree of relative sharpness desired will often dictate the format size - larger formats are typically sharper than smaller - while one's subjective sensibility will dictate how important sharpness is to begin with. Sharp images are not necessarily better, and there does not exist an objective science of ranking photographic images based upon measurable criteria, since esthetic and artistic sensibility is totally subjective; so while the science of optics can inform us of the performance of a pinhole lens, it can't tell us how best to employ such a tool to our creative advantage.
In the case of this camera, I had desired to optimize it for some relatively sharp images (by pinhole camera standards) by using a quite small sized aperture. And so, standing atop the slick-rock mountain adjacent to Delicate Arch, with the early April wind howling, it was necessary to wait for a lull in the wind before opening the shutter, since the large but relatively light box acts like a sail, vibrating enough upon the tripod to excessively soften the image. The exposure time was about a minute (I'm guessing here, as I haven't gone back to research my notes from that trip), during which I worried incessantly about a heavy wind picking up, or someone walking into the scene and stopping long enough to record their ghost-like image (which can be an interesting effect).
Afterwards, I have to find somewhere else to sit down, in order to form a lap, upon which I can reload the camera.
A person has to be peculiarly focused to want to do this type of photography during what would otherwise be a normal family vacation trip. There are, of course, other forms of image-making much more convenient, that produce images much sharper, and in color. Which begs the question, Why?
That's what we are going to explore within this blog, the question of Why.
~Joe
Subscribe to:
Posts (Atom)