Monday, June 20, 2016

Words and Pictures

P1000645a

Words and pictures. Images both literary and visual. These have been considered so similar that the verbiage used to describe them seem to be synonymous. Word pictures. A picture is worth a thousand words. Terms almost interchangeable. It should come as no surprise then that the devices we've made to construct words and images together seem to operate so similarly. Today, digital images and text files seem virtually the same, mere data, slung around networks of optic fibers and copper wires.

Looking backwards is often required to see forward. So it is when combining gelatin silver paper prints and typewriters; or, gelatin silver prints of typewriters, two technologies that seem so like-minded.

A few years ago, when I was delving deep into the world of paper negative photography - employing silver paper as a form of in-camera, black & white "film" - I began looking for alternative methods of displaying these as positive images. Two obvious ways were contact printing them, in the darkroom, onto other sheets of silver paper; or scanning the negatives to produce digital files, to be inverted later via software into positive images. Both methods have their benefits. The first produces a physical print, while the second is intrinsically software-based.

But then I came up with a third method, similar to digital scanning, but employing a handheld digital camera; placing the paper negative into some setting or scene, perhaps related to the original image, and often outdoors; photographing the paper negative within the larger scenic context; then inverting the tones of the image afterwards, to produce a positive monochrome image set inside an otherworldly appearing scene, a shifted color palette of negative tones, a reversed world where the real is imaginary and the imaginary real.

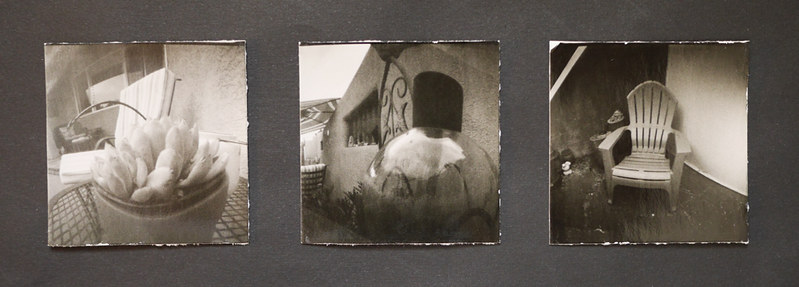
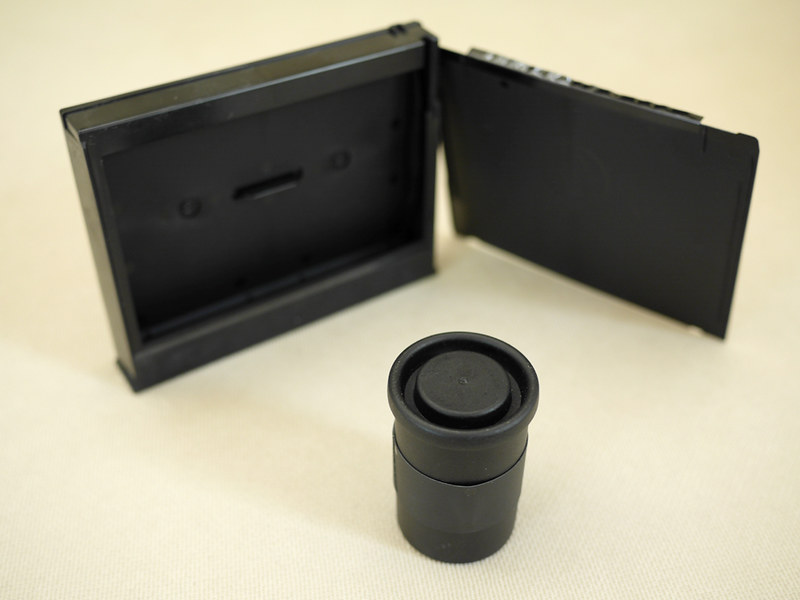
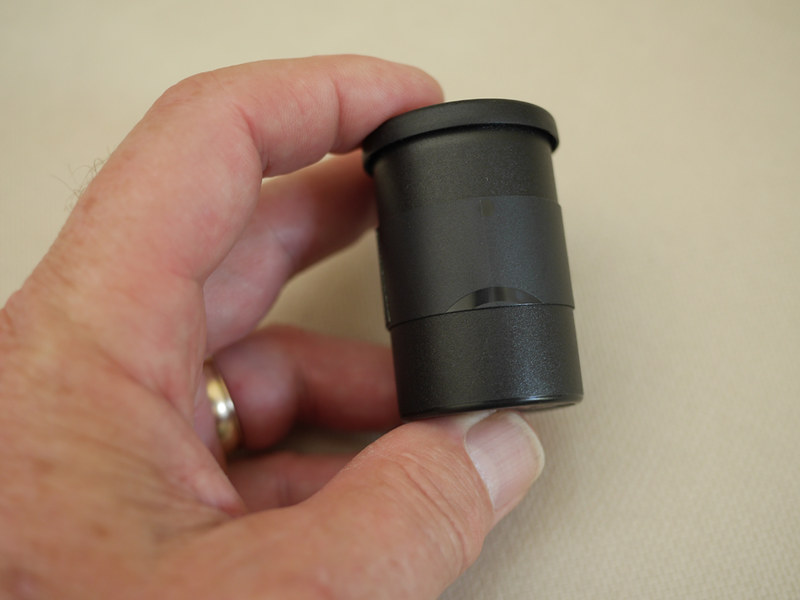
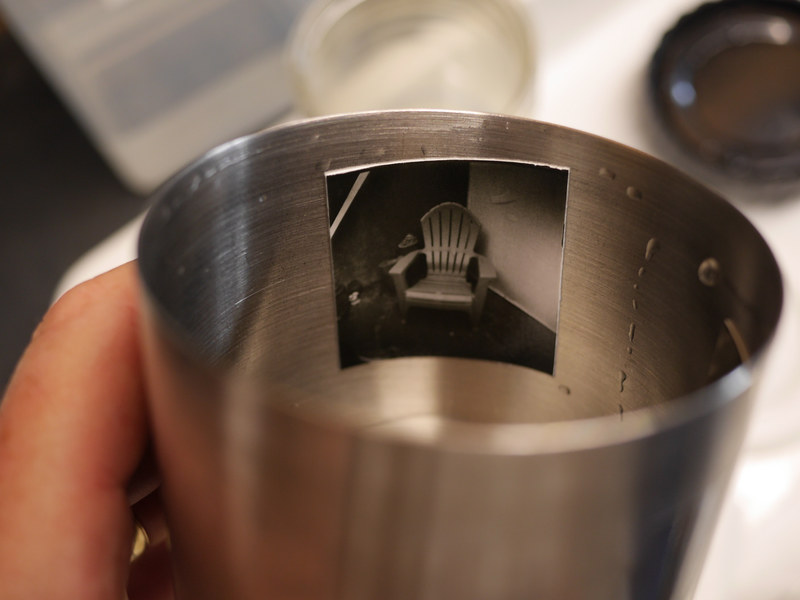
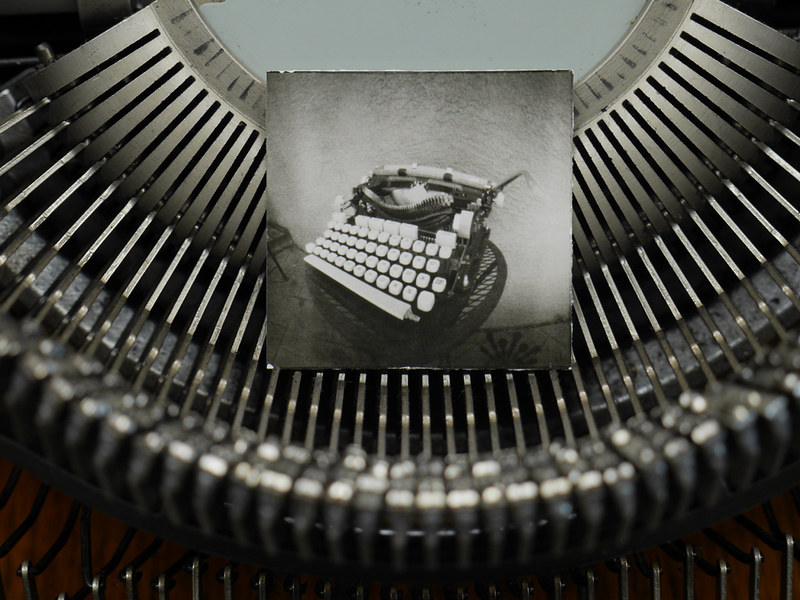
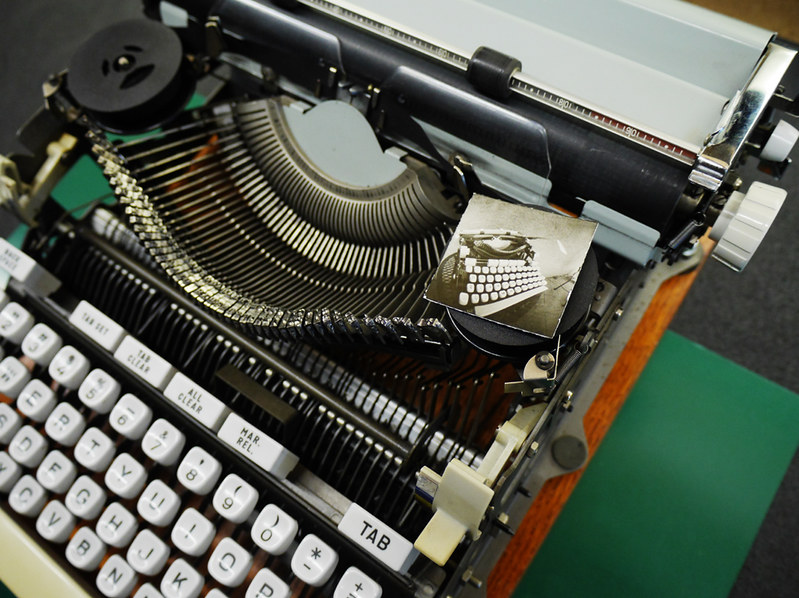
Since that time, I've been working more regularly with Harman Direct Positive paper, that produces a positive image requiring no tonal reversal afterward. But the idea of digitizing these prints, by photographing them in some larger context using a handheld digital camera, persists to this day. So it was that, after making this small study of my Hermes 3000 "Nekkid-Riter" chopped typewriter, using small squares of the Harman paper in my film canister pinhole cameras, it seemed obvious that sharing these prints online might be more interesting done this way than by merely scanning.

P1000646a

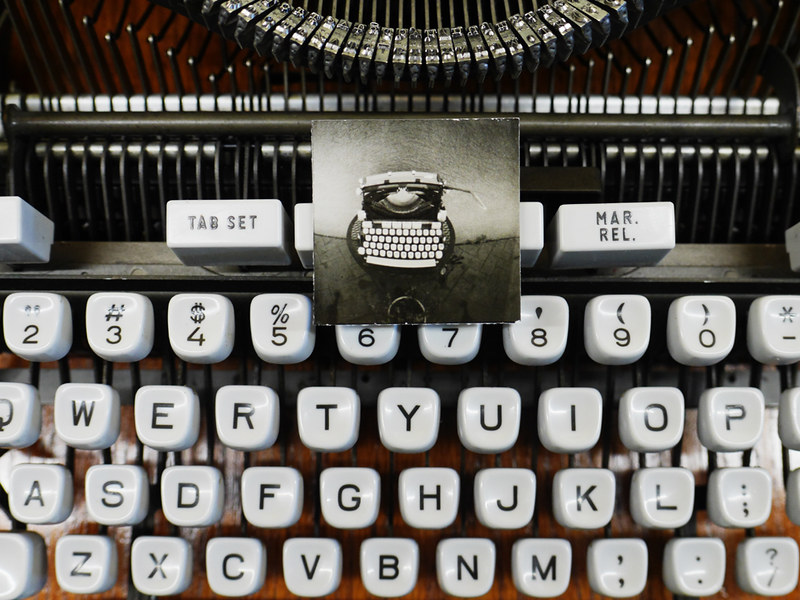
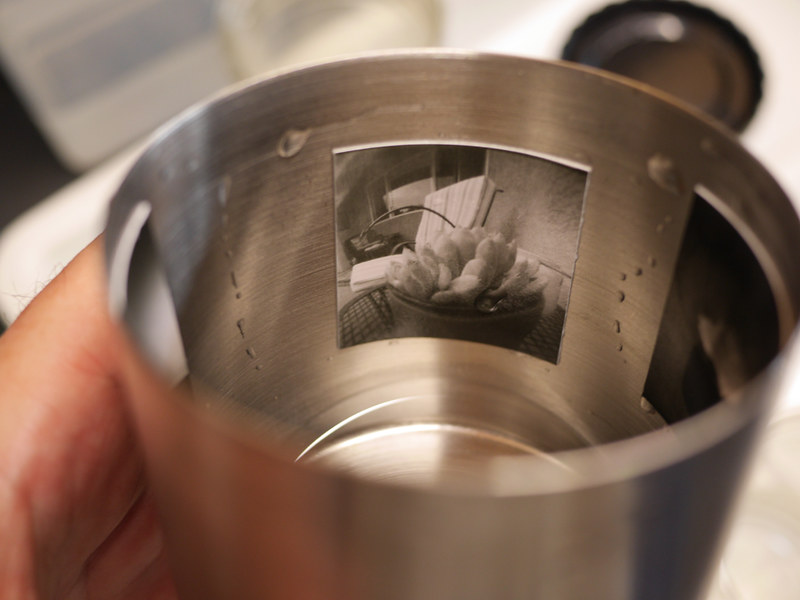
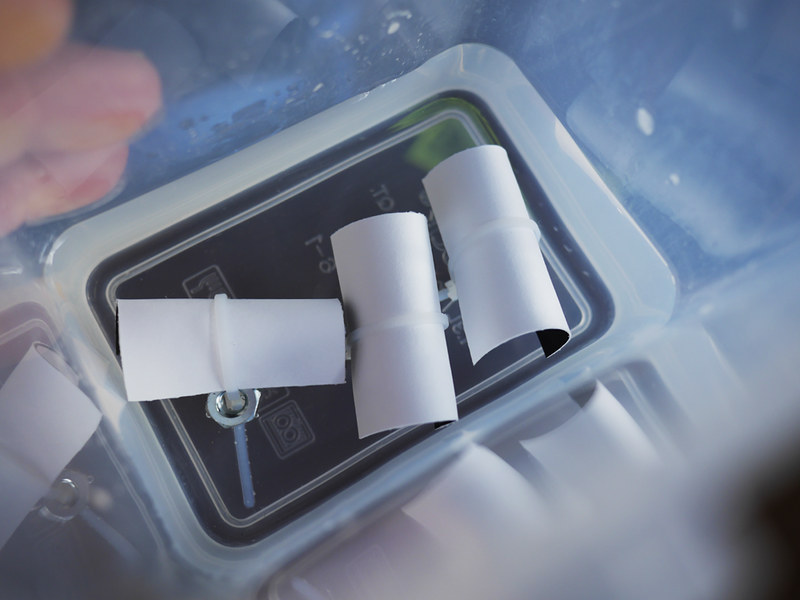
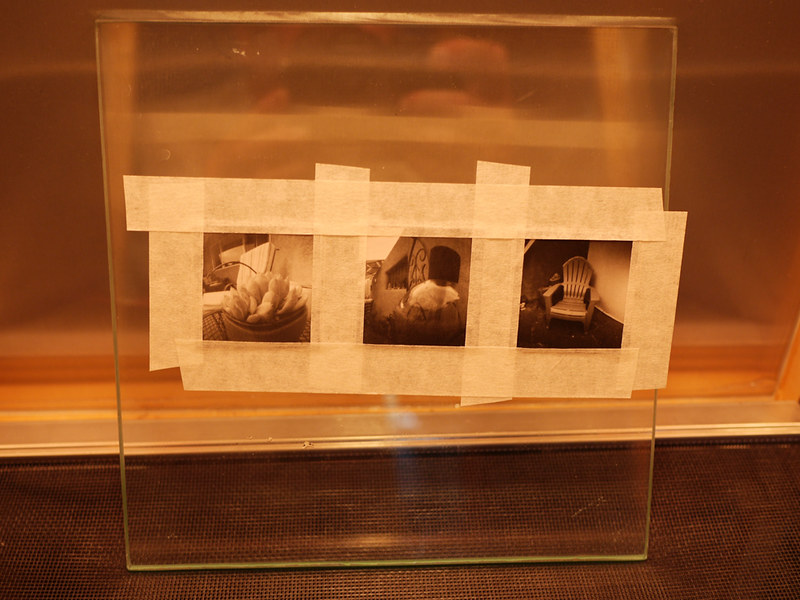
The process I use to make these prints, now that I've worked toward refining it, is so simple as to almost be silly. Give the paper a brief pre-flash of even light in the darkroom, then load into the film canisters. Rate the paper at an exposure index of 10, and the pinhole cameras at F/128. Meter the scene, make the exposure based on the metered reading. Load paper into a steel film developing tank, minus the reels, using loops of drafting tape on the backsides. Three such prints can easily be processed simultaneously. Mix Ilford MG paper developer, diluted at 1 + 15, to a volume of 100mL. Use continuous rotary processing, using the film tank on its side, for 3 minutes. Stop, fix and rinse as normal. Dry for an hour or two on a sheet of glass, taped down on the edges with more drafting tape. Done. Beautiful, individually unique gelatin silver positive prints.

P1000647a

I might say that the typewriters themselves, though each are as unique as the Harman positive prints, are a bit more complex. They aren't being manufactured, and spare parts are only to be found from other, donor, machines. Platen rollers can be resurfaced, and new ribbons are easily available, however. But the machines themselves are to be found online, at local thrift stores, Craigslist ads or estate sales. They almost always need some kind of service in order to be functional; at the very least, a thorough cleaning, degreasing and relubrication, then often some adjustments have to be made. Lots of hands-on fiddling, but also very satisfying when the typewriter collector/user also becomes a typewriter technician.

Typewriters also have a functional use, which is to mechanically print letters neatly onto paper. They're like film cameras in this regard, made to do but one thing, to lay down images of the literary kind. Which brings us back to where we started, with words and pictures.

Tuesday, June 14, 2016

Film Canister Pinhole Camera Project Update


P1000583a
Three new prints from the film canister pinhole camera project

It's been a few weeks since I began delving into this film canister pinhole camera project, and along the way I've made a few improvements and changes, which I'll share with you today. As you might recall, I was having issues with the black tape used as the shutter on these small cameras, because being adhesive, as you peel off the tape it's very easy to move the camera, resulting in a blurry image. Also, because the canisters are made of soft plastic, they shouldn't be gripped too tightly, which might cause their caps to pop off and fog the paper inside.

So I had to find an alternative, more mechanical, form of a shutter device. I had some ideas, but was also helped by readers of this blog and viewers of my You Tube video. I ended up making plastic sleeves that fit snugly around the periphery of the cameras, that slide up and down to control the exposure. These were made from the black plastic dark slide sheets that get ejected from the Fujifilm Instax Wide instant film cassettes, which I've been saving for a purpose such as this.

P1000574a
Fujfilm Instax Wide empty cassette and dark slide

I trimmed the edges of these dark slides so they were square, then into 18mm wide strips, that were then taped to the canisters using gaffers tape. They weren't quite long enough to extend all the way around the periphery of each canister, thus I used a thin piece of gaffers tape mounted backwards on the middle section of each piece of gaffers tape to prevent the tape from binding on the body of the film canister. Because the canisters are slightly tapered, the shutters fit snugly in place, and can be easily raised up into the exposed position without moving the canister on its magnetic mount. Once the exposure is complete they push back down into the closed position easily.

P1000576a
Shutter in closed position

P1000575a
Shutter in open position

I also made a change to my exposure method. I usually set the meter to the Harman Direct Positive paper's ISO (I use a value of 8), then reference the exposure time recommended by the meter opposite f/128 and apply a correction factor to account for the difference between the cameras' focal ratio and the f/128 metered value. For these cameras, whose focal ratios were around f/120, that correction factor was about 0.94. What I did this week was to artificially rate the paper's ISO at 10, instead of 8, and directly reference the exposure time for f/128, without applying any correction factor. This enables me to arrive at the correct exposure times without having to resort to the use of a calculator, which streamlines the process when out in the field.

Another problem I'd been having were intermittent scratches or gouges in the prints, revealed as small white marks, which turned out to be caused by the sharp edges of the radial struts of the steel film reels. As you might recall, I process these small prints, rotary-style, using a steel 35mm film developing tank employed as a makeshift rotary drum. I'd place the prints in the gap between the reels and the inside surface of the tank, emulsion side facing inward. What I did this week was to entirely remove the reels and instead apply a small loop of drafting tape on the reverse side of each print, to assist in adhering them to the inside surface of the tank while processing; the tape is sticky enough so the prints don't come loose while processing, yet are easily removed afterwards without harming the paper or leaving residue.

As you might recall from previous videos, I process the Harman Direct Positive paper for three minutes, rotary style, using Ilford Multigrade or Universal paper developer diluted 1 + 15, for a volume of 100mL.

P1000578a
P1000577a
Two of the prints, right after the tank has been opened post-processing

Because these prints are so small, they don't stay immersed in the rinse bath, since they have a larger edge length-to-surface area ratio. Therefore I made these weighted cable-tie loops, within which each print is curled, taco-style. The prints are bent along their natural curve axis. They stay nicely immersed in my rinse tank; which I take outdoors and, using a garden hose under my tree, water my landscaping instead of wasting the rinse water down the drain - I do live in an arid climate, where fresh drinking water is precious.

P1000579a
Paper rinsing clips in the rinse tank

I use the same drafting tape mentioned earlier to mount the prints on a sheet of glass, where they dry inside my film drying cabinet and end up very flat; while afterwards the tape is easily removed without damage to the emulsion.

P1000580a
Prints drying on a sheet of glass in the drying cabinet

I tested this new methodology with three of the canister cameras, the results which you can see in the top photo. Going forward, this is going to be a very fun kit to employ in creating these miniature photographic gems.

Wednesday, June 8, 2016

Thoughts on a Forensic Documentary Photography

P1000495a

To tell the story of a place is to tell the story of its people. Yet, a cursory, mere superficial visit might not reveal that underlying character of a place, if all we have to go by are surface appearances, without decyphering those cryptic clues revealed as the built environment, cluttered and stained by the detritus of human existence.

Walking the streets, sidewalks and alleys of a place, we are archeologists sifting the clues of a hidden civilization. A piece of rubbish in the gutter tells a story, however incomplete, as do the piles of clothes in the alley a block away, scant evidence of a human tragedy unfolding.

We might wish instead to seek out the form of the human visage, as a more comforting and familiar representation of a place. But that can be deceiving, because personal appearances are often mediated through the dictates of post-modern, ironic fashion statements masquerading as anti-fashion, blended together styles appropriated from the furthest reaches of culture.

Clothes, we soon find out, function just as much as costume and concealment devices as they do protection from the elements and clues as to one's cultural origins.

To more fully understand a place, perhaps we need a more forensic approach to the art of documentary photography; seeking, through a variety of clues left by human activity, an understanding less mediated and more transparent.

In the last seven years that I've prowled the streets of my city, camera in hand, I've periodically found myself feeling insufficient in the role of street photographer, since my images mostly lack the direct presence of people.

I sincerely believe that a person should pursue the kinds of subject matter that they most naturally gravitate toward, regardless of genres and tropes defined by others. Originality and individuality count much more than adherance to someone else's perceptions.

Rather than consider my body of work to be some insufficient example of "street" photography, I'm coming around to the understanding that it actually represents something else entirely, closer to that idea of a forensic documentary style, sifting clues as an urban archeologist might.

There's more than mere symbolism at work here, for in a very real sense the culture we seek evidence of is continually passing away; given the fact of a constantly evolving civilization, any artifacts found are intrinsically from the past, even if it's from a mere hour ago.

Walking the alleyways of Albuquerque's student ghetto area near UNM, for example, is a rich experience in urban archeology, as the detritus of an evolving culture are represented in piles of refuse and debris; meanwhile, the people themselves remain cloaked in the costumes of fashion and popular culture, revealing less about themselves than do their trail of artifacts.

I trudge through the dusty emptiness of an abandoned gas station property across Central Avenue from UNM, devoid of any signs of commerce or prosperity, and this too represents a more accurate weathervane of the local economy than the mere choice of fashion or dress; even the street people, panhandling visitors for change, are deceiving in their attire, with their fresh, clean shoes, unstained by the sidewalks of life; these same faces I've seen repeatedly, these professionals masquerading as homeless. Things are not what them seem from superficial appearances. Deeper thinking, a more critical eye, is warranted.

The kinds of questions posed by the cultural anthropologist might be necessary to gaining a more critical understanding. How people get by, their economic survival modes, are key to understanding a place. These are the kinds of questions of which we need to be seeking answers.

A healthy suspicion of photography's veracity is equally essential to understanding how best to document a place. The process of limiting the viewer's perspective to a particular framing defined by the image's edges, frozen in some specifically chosen moment in time, is fundamentally an editorial decision; in truth, there is no objective photography. All photographs are lies, told however convincingly by their appearance of faithfulness to the laws of optical perspective, color and tone.

The challenge for the photographer as documentarian is to impart as little additional untruth as possible; or, at the least, to understand what level of truth is being pursued - superficial visual reality or something deeper.

In seeking to delve below the level of the mere superficial, monochrome imagery often is more effective than some more realistic color rendering in bringing the viewer to that deeper level; telling a superficial lie (in that visual reality is more than monochrome) to arrive at some underlying perception that color might obscure.

P1000508a
P1000506a
P1000502a
P1000499a
P1000497a
P1000487a
P1000486a
P1000504a
P1000494a
P1000481a