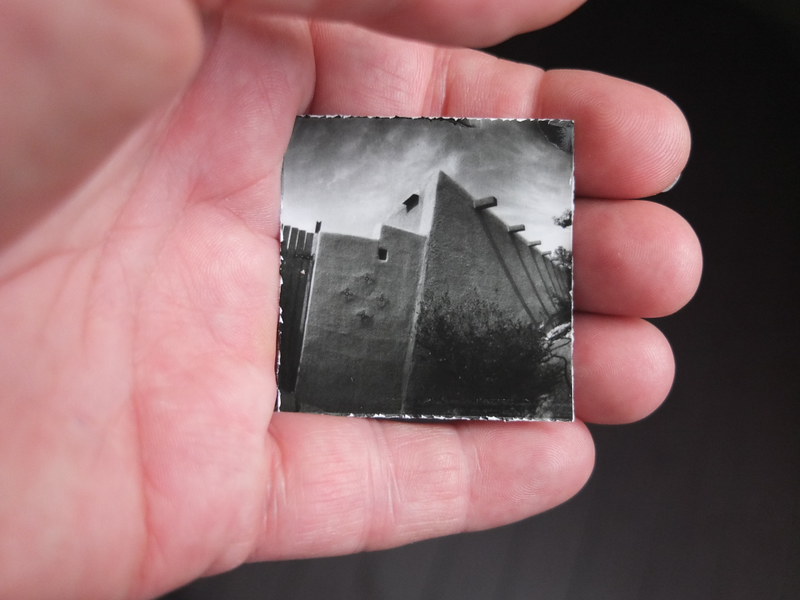
An exquisite little jewel of a print that fits in the palm of your hand
Last week, after a long, long hiatus from much of any pinhole or gelatin silver photographic work, I embarked, in a sudden fit of inspiration, on a mad rush to build a set of nine pinhole cameras from black 35mm film canisters. Why the sudden inspiration, after all this time of little creative photographic output? Hmm. Best not to question the Muse, but rather to strike while the iron's hot; there'll be plenty of time, down the road, to ponder the whys.
My intention was for this set of small cameras to use Harman's Direct Positive paper, cut down to 1.75" square, which after a standard processing in black & white chemistry produces one-of-a-kind, fiber paper prints. Think "wet Polaroids" and you get the general idea.
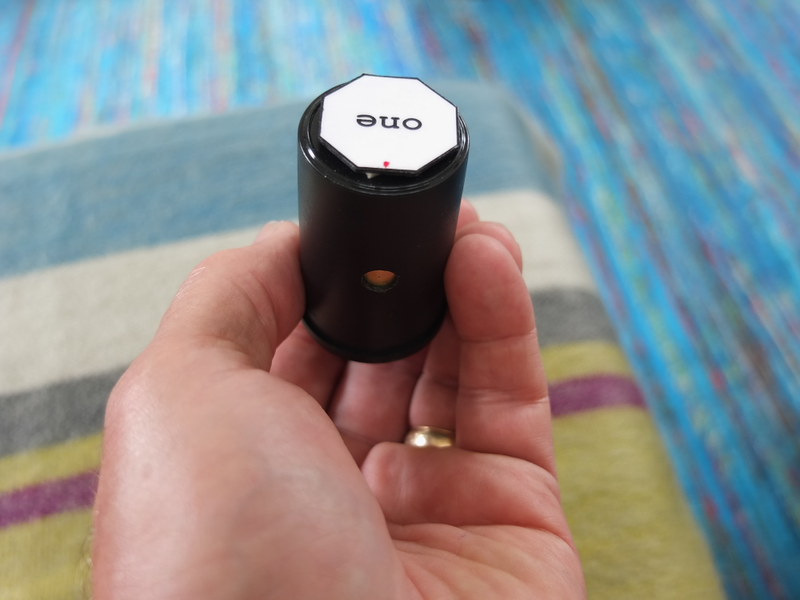
Camera number one, with black tape shutter removed. The red dot on the cap indicates the direction of the pinhole.
My previous experience with this paper in pinhole cameras has shown that it doesn't tolerate lengthy exposures in cameras sporting hefty focal-ratios, since I rate its "exposure index" (the fancy term for the paper's "film ISO") at a value of 8 - much, much slower than what one might expect in a modern digital camera, for example. Given the paper's slow "speed" and the minute apertures found in bigger pinhole cameras (whose focal ratios often extend in the 100s), a smaller-sized camera, with a shorter focal length, would have a more reasonable f-number, yielding exposures short enough to be practical. In the case of these cameras, their f-numbers come in at around f/120 or so. I say "or so" because all nine of the pinholes were made by hand, and thus might not be exactly identical; but they're close enough.
I made the pinhole into 2-mil (i.e. 0.002" thick; NOT 2 millimeters) sheet brass, using a sewing needle and 600-grit emery paper. I've made a video to demonstrate my pinhole making technique, linked below.
Making Pinhole Camera Apertures
After doing a fairly good job at making the cameras themselves, and their little storage box, I had to decide how to use them with a tripod. After over-thinking it with ideas of pipe clamps and whatnot, I finally hit on the simply elegant idea of using the power of magnets, like Jessie Pinkman in the AMC series "Breaking Bad." Yea! Magnets, b*tch! (If you don't understand the reference, Google is your friend.) I installed magnets on the caps of each camera, which mate with a metal plate, screwed to a wooden base with tripod fitting underneath. I can place multiple cameras atop the metal plate, and the attractive force is strong enough to keep the cameras secure in almost any position.
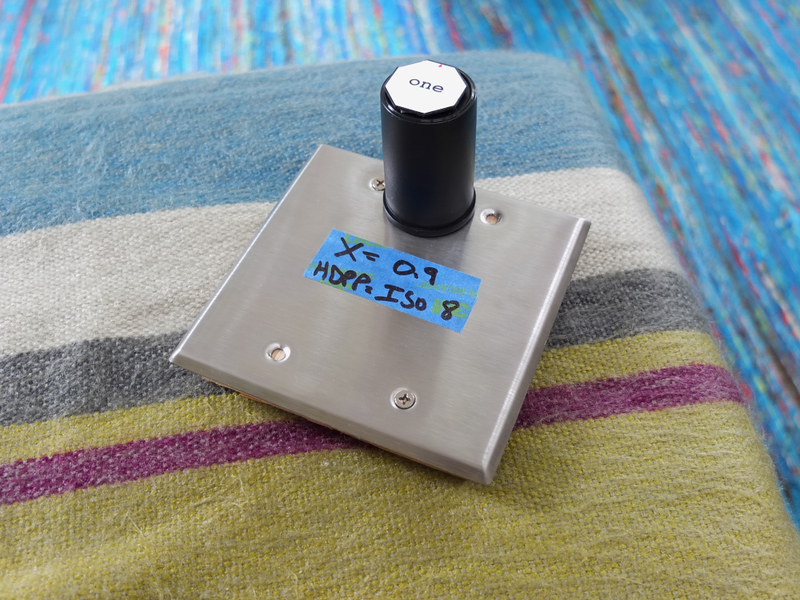
Camera number one atop the magnetic tripod head
This morning, I took these little cameras out into my front and back yards, to make a series of test images. My standard metering and exposure technique is to use a Gossen Luna Pro F meter, set to the paper's exposure index of 8, using either reflective or incident metering (I used both during today's tests); reference the exposure time recommended for f/128, then apply the correction factor for the cameras' focal ratio. Since these cameras were about f/120, and the correction factor was about 0.9, I ended up just using the f/128 reading itself for about half of these shots; close enough for the tolerances of the process. This also represents a convenience factor, since I can use the meter reading directly without having to pull out a calculator to do the conversion.
All the cameras worked as expected, no light leaks noted, and the exposures were all pretty good; there was one image, of irises whose leaves were in bright sun but background was heavily shaded, where I metered the leaves themselves, and ended up with them being around medium-gray in tone, with the background almost completely black. Again, as one would expect; for a better image I should have added a +1 compensation to the exposure to brighten those leaves. I also did not do any pre-flashing of these prints, as I normally do with Harman Direct Positive paper (and also paper negatives), as I wanted to see the images straight away as the cameras record them, without any additional compensation.
Another image was taken in shade, with an exposure time of 55 seconds, the longest of the session, and it came out fine, with a good tonal range (as one would expect of this paper in shaded light), further proof as to the accuracy of my pinhole measuring technique.
In actual use, I keep the cameras in the box with their lids facing downward, the bottoms of each canister having a clearly visible number label affixed via double-sided tape. I start with camera #9. After its exposure, it goes back in the box cap-side up, so its number is no longer visible; so then, the highest numbered camera is 8, telling me that I have 8 exposures left. Simple but effective, and keeping me from getting confused, while out in the field.
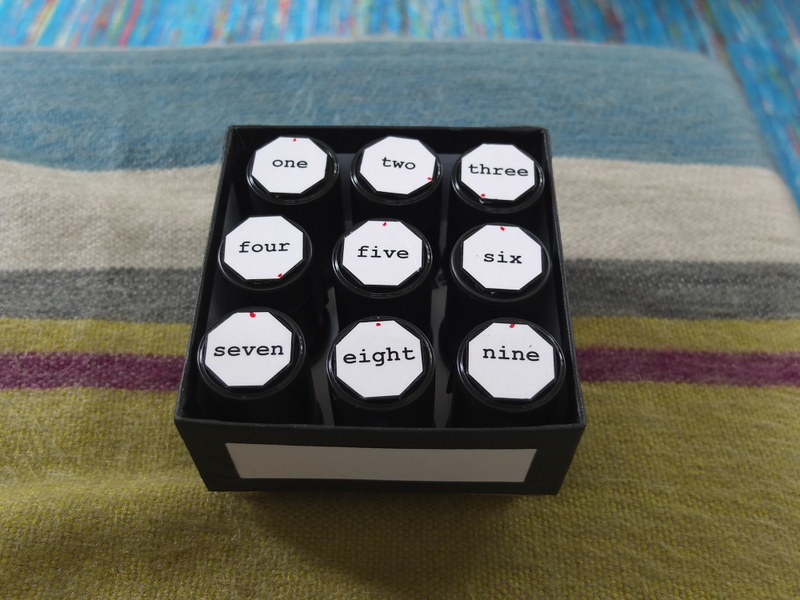
The set of nine pinhole cameras in their carrying box
For shutters on the cameras, I've gone with the simple but elegant method of using black electrical tape. Best not to over-engineer what should be a very simple camera.
I've made another video documenting this project.
Film Canister Pinhole Camera Project
As I indicate at the end of that video, my desire is for this to be the start of some "serious" pinhole work, and not merely another camera-building project. I've built countless pinhole cameras over the last few decades, but much less have I seriously employed them in the service of some long-term documentary project. I hope this marks the start of a long stretch of productive pinhole creativity.
For those of you technically-minded, the pinholes were about 0.2mm in diameter, with the nominal focal length about 27mm (the curved film plane in the canisters ranges from 25mm at the center to 30mm near the edges). I expose the Harman paper using an exposure index of 8, then process them in a makeshift rotary drum (a standard metal 35mm tank laid on its side) for 3 minutes in a 100mL volume of Ilford Multigrade paper developer at a concentration of 1 + 15, followed by standard stop bath, fixing and rinsing.
Joe, there are clouds that sky! And the sky is the upper 1/3, so not all that far off axis, to benefit from falloff. Have you seen that before with Harmon DP paper? Is 1+15 fairly dilute for multigrade developer ( I've never used it ), and is 8 a bit more exposure than "normal" for DPP?
ReplyDeleteGreat project, I love simple, practical pinhole cameras like these. If you wouldn't mind, it might be interesting to let one sit out all day, or at least 5 or 6 hours, and see what sort of image prints out... I doubt it will be a positive, but it would be interesting to know.
Ned, thanks for the comment. The exposure is normal for ISO8 and the subject matter being metered. The building was in bright morning sun, so it didn't need much exposure, which helped to not over expose the sky.
ReplyDeleteI've been using 1 + 15 for a while, I consider pretty normal of a dilution, good for rotary processing.
I'll have to try the long exposure, and see what happens. The thing is, Harman DPP is essentially a monochrome version of Cibachrome/Ilfochrome positive print paper emulsion, so it's chemistry is different from conventional silver gelatin. That' sabot all I know about to. Yes, it deserves more experimentation.