One of the previous You Tube videos I posted made reference to using an electronic circuit and oscilloscope for measuring the shutter speed of my 8" x 10" box camera's mechanical shutter. Since then I've been asked to provide more information on this circuit.
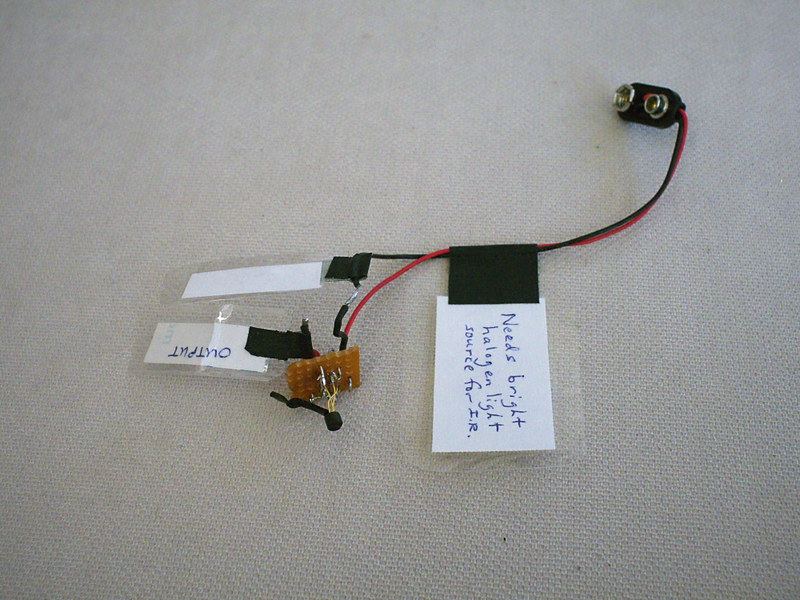
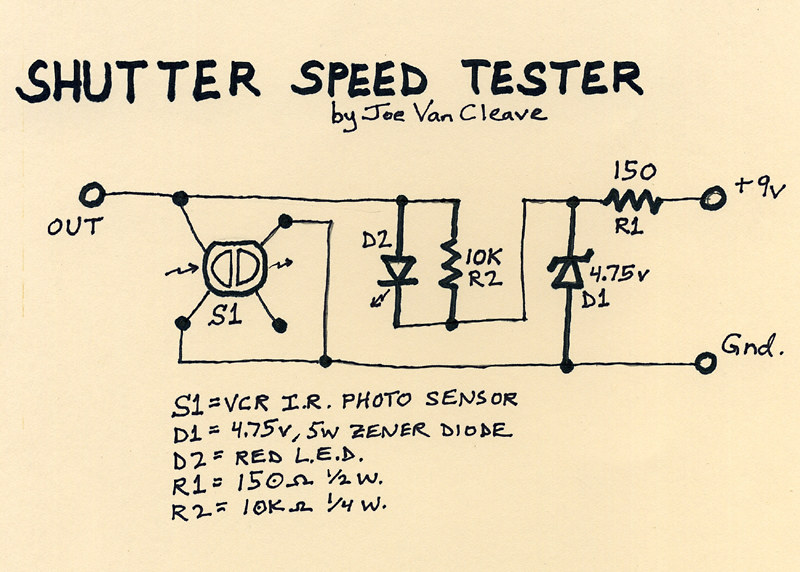
As can be seen above, the little circuit board has a handful of components, the most important being an optical sensor, salvaged some years ago from a VCR. This particular component has no identifying part number, and so I cannot give you any more information about sourcing a similar part, but a description might be helpful. It has four legs and two sections, an infrared-emitting diode section and an IR-sensitive photo-transistor section. In the schematic diagram I've drawn S1 as it appears when looking down at the sensor end of the device, with the four legs spread out underneath. It was originally used underneath the supply and take-up reel spindles in a VCR to sense rotation of the spindles. IR light emitted by the device would be reflected off a series of silver and black segments on the underside of a reel spindle, resulting in a square-wave output signal from the photo-transistor as the spindle rotates. The device is intended to be powered from a 5v TTL source.
The circuit is powered by a standard 9V battery, regulated down to just under 5v by means of resistor R1 and zener diode D1. Keep in mind that this circuit was made from spare parts I had on hand, so it's not optimized in design. In particular, the value of R1 (here 150 ohms) is determined by how much current is drawn by the photo-transistor device S1, and the zener diode. The lower the value of R1, the more wattage diode D1 will consume in trying to regulate the voltage to about 5 volts, thus determining how much wattage the diode needs to be rated at. I have the sense that I could have increased the value of R1 and used a lower wattage diode. If you decide to build something like this, you'll have to measure the current flowing out of R1 and calculate its optimal value accordingly. As it is, none of the parts draw enough power to get too hot, so at least I'm in the ballpark, design-wise.
Resistor R2 provides bias voltage for the photo-transistor portion of device S1. The red LED diode, D2, that's in parallel with R2, was added as a means of improving the biasing of S1; without D2, the device doesn't output as much of a signal.
The right-hand portion of S1 in the diagram is the IR-emitting diode, which is not needed in our application, so its power leg is left open.
In actual use, this circuit is intended to be used with an oscilloscope, on whose screen you can measure the pulse width resulting from the shutter firing and thereby calculate its speed. I also connect a volt meter across the output, as a way of verifying the output switches from its no-light condition of around 4.2 volts to below 1 volt when the sensor is hit with a bright source of infrared light. I connect the ground leads of both the meter and scope to "gnd," and the positive lead of the meter and scope probe to "out." A standard 9V battery is connected to power the circuit.
To calculate the shutter speed, measure on the scope the pulse width in graticule divisions (you might have to fiddle with triggering settings on your scope to get it to properly display when the shutter is fired), then multiply the number of divisions by the setting of the time base control. This tells you how many milliseconds the shutter is opened. To convert that into a practical fractional value usable with a light meter, take the pulse width in milliseconds and divide by 1000; then invert the result - this will be the fractional value of the shutter speed in seconds.
Example 1: the pulse width measures 125 milliseconds on the scope. 1/(125/1000) = 8. So your shutter speed is 1/8 second.
Example 2: the pulse width measures 112 milliseconds on the scope. 1/(112/1000) = 8.93. So your shutter speed is 1/8.93 seconds. You can see how representing the shutter speed as a fraction helps to determine the correct aperture required on your light meter, since I know of no meter that reads shutter speed in milliseconds of duration (at least my analog meters don't).
Since the sensor S1 is only infrared-sensitive, you'll have to use a bright source of IR light. I found a halogen flood lamp, at least 65 watts, will work well. You may have to adjust the angle of the light striking the sensor to optimize the output signal to be as low as possible when lit; that's what I use the meter for, prior to actually firing the shutter and using the scope.
I plan on installing this circuit into a housing, and adding a switch and output terminals, so the battery can be kept connected; this will make it more functional and practical.
I know there are other shutter speed testers that use a microphone and audio-editing software to measure the time duration of the sound made by the shutter. While this method might be accurate enough for curtain shutters found on film cameras, a shutter like mine doesn't make a distinctive enough start and stop sound to make audio measurements accurate. I have the sense that the same is true with any kind of leaf shutter. So an optical means of measuring shutter speed should be more accurate.
Let me know in the comments section below how your shutter speed tester project comes out.
No comments:
Post a Comment
Please leave a comment; I will curate them before posting.