I was anxious to do some testing of the mechanical shutter for the 8" x 10" lens box camera, that I had wrote about in the previous article, but due to the cloudy, snowy weather this last week I didn't have enough light. The mechanical shutter has a speed of about 1/8 second; combined with the slow speed of the Harman Direct Positive paper (I rate it's Exposure Index at around 7.5), that means you need a relatively wide aperture to get sufficient exposure, or find bright daylight.
But last week I did have a chance to eke out one test, in my front courtyard, under a sky streaked with high clouds, barely enough light to get sufficient exposure, but the test did come out fine, indicating that my measurements of the paper's sensitivity and the shutter's speed were fairly close.
I was also anxious to complete part two of the video series about this shutter, initially hoping to find bright, sunny conditions where I could simultaneously shoot more tests while also recording some video. But the weather didn't cooperate, it remaining cloudy and stormy this week, and so yesterday I decided to just do a speaking video about the shutter, describing in detail how I control exposure using the choice of aperture plate, rather than actually demonstrating it live under real-world conditions.
In the course of preparing for this second video, I had to figure out in more detail how I was going to manage exposure control with this shutter. It finally struck me that, with a fixed, single speed, I'd be operating the camera as if it were set to "shutter speed priority" mode - you have one shutter speed, and the paper's sensitivity is also fixed. So the only control one has over exposure is choice of aperture plates. But I only had a handful of such plates made, a choice of 34mm, 17mm, 9mm, 6mm and 3mm. I had to figure out how many other apertures I'd need, and of what sizes.
Thinking further about this, I finally realized that there are two "inputs" that determine the choice of aperture size: the camera's focal length, and the meter's recommended exposure.
In practice, as with any camera, these large format cameras require you to know the actual focal ratio of your lens, in order to properly determine the required exposure. But with these cameras, as you focus the lens by sliding the rear part of the box in and out of the front portion (or expand or contract a bellows, with a commercially-made large format camera), the focal length of the lens changes as you focus. Since focal ratio is focal length divided by aperture size, this means that with large format cameras, changes in focus will affect changes in exposure.
My camera is primitive enough that its lens doesn't have an f-stop control with a scale indicating focal ratio; even if it did, as with my Graflex Speed Graphic, you need to know the real aperture ratio, that takes into account the real focal length of the lens after it's been focused, especially when doing close-up work where the bellows might be extended out rather far from the default infinity focus distance. This hand made camera does include a measuring scale that indicates this actual focal length, however, and that should be sufficient.
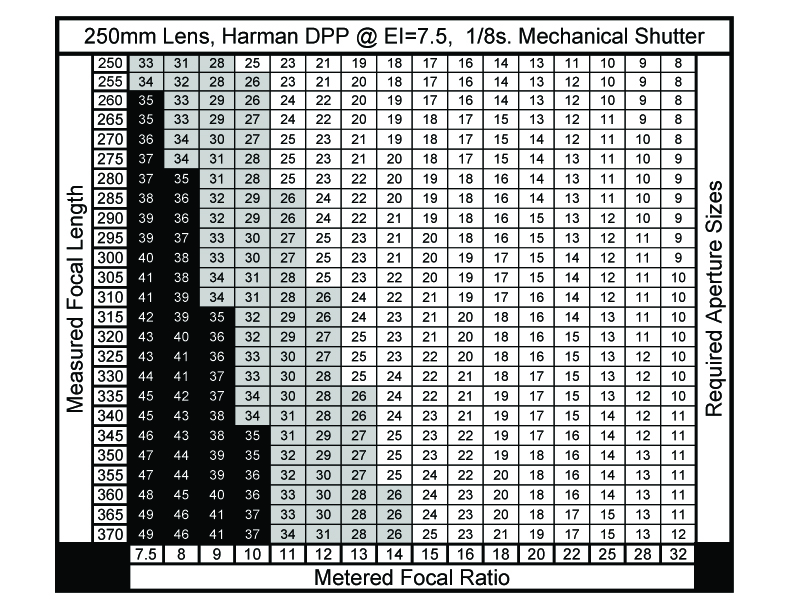
So I finally figured out that it would be most helpful to have a chart, attached to the camera, that gives me the needed aperture sizes for any combination of real focal length and required focal ratio from the meter. I sat down and made such a chart using spreadsheet software, with the vertical axis being focal length and the horizontal axis being needed focal ratio. I rounded off the values in each cell to whole numbers, in keeping with the accuracy given in real-world conditions of reading the dial of an analog light meter.
The table yields all the required sizes of aperture plates needed to cover the range of exposures given by the meter, for the entire range of focal lengths of the camera. But I wasn't certain that I wanted to make all those additional aperture plates. For one, the values given in the lower left quadrant are hypothetical sizes, actually larger than the diameter of the lens currently in place, and so I blackened those cells out. Second, from 34mm down to about 26mm I figured the image would be noticeably blurry around the edges and corners, in keeping with the way meniscus lenses operate at nearly wide-open apertures, and so I grayed out those cells; I do have a 34mm plate, while if I choose to, more of these larger sized plates in the range from 26mm-34mm can be made later on, perhaps for making portraits.
The main body of the table gives aperture sizes from 25mm down to 8mm. Instead of making plates with every one of these sizes, I chose to make plates for every value in the top 250mm (infinity) focal length row. As I show in the video, there are now sufficient plates for virtually any required exposure within the range given.
I made these eleven additional plates using heavy black craft paper, reinforced with black gaffers tape, as I had done previously with some of the other plates. I cut the holes using a compass cutter, a craft tool that operates like a draftsman's compass but uses a thin knife blade in place of the lead point. All nested together in one stack, bundled with an elastic band, they can easily be stored inside the camera during transport.
More work is required, of using this system to make real-world images in various kinds of light, before I can say it's entirely practical. But my initial courtyard test image shows promise.
Going forward, it would be nice to have a more sophisticated shutter, with actual variable (and accurate) speeds to choose from; but that will have to wait for another day.
No comments:
Post a Comment
Please leave a comment; I will curate them before posting.