Showing posts with label Harman DPP. Show all posts

Wednesday, July 20, 2016

Recent Pinhole-Related Videos

P1000577a

This week I posted a two-part You Tube video that covers the complete process of Harman Direct Positive Paper in pinhole cameras, specifically using my set of nine film-canister pinhole cameras. The videos cover everything a person would need, from cutting the paper to size, loading the cameras, equipment needed in the field, aiming the cameras, determining exposure via a light meter, unloading the prints to a film developing tank and the entire method of rotary processing these small prints using a metal 35mm day tank.

I felt it necessary to make this two-part video because, even though many of these individual steps have been covered in previous videos, having them all in one production might make more sense to some people. My desire is to encourage more people to discover for themselves the simple joy it is of working with this remarkable medium, that yields exquisite little gem-like prints from a humble pinhole chamber and paper processed in a simple 3-part procedure.

We do live in a remarkable era, photographically speaking, because we have at our avail the most contemporary of digital imaging systems while also enjoying a resurgence of interest in historic photographic processes, along with unique products such as this direct positive paper.

Personally, I've been doing less digital photography in my free time, instead putting more time into various video projects, not only photographically related but also a series involving typewriters as the theme. Yet at the same time, I've begun to slowly shoot more black and white film, home processed and scanned, along with these direct positive pinhole prints. It's a satisfying mix of technologies, working within the medium of video while at the same time working with gelatin silver imagery, the best of the old and the new. Too, video and still photography work to tell stories and engage the viewer in differing ways; so I see these as complementary activities, rather than competitors.

This last week I finished a roll of Ilford HP5 Plus in my Minox GT-E, while I'm just now starting a roll of Ilford FP4 Plus in a Yashica T4 Super. I'm enjoying being able to put these various cameras from my collection through their paces, enjoying each of their respective unique attributes as film cameras, while also stretching my film-processing legs a bit more.

Here are the links to the two-part video series about the pinhole camera process. Enjoy.

Part One:


Part Two:

Tuesday, July 5, 2016

Returning to the Scene of the Crime

DSCF5013a

Slow and methodically I've been using up this latest round of Harman Direct Positive prints in my set of nine film-canister pinhole cameras. Every time I do so, it's been in quantities of three, enough to develop in one batch in the 35mm steel development tank. Three seems a good number; a triptych, in quantity if not in actual intention.

To do this, to make the creating of these little gem-like prints part of one's private life, means that there has to be a sense of balance between the desire to chuck it all, ignore family, friends and obligations for the obsessive pursuit of one's Arte, and maintaining peace in one's life and relationships. In the past, I've been much more apt to obsess over the pinhole photography process, each outing a mission dedicated to the One Big Objective of returning with some trophy-like images - or don't come home at all.

DSCF5019a

These days, I'm a bit more laid back. For one, I've eased back on my expectations, happy with one or two good prints, even if they are small enough to fit in the palm of one's hand. Also, the gear is small enough to easily carry, even with a modest tripod. I'll carry a small day pack, with tripod in hand, metal camera mounting plate attached. Once I find a promising scene I'll get the tripod set, meter the scene and then pull out of its storage box one of these little cameras. The typical scene might only take all of a minute to set up, meter and expose. Quick, and expeditious. Then, I can get back to the business of whatever the day requires. No day-long pinhole expeditions, no choosing between creativity and life's responsibilities. Just fit it into those interstitial moments that have so much to do with whether a day has been successful and rewarding, or not.

Honestly, if I could be satisfied with a short, handheld tripod and the restrictive compositions it might limit me to, this whole process would be that much less obtrusive.

Last week, I made a visit to the Green Jeans Market in Albuquerque, a cluster of cafes and shops made from metal shipping containers, situated in a bit of land adjacent to Interstate 40, and made a few pinhole exposures; today, I returned to the scene of the crime, prints in hand along with a digital camera, fountain pen and notepad, to document these thoughts, while having a bite of lunch.

Now, since constant improvement (or, at least, spurious innovation) has been a continual part of my photographic journey, I've been thinking about the possibility of a combination pinhole camera and developing tank. Since I have several spare 35mm steel processing tanks, the thought came to me that, were I to drill a hole in the side of one of these tanks, then outfit it with some sort of liquid-proof pinhole/shutter mechanism, that I could expose and process a single, larger Harman Direct Positive print in said tank. I can imagine carrying a little box of small containers of processing chemicals, along with my little rotary base.

I can imagine a scenario like this: I visit some photogenic locale, such as this Green Jeans Market area, and expose one image. Then I retire to the cool comfort of Santa Fe Brewery's upstairs seating area, burger and brew at hand, and proceed to process said pinhole print at my table, between mouthfuls of greasy burger, washed down by a cool beverage that might resemble, were it not for the carbonation's bubbles, a glass of expired developer; best not to get the two confused. The result being - what? - a wet print that still requires a lengthy archival wash, then taped to a sheet of glass to dry for an hour or two in a drying cabinet?

DSCF5020a

This is where the needle scratches the record, where the whole idea falls flat on its face and I all too easily express my frustration that Harman/Ilford refuses to make an RC paper version of this wonderful positive photographic medium. For with a resin-coated, direct positive paper, the possibility remains of having finished, dry, one-of-a-kind positive pinhole prints in-hand at said brewery table, after a brief water rinse, squeegee and air dry, again between mouthfuls of greasy burger, washed down by cold brew. Which opens up the possibility of being able to create portraits on-location, reminiscent of those street portraitists of old, who would prowl the dark nightclubs of the 20th century in search of couples who wished to document their nocturnal encounters.

For now, the dream remains but a dream, and I have to be satisfied to return home to process these prints to completion. Yet I continue to dream these dreams, incessantly, never giving up hope for the things that could be, for that is what the joy in life is made of.

Monday, June 20, 2016

Words and Pictures

P1000645a

Words and pictures. Images both literary and visual. These have been considered so similar that the verbiage used to describe them seem to be synonymous. Word pictures. A picture is worth a thousand words. Terms almost interchangeable. It should come as no surprise then that the devices we've made to construct words and images together seem to operate so similarly. Today, digital images and text files seem virtually the same, mere data, slung around networks of optic fibers and copper wires.

Looking backwards is often required to see forward. So it is when combining gelatin silver paper prints and typewriters; or, gelatin silver prints of typewriters, two technologies that seem so like-minded.

A few years ago, when I was delving deep into the world of paper negative photography - employing silver paper as a form of in-camera, black & white "film" - I began looking for alternative methods of displaying these as positive images. Two obvious ways were contact printing them, in the darkroom, onto other sheets of silver paper; or scanning the negatives to produce digital files, to be inverted later via software into positive images. Both methods have their benefits. The first produces a physical print, while the second is intrinsically software-based.

But then I came up with a third method, similar to digital scanning, but employing a handheld digital camera; placing the paper negative into some setting or scene, perhaps related to the original image, and often outdoors; photographing the paper negative within the larger scenic context; then inverting the tones of the image afterwards, to produce a positive monochrome image set inside an otherworldly appearing scene, a shifted color palette of negative tones, a reversed world where the real is imaginary and the imaginary real.

Since that time, I've been working more regularly with Harman Direct Positive paper, that produces a positive image requiring no tonal reversal afterward. But the idea of digitizing these prints, by photographing them in some larger context using a handheld digital camera, persists to this day. So it was that, after making this small study of my Hermes 3000 "Nekkid-Riter" chopped typewriter, using small squares of the Harman paper in my film canister pinhole cameras, it seemed obvious that sharing these prints online might be more interesting done this way than by merely scanning.

P1000646a

The process I use to make these prints, now that I've worked toward refining it, is so simple as to almost be silly. Give the paper a brief pre-flash of even light in the darkroom, then load into the film canisters. Rate the paper at an exposure index of 10, and the pinhole cameras at F/128. Meter the scene, make the exposure based on the metered reading. Load paper into a steel film developing tank, minus the reels, using loops of drafting tape on the backsides. Three such prints can easily be processed simultaneously. Mix Ilford MG paper developer, diluted at 1 + 15, to a volume of 100mL. Use continuous rotary processing, using the film tank on its side, for 3 minutes. Stop, fix and rinse as normal. Dry for an hour or two on a sheet of glass, taped down on the edges with more drafting tape. Done. Beautiful, individually unique gelatin silver positive prints.

P1000647a

I might say that the typewriters themselves, though each are as unique as the Harman positive prints, are a bit more complex. They aren't being manufactured, and spare parts are only to be found from other, donor, machines. Platen rollers can be resurfaced, and new ribbons are easily available, however. But the machines themselves are to be found online, at local thrift stores, Craigslist ads or estate sales. They almost always need some kind of service in order to be functional; at the very least, a thorough cleaning, degreasing and relubrication, then often some adjustments have to be made. Lots of hands-on fiddling, but also very satisfying when the typewriter collector/user also becomes a typewriter technician.

Typewriters also have a functional use, which is to mechanically print letters neatly onto paper. They're like film cameras in this regard, made to do but one thing, to lay down images of the literary kind. Which brings us back to where we started, with words and pictures.

Tuesday, June 14, 2016

Film Canister Pinhole Camera Project Update


P1000583a
Three new prints from the film canister pinhole camera project

It's been a few weeks since I began delving into this film canister pinhole camera project, and along the way I've made a few improvements and changes, which I'll share with you today. As you might recall, I was having issues with the black tape used as the shutter on these small cameras, because being adhesive, as you peel off the tape it's very easy to move the camera, resulting in a blurry image. Also, because the canisters are made of soft plastic, they shouldn't be gripped too tightly, which might cause their caps to pop off and fog the paper inside.

So I had to find an alternative, more mechanical, form of a shutter device. I had some ideas, but was also helped by readers of this blog and viewers of my You Tube video. I ended up making plastic sleeves that fit snugly around the periphery of the cameras, that slide up and down to control the exposure. These were made from the black plastic dark slide sheets that get ejected from the Fujifilm Instax Wide instant film cassettes, which I've been saving for a purpose such as this.

P1000574a
Fujfilm Instax Wide empty cassette and dark slide

I trimmed the edges of these dark slides so they were square, then into 18mm wide strips, that were then taped to the canisters using gaffers tape. They weren't quite long enough to extend all the way around the periphery of each canister, thus I used a thin piece of gaffers tape mounted backwards on the middle section of each piece of gaffers tape to prevent the tape from binding on the body of the film canister. Because the canisters are slightly tapered, the shutters fit snugly in place, and can be easily raised up into the exposed position without moving the canister on its magnetic mount. Once the exposure is complete they push back down into the closed position easily.

P1000576a
Shutter in closed position

P1000575a
Shutter in open position

I also made a change to my exposure method. I usually set the meter to the Harman Direct Positive paper's ISO (I use a value of 8), then reference the exposure time recommended by the meter opposite f/128 and apply a correction factor to account for the difference between the cameras' focal ratio and the f/128 metered value. For these cameras, whose focal ratios were around f/120, that correction factor was about 0.94. What I did this week was to artificially rate the paper's ISO at 10, instead of 8, and directly reference the exposure time for f/128, without applying any correction factor. This enables me to arrive at the correct exposure times without having to resort to the use of a calculator, which streamlines the process when out in the field.

Another problem I'd been having were intermittent scratches or gouges in the prints, revealed as small white marks, which turned out to be caused by the sharp edges of the radial struts of the steel film reels. As you might recall, I process these small prints, rotary-style, using a steel 35mm film developing tank employed as a makeshift rotary drum. I'd place the prints in the gap between the reels and the inside surface of the tank, emulsion side facing inward. What I did this week was to entirely remove the reels and instead apply a small loop of drafting tape on the reverse side of each print, to assist in adhering them to the inside surface of the tank while processing; the tape is sticky enough so the prints don't come loose while processing, yet are easily removed afterwards without harming the paper or leaving residue.

As you might recall from previous videos, I process the Harman Direct Positive paper for three minutes, rotary style, using Ilford Multigrade or Universal paper developer diluted 1 + 15, for a volume of 100mL.

P1000578a
P1000577a
Two of the prints, right after the tank has been opened post-processing

Because these prints are so small, they don't stay immersed in the rinse bath, since they have a larger edge length-to-surface area ratio. Therefore I made these weighted cable-tie loops, within which each print is curled, taco-style. The prints are bent along their natural curve axis. They stay nicely immersed in my rinse tank; which I take outdoors and, using a garden hose under my tree, water my landscaping instead of wasting the rinse water down the drain - I do live in an arid climate, where fresh drinking water is precious.

P1000579a
Paper rinsing clips in the rinse tank

I use the same drafting tape mentioned earlier to mount the prints on a sheet of glass, where they dry inside my film drying cabinet and end up very flat; while afterwards the tape is easily removed without damage to the emulsion.

P1000580a
Prints drying on a sheet of glass in the drying cabinet

I tested this new methodology with three of the canister cameras, the results which you can see in the top photo. Going forward, this is going to be a very fun kit to employ in creating these miniature photographic gems.

Tuesday, May 31, 2016

Film Canister Pinhole Camera Project

DSCF4967a
An exquisite little jewel of a print that fits in the palm of your hand

Last week, after a long, long hiatus from much of any pinhole or gelatin silver photographic work, I embarked, in a sudden fit of inspiration, on a mad rush to build a set of nine pinhole cameras from black 35mm film canisters. Why the sudden inspiration, after all this time of little creative photographic output? Hmm. Best not to question the Muse, but rather to strike while the iron's hot; there'll be plenty of time, down the road, to ponder the whys.

My intention was for this set of small cameras to use Harman's Direct Positive paper, cut down to 1.75" square, which after a standard processing in black & white chemistry produces one-of-a-kind, fiber paper prints. Think "wet Polaroids" and you get the general idea.

DSCF4970a
Camera number one, with black tape shutter removed. The red dot on the cap indicates the direction of the pinhole.

My previous experience with this paper in pinhole cameras has shown that it doesn't tolerate lengthy exposures in cameras sporting hefty focal-ratios, since I rate its "exposure index" (the fancy term for the paper's "film ISO") at a value of 8 - much, much slower than what one might expect in a modern digital camera, for example. Given the paper's slow "speed" and the minute apertures found in bigger pinhole cameras (whose focal ratios often extend in the 100s), a smaller-sized camera, with a shorter focal length, would have a more reasonable f-number, yielding exposures short enough to be practical. In the case of these cameras, their f-numbers come in at around f/120 or so. I say "or so" because all nine of the pinholes were made by hand, and thus might not be exactly identical; but they're close enough.

I made the pinhole into 2-mil (i.e. 0.002" thick; NOT 2 millimeters) sheet brass, using a sewing needle and 600-grit emery paper. I've made a video to demonstrate my pinhole making technique, linked below.


Making Pinhole Camera Apertures

After doing a fairly good job at making the cameras themselves, and their little storage box, I had to decide how to use them with a tripod. After over-thinking it with ideas of pipe clamps and whatnot, I finally hit on the simply elegant idea of using the power of magnets, like Jessie Pinkman in the AMC series "Breaking Bad." Yea! Magnets, b*tch! (If you don't understand the reference, Google is your friend.) I installed magnets on the caps of each camera, which mate with a metal plate, screwed to a wooden base with tripod fitting underneath. I can place multiple cameras atop the metal plate, and the attractive force is strong enough to keep the cameras secure in almost any position.

DSCF4971a
Camera number one atop the magnetic tripod head

This morning, I took these little cameras out into my front and back yards, to make a series of test images. My standard metering and exposure technique is to use a Gossen Luna Pro F meter, set to the paper's exposure index of 8, using either reflective or incident metering (I used both during today's tests); reference the exposure time recommended for f/128, then apply the correction factor for the cameras' focal ratio. Since these cameras were about f/120, and the correction factor was about 0.9, I ended up just using the f/128 reading itself for about half of these shots; close enough for the tolerances of the process. This also represents a convenience factor, since I can use the meter reading directly without having to pull out a calculator to do the conversion.

All the cameras worked as expected, no light leaks noted, and the exposures were all pretty good; there was one image, of irises whose leaves were in bright sun but background was heavily shaded, where I metered the leaves themselves, and ended up with them being around medium-gray in tone, with the background almost completely black. Again, as one would expect; for a better image I should have added a +1 compensation to the exposure to brighten those leaves. I also did not do any pre-flashing of these prints, as I normally do with Harman Direct Positive paper (and also paper negatives), as I wanted to see the images straight away as the cameras record them, without any additional compensation.

Another image was taken in shade, with an exposure time of 55 seconds, the longest of the session, and it came out fine, with a good tonal range (as one would expect of this paper in shaded light), further proof as to the accuracy of my pinhole measuring technique.

In actual use, I keep the cameras in the box with their lids facing downward, the bottoms of each canister having a clearly visible number label affixed via double-sided tape. I start with camera #9. After its exposure, it goes back in the box cap-side up, so its number is no longer visible; so then, the highest numbered camera is 8, telling me that I have 8 exposures left. Simple but effective, and keeping me from getting confused, while out in the field.

DSCF4968a
The set of nine pinhole cameras in their carrying box

For shutters on the cameras, I've gone with the simple but elegant method of using black electrical tape. Best not to over-engineer what should be a very simple camera.

I've made another video documenting this project.


Film Canister Pinhole Camera Project

As I indicate at the end of that video, my desire is for this to be the start of some "serious" pinhole work, and not merely another camera-building project. I've built countless pinhole cameras over the last few decades, but much less have I seriously employed them in the service of some long-term documentary project. I hope this marks the start of a long stretch of productive pinhole creativity.

For those of you technically-minded, the pinholes were about 0.2mm in diameter, with the nominal focal length about 27mm (the curved film plane in the canisters ranges from 25mm at the center to 30mm near the edges). I expose the Harman paper using an exposure index of 8, then process them in a makeshift rotary drum (a standard metal 35mm tank laid on its side) for 3 minutes in a 100mL volume of Ilford Multigrade paper developer at a concentration of 1 + 15, followed by standard stop bath, fixing and rinsing.

Tuesday, May 24, 2016

Jumping Back In

Ken001a

I've had these three rolls of film sitting around in my office for so long that I couldn't even remember what year they'd been exposed. I knew they were exposed because the film leaders were retracted in their cassettes, but that was about all. They were all Ilford FP4 Plus, medium speed black and white film.

My "analog" (gosh how I hate that term) photographic activity has been essentially dormant for a year, when I last was working with the instant box camera project and paper negatives; and before that it's been virtually exclusively paper negatives or Harman's Direct Positive paper, for a number of years. But film? Nada. Oh, maybe a few rolls of color, sent off to my local lab. But black and white? Nope, not even.

This is almost a sin. Having a darkroom at home, capable of processing and printing every kind of black and white film, from 35mm to 8"-by"10" formats, and prints up to 11"-by-14" in size. Two enlargers. A film drying cabinet of my own design. A hobbyist darkroom any photo student would be envious of. And what has it used for, these last few years? To store my darkroom equipment, that's about it. And Christmas and birthday gifts (but don't tell the grand-kids, okay?).

I'd been eyeing those rolls of film in my office for some time now. They'd been sitting in a green glass candy dish up on one shelf of my bookcase. I'd occasionally take them down, open up their containers and eye them suspiciously. After thinking about processing them, "one of these days," I'd put them back in the dish.

Noah003a

Last week I finally decided to tackle one of the rolls. I figured it was safe to start off with just one roll, since my skills were rusty and thus there'd be less to lose if something went awry. I also was suspicious of the quality of several bottles of developer sitting out in the darkroom. Getting up the nerve, I finally decided to give it a go.

I collected all the bits I'd need. Jobo processing tank? Check. Mixing containers? Check. Changing bag? Check ... but not until after a lengthy search revealed the bag to have been stored away, high up in the loft. Thermometer? Check. Fixer? Check. Scissors? Check. Can opener? Nope. I'd have to improvise. Stop bath? Nope. I'd have to use white vinegar. White vinegar? Nope. I'd have to use apple cider vinegar. More improvisation. Hopefully it wouldn't leave some funky residue on the film.

Developer? I checked the bottle of HC-110 concentrate, but crystallization along the inside of the bottle ruled that out. Oh, well, more wasted money. Agfa Rodinal? Yep, a used bottle, only 1/3 full. Should I use it? My better judgement said no, despite Internet wisdom on its longevity. Finally I found a newer bottle of R09, a Rodinal-like substitute, that appeared in good condition, no crystals or other funkiness. Time to get busy.

I decided on a more standard dilution of 1 + 25, with regular agitation, despite more Internet suggestions of excess grain with Rodinal and I should be doing semi-stand development, for improved granularity, yadda-yadda-yadda. Sometimes you have to shut your ears to all the online experts and go with your gut feel. I'd had bad experiences, years ago, with used developer and development procedures I'd only read about and not experienced personally. Best to be safe. Don't jump in the deep end too soon.

I had less issues loading the roll of film than I expected. Sometimes these plastic film reels can be finicky, and other times they can be wonderfully easy. It's all a crap shoot. But this time I did something a bit more deliberate, which was to trim the two front corners of the leader, like what's suggested for loading old film cameras, and this helped a lot, keeping those otherwise sharp corners from snagging in the plastic reel as it's being threaded.

Not wanting to give any negative results an excuse, I was careful with the chemical mixing and also ensuring proper temperatures were employed. The data sheet on the bottle of R09 suggested 8 minutes development time, which I stuck to, while opting for agitation every 30 seconds, using my normal method of several medium speed inversions while the tank is being constantly rotated along its axis. I suppose it's like riding a bike, you never forget.

Past experience with issues of residue and dust taught me to use for the final rinse Kodak Photoflo surfactant diluted 1 + 200 into distilled water, which I measured accurately and mixed thoroughly. In the past, I'd been sloppy enough to just slop a bit of Photoflo into tap water without so much as any measurement at all, resulting in either a film residue left on the film after drying, from too much Photoflo, or water spots from not enough.

Whereas I used to hang the film in a bathroom shower whose cleanliness was questionable, this time I had the convenience of a film drying cabinet, that I built some years ago and used for drying prints but never until now had actually hung any film inside. Its 100 watt heat lamp and HEPA-filtered laminar airflow seems to work wonders in drying film with little or no dust spots, because my scans afterwards were virtually spot-free; hardly any clone-stamping work needed to be done in Photoshop.

Fry's001a

My results were promising enough that I tackled the other two rolls yesterday. This time I used white vinegar for stop bath, but otherwise everything was done the same, with the exception of agitation every minute instead of every 30 seconds. The results were also very good.

Christmas_Family006a

Afterwards, I found a roll of Ilford HP5 that had been exposed last December, and I again processed it with no issues. The roll hasn't yet been scanned, but initial inspection suggests good results.

Some years ago I bought a brick of the HP5 film from a local camera store, used some of it, but still had a number of rolls left. So this afternoon, buoyed by my recent processing success, I unearthed my Minolta X700, purchased last year from KEH Camera (and that's only seen several rolls of color film since), and loaded up a roll, with a yellow filter over the lens. I've yet to make any exposures, but I figure it's "almost free," since the film's been long payed for, as have the camera, chemicals and post-processing scanner and software. So it's almost the same as digital, except the added fun of processing and scanning. But working with manual focus film cameras is so enjoyable, and inexpensive, as to truly be a valid alternative to expensive digital systems for monochrome photography.

I don't know if this is just a soon passing fad, or if I'll stick with shooting more film. I hope it's the latter. The Minolta X700 deserves to be used more, as does my darkroom. I also have a Soviet-era Zorki IV and Kodak Retina IIIC rangefinder cameras that also need to be used more. And if I get enough good negatives, perhaps even a session of wet-printing onto gelatin silver paper might be in order. If so, I'll update you here.

I think the lesson here is never sell off your darkroom equipment just because you're currently not using it; nor should you tear down your darkroom, if you can at all help it, because film and printing paper are still readily available, as are all those wonderful old film cameras. Now's the time to take the leap, before economic considerations threaten the future of this marvelous medium.

Monday, March 7, 2016

One Hundred Prints

Bird001a

I've been trying to get back to the print; the idea that a photograph isn't a photograph until you have paper in hand. I can remember, maybe 25 years ago, when that was the only type of photograph available, either a color print from a local lab or a black & white darkroom print I made myself. The idea of an electronic image was only possible for the common person back then if you had videotaped some photos with your camcorder and were watching them on T.V.

In the intervening years, all that has changed. Digital cameras and cell phones are so well equipped to enable the creation of instant electronic images that we forget about prints in hand. I know that I've been guilty of this, despite the fact that I still maintain a (somewhat primitive) darkroom in my unheated garage.

In the last decade since I've been dabbling in digital photography, I've certainly become lazier. The idea of shooting a roll of black & white film, then processing it, isn't so bad; it's the idea of printing every image in the darkroom that sets me back. Part of it is because my darkroom facilities are still so primitive - a small space, now crowded with junk, unheated in the winter and hot in the summer, requiring hours of prep time in advance in order to condition the environment sufficiently for chemical processing. Not to mention the dust everywhere, that ruins the idea of pristine, glowing prints.

I've pretty much relegated myself to the idea that, for capturing images out in public venues, I'm going to be using a digital camera. But I still like landscape and still-life images on silver gelatin paper. Fortunately, I've developed a method that seems relatively trouble-free and efficient, that produces nice fiber paper, silver gelatin prints.

I load 4"-by-5" sized sheets of Harman Direct Positive paper into sheet film holders, expose them in either my Anniversary Speed Graphic or pinhole box cameras, then process them in the year-round convenience of my kitchen, via a Jobo print developing tank and rotary processing base. Once properly rinsed and superficially dried, I tape then to sheets of glass, using drafting tape, and permit them to dry in my film drying cabinet. After several hours, I have one-of-a-kind, fiber paper prints in hand.

Given the relative ease of this process, I can no longer afford to use the excuse that I don't have the time or energy to do this. So I've been trying, at least every week, to make some sort of image - any image, regardless of how mundane it might seem - using this process, as a means of exercising my processing skills and building a collection of these one-off prints.

Today's session was no less impromptu and spontaneous. The afternoon weather was balmy and warm, the winds calm, and so I set up tripod and Speed Graphic in my front courtyard and proceeded to load a sheet film holder with a pair of Harman prints. It's convenient that one sheet film holder holds two such prints, that can both be processed as a single batch in my day tank within the span of less than ten minutes.

I thought this still-life of garden art sitting on a patio table was quirky enough to be representative of the kinds of spontaneous prints made possible by this process. And with the investment of just a bit more time, and a bit of gasoline, those two prints could have instead been exposed somewhere a bit more photogenic than merely around the house. But that's the beauty of this process - even if you don't feel like going far afield from home, you can still create these remarkable little prints, from scenes discovered just around one's own home.

What this really illustrates is the idea that it isn't all that hard to create two prints per week. That doesn't sound like an awful lot, does it? But two fiber paper, silver gelatin prints per week amounts to over a hundred prints in a year's time. All with the investment of just a few minutes time for loading the film holders, setting up the camera, making the exposure and processing the paper. Then a rinse - which I do under a tree in my yard, so as not to waste the water down the drain - and afterwards a few hours in the drying cabinet, while I'm off doing something else. Do that one time every week, and you'll have a hundred prints by the end of the year.

This process is made most convenient by the unique properties of the Harman Direct paper. While it does have some significant limitations that you have to get used to working around, such as contrast control, low sensitivity and spectral response, its main attribute is that you totally bypass the whole issue of processing film and the subsequent printing phase. What you're doing with the Harman paper is loading the finished print directly into your camera, then using a simple paper processing regimen. It really is a unique process, one that's also new, in the historic sense, given that such direct positive paper emulsions were unheard of in the formative years of photography. The irony is that this product has only come to market now, in the post-film era of ubiquitous digital imagery.

I would like to encourage you to embrace this process, experiment with it, and see what you can do. It's a great age we live in, where we have such a wide variety of choices available for our creative expression, including the choice of creating silver gelatin prints with such relative ease.

Wednesday, March 2, 2016

Harman Brownies

DSCF4588a

Today I had the urge to play with an old Kodak Brownie camera and Harman Direct Positive paper. The camera, a Kodak Six-16 Brownie Junior, had been sitting for a long time in my Man Cave shed, and also seemed to have been ignored, since the rest of my camera collection is in my office on a shelf; as if cameras had feelings (which we know they do).

Several issues needed resolving before I could attempt an exposure. First, I didn't know what the focal ratio of the shutter's two aperture settings were, so that would require partial disassembly of the front in order to get a set of calipers in close enough to measure. Second, while I was in there, one of the viewfinder mirrors had been dislodged, and would need to be secured back in place. Third, it was rather dusty, and the optics needed cleaning.

DSCF4583a

I removed the four small screws securing the front panel, then bent the end of the bulb/normal lever, in order to get it through the slot in the side of the front panel. Once that was done, it could be easily removed, giving access to the shutter, aperture plates and viewfinder areas.

Measuring the diameter of the two aperture settings and dividing those figures into the focal length yielded f-stops of f/20 and f/30; the online Kodak manual for this camera didn't actually have those values listed, as it was written (apparently) with the idea that you chose a certain type of film and a certain quality of light, or used photo flood lamps (it also lacks a flash trigger); none of those methods would do for us today without lots of experimentation, since we don't have access to the same kinds of film and accessories as one had back in the 1930s.

DSCF4586a

I secured the loose mirror with hot glue, and did my best to clean the lens, but there was some discoloration (more like a mottled film) on an inside surface I couldn't easily access. Still, it cleaned up pretty well.

For use with Harman's Direct Positive paper, I would be loading individual sheets into the camera at the film plane, which required the paper be trimmed down to 2-3/4" by 4-1/4". I also wanted the paper to sit as flat as possible against the film plane flange, and so I used a backing pad of two thicknesses of black adhesive craft felt, cut to size and stuck together. I also taped over the rear red film counter window with black gaffer's tape.

DSCF4587a

Now that I had a functional camera, purposefully modified for individual sheets of direct positive paper, it was time to figure out my exposure method. Based on my working exposure index of the Harman paper rated at ISO 8, bright sunny conditions would require a shutter speed between 1/4 and 1/2 second, much slower than its single speed of 1/125. However, shaded daylight exposures of f/20 for 2 seconds are possible, making it possible to be used as a portrait camera for the kinds of seated poses once made with wet plate cameras, involving a head brace so as to steady the subject.

Of course, once you begin thinking about issues of focus with portraiture - the camera is fixed focus, set approximately to the hyperfocal distance for its two apertures, you realize that, other than whole-body portraits, you can't do justice to a subject close-up without the accessory Kodak close-up filter, which hasn't been made since the 1940s. Good luck finding one. I suppose a person could fiddle with adapting SLR close-up filters and examining the results at the film plane with a makeshift ground glass, then work out a preset seating distance for your subject. But once you start going to that much trouble, you might as well be pulling out the Speed Graphic, which yields a bigger print, variable apertures and shutter speeds and focusing via a view-screen.

So really, this is a simple snapshot camera, we must remind ourselves. Go outside and frame up composition suited to its limitations.

I made three test exposures today, the first one in my front driveway, of the house brightly lit by the morning sun. Since the camera's single shutter speed was about five stops below what the meter recommended, I simply fixed the camera to a tripod (via an adapter plate and bungee cord - the camera lacks a tripod bushing despite it having a bulb shutter mode), and tripped the shutter five times. The result came out a bit under-exposed, but a usable image.

For the second exposure I metered the shade under my back porch and exposed the paper for 2 seconds at f/20, with a good result for the shaded part of the image but obviously over-exposed along the edges of the scene that were brightly lit.

The third image, posted below, is an uninspiring image of my backyard wall and the neighbor's trees. I used the f/30 aperture and flipped the shutter open and close as fast as I could, simulating a 1/2 second shutter speed. The result was the best of the three thus far. I could see, were I to pursue this further, taping a neutral density filter to the front, giving me more easily controllable shutter speeds in the 1-2 second range in bright daylight, sufficient for landscape images.
Harman Direct Positive, Kodak Six-16 Brownie Junior

The lens is adequately sharp for the contact prints it was intended to produce, but probably would be soft by today's standards for enlargements or scans.

It's too bad the shutter doesn't have a flash attachment, because this would open up other exposure possibilities; one must remind themselves that Kodak made a large lineup of different camera models back in its day, and this one was near the bottom of the model range. It's the case that one must choose carefully the type of antique to modify; sometimes you get a Corvette and other times a Vega - even though they're both old Chevys.

I used my stainless 35mm developing tank and hand-made rotary processing base for these prints. The first print, of the front of my house, had an unfortunate gash in the emulsion, right near the center of the image, caused by a sharp edge on the end of the radial bracing rods of the tank reel. So for the next two prints I removed the reels, and the print was long enough to stay bent along the inside periphery of the tank for the duration of the processing, without becoming dislodged. Going forward, I'm going to remember to remove the reels while processing other prints of sufficient length.

This was a fun evolution, but doesn't really result in sufficiently satisfying results, given the limitations of the camera. Still, it at least served for providing more experience with using a roll-film tank for rotary processing small direct positive prints, and metering and exposing the Harman paper in a variety of situations where the shutter speeds or apertures are limited in range. In the final analysis, it points toward a better camera, like my Speed Graphic with modern Fuji lens, as a way to make really satisfying work.

Tuesday, February 9, 2016

The Tangible Reality of Print in Hand

Gate_F285_Pinhole001aGate

Having recently worked to refine my methodology for exposing and processing Harman Direct Positive paper, I've begun to create more pinhole camera-based, in-camera prints. This is after a long hiatus of a number of years, where the volume of my pinhole work was minuscule.

Part of the reason for this dry spell was that, at the time, I'd been working almost exclusively for over a decade with paper negatives - which don't directly produce a finished print - instead requiring either a contact print be made in my darkroom (a laborious process made impractical in the colder months of the year), or scanned to create positive digital image files.

It was this second process method, of scanning paper negatives, that I had mostly used, resulting in files to be posted and shared online, but still absent any physical print in hand.

Eventually, I left pinhole behind almost entirely and instead concentrated my creative energy mostly on digital camera-produced imagery; creatively satisfying but absent a real silver print in hand.

My initial experiments, a few years ago, using Harman positive paper in pinhole cameras involved larger sized formats, with longer focal lengths and the resulting larger focal ratios, which resulted in extended exposure times, even in bright sunlight, of well over a minute. For this reason I balked at continuing to use this paper in pinhole cameras, and ended up using it mainly with faster, lens-based cameras.

Pop_N_Taco_F285_Pinhole001aPop-N-Taco, Albuquerque

However, results from recent experiments with exposing small pieces of Harman paper in pinhole cameras with smaller focal ratios has suggested that successful direct in-camera pinhole prints can be easily made using reasonably short exposure times. Most notably was having made test exposures in the little 2"-by-2" brass pinhole plate camera. Its F/140 aperture was fast enough to warrant reasonably short exposure times in bright sun, inciting me into changing my mind about direct positive pinhole print work.

Now I've begun working more with a 4"-by-5" wooden pinhole box camera, with a focal ratio of F/285 - small enough of an aperture to render reasonably sharp prints while keeping the exposure times well under a minute.

Despite requiring a tripod mount and lengthy timed exposures, the focus-free nature of pinhole photography implies that alternative composing methods can by employed, enabling accurate framing while streamlining the image-making process, as compared to the more traditional large-format process, where the photographer tucks in under a dark-cloth, squinting into a view-screen with magnifying loupe in hand. The "viewing dots" on my pinhole box camera provide an accurate and convenient method of composing a scene, as an alternative to either the cumbersome large format methods or the questionable accuracy of mere point-and-guess aiming with box cameras absent any viewing system whatsoever.

In the previous article I discussed the merits of employing extremely wide angles of view with pinhole cameras using orthochromatic media like Harman Direct Positive paper, as a strategy for creating landscape images with a reasonably dark sky tone. While this 4"-by-5" camera has not nearly as wide of an angle of view as that cardboard box camera discussed previously, I'm still able to get skies rendered with a reasonable degree of tonal detail, while the exposure differences from center-to-edge are much less severe in light fall-off.

Pop_N_Taco_F285_Pinhole002aPop-N-Taco, Albuquerque

Holding these little prints in hand, they seem to be much sharper than their pinhole origins might otherwise suggest. One doesn't appreciate this as much with Internet-posted digital scans, however, since they don't hold up well to the closer scrutiny afforded by a larger computer monitor.

This reminds me that one of the greatest thing about creating these in-camera prints is their physical presence; the paper's thickness, texture and surface sheen; how one has to hold such a print close to oneself, an intimate interaction, an experience that remains lacking when merely simulated on a digital viewing screen.

So while IBM's Deep Blue A.I. might be able to best the world's Chess or Go champions, there's still nothing like holding a silver print in hand, an entirely non-Internet-based, physical experience.

Monday, February 8, 2016

Wide Angle Direct Positive Work

P1110673a
There was a time, several years ago, when I decided to make yet another pinhole camera, this one being a one-shot box camera made from "chipboard" cardboard (available in packs at Michael's crafts store) and gaffers tape. Using a paper size of 4"-by-5", and an image area of 3.5" square, its principal feature was a very wide angle of view. I had used this camera briefly, with paper negatives, then set it aside for a time.

Then last week I had a hankering to work again with this camera, only instead of using paper negatives I wanted to try Harman's Direct Positive paper, which I have been using extensively these last few months in other cameras, having arrived at a more accurate working exposure index and development methodology.

I created two images that day, exposed with my usual method of rating its ISO speed at 8 and metering the scene reflectively. I reference the exposure time on my meter opposite F/128, then multiply that by the camera's "X-value", marked on the front of the camera, that adjusts for the camera's true focal ratio, to arrive at the working exposure time.

P1110671a
For this first image, of a tree in a front yard along a neighboring street, in the morning light, the meter indicated 15 seconds at F/128, while the actual exposure, taking into account the camera's actual focal ratio using the "X-value" multiplier, was 47 seconds. To make the setup small and convenient to carry, I didn't bring a regular tripod during this morning walk but rather just a tabletop mini-tripod, which I set on the ground in front of this tree, looking upward. I had to ensure that I stayed out of the way of the pinhole's field of view after sliding open the cardboard shutter, given the extra wide angle of view of this short camera. Metering was done against the brightly lit front part of the tree trunk.

Inspiration for this image was found that previous evening, during a stroll, when I noticed the stark, barren branches illuminated by the dim light of a street lamp.

P1110672a
This next image was created after returning from this morning walk, of a pot near my front courtyard, again taken from a ground-level perspective, with the camera atop the mini-tripod. The meter indicated 10 seconds at F/128, while the actual exposure was 32 seconds.

Several aspects of these images interest me. For one, there's the extremely wide angle of view, causing the severe vignetting. I like the way that the central image area seems framed in a surrounding area of blackness. Also, the sky in the first image appears to be nicely dark in tone, rather than the usual blown-out whiteness when using orthochromatic paper media.

Both of these aspects are actually interrelated, since the reason for the relatively dark sky tones is because of the light falloff caused by that severe vignetting. Were the camera of a "normal" angle of view (where the focal length is about the same as the format size) there would be much less vignetting and light falloff toward the edges, resulting in a much more over-exposed sky.

This is an important point to consider when designing a pinhole camera for scenic photography that's intended to be employed using orthochromatic paper media. The severe light falloff caused by these short focal length, wide-angle cameras can serve to darken the edges and corners sufficiently to render the sky with a more pleasing, darker tone, more like what we'd expect using panchromatic film.

Of course, when doing so one must also accept the resulting severe foreshortening effect of such wide-angle optics, rendering objects even relatively near the camera rather diminutive in size, unless they are only inches away from the aperture.

It is possible to find a reasonable compromise with angle-of-view, that renders objects with a more normal perspective while still affecting some degree of light falloff sufficient to render a bit of sky detail visible. In my experience this occurs in angles of view somewhere in the range between 90 and 120 degrees. Some experimentation is required, for your individual needs. A handy rule of thumb is that a 90-degree angle-of-view occurs when the film or paper is twice as wide as the focal length.

These little 3.5" square prints will work very nicely when matted to a larger frame size, and I can see an entire series being presented in this manner. What makes this possible is the refinement in my process that I've worked toward, from camera to finished print via rotary processing of Harman Direct Positive paper.

Monday, February 1, 2016

Custom Roller Base Project

P1110635a
For a few years now, I've been working with the Harman Direct Positive Paper, a silver gelatin, fiber based, black & white print paper that has a direct positive emulsion, meaning that it can be directly exposed inside of a camera to produce, after development using standard chemistry, a one-of-a-kind print. There was a point in time, for about a year, when the paper was out of manufacture, due to a chemical supplier going out of business and another source having to be found, but now it's once again being made, and supplies are plentiful.

I've created one-of-a-kind prints using this medium in a variety of sizes, from sub-miniature Minox-sized to 8"-by-10". While the larger formats require either tray development in a darkroom setting or a large processing drum, and the Minox-sized prints were best handled in small containers in a darkroom, it is in those intermediate-sized formats, from 35mm to 4"-by-5", that I've done most of my work with this paper, and hence would like to find more convenient working methods.

One of the main issues I have is during the winter months, when my unheated, garage-based darkroom requires considerable time to warm up using a space heater, precluding spur-of-the-moment boughts of darkroom creativity. What I'd like is at least a way to work with the Harman paper in the convenience of my kitchen.

While I do have a Jobo processing drum for 4"-by-5" prints, the associated manual roller base is a rather pricey and fragile item. However, for smaller-sized prints - such as those cut to custom sizes for loading, one-at-a-time, into small and medium format cameras - there is no custom-fit processing tank available.

Several years ago, in a fit of inspiration, I decided that I might be able to use a stainless steel 35mm developing tank as a makeshift rotary processor for these special-sized smaller prints. The idea was that the reels would be kept inside the tank and the paper would be slipped into the gap between the outside of the reels and the inner surface of the tank, with the emulsion facing inward. With the lid installed, an adequate quantity of chemicals - about 100mL - can be used for processing without sloshes spilling from the lid, as the tank is oriented sideways and continuously rotated.

What I needed to make this work was a roller base. I had the Jobo base for my larger formats, and I figured out how to rearrange the roller brackets to make it work somewhat for the smaller steel tank, but I wanted a dedicated solution, so I wouldn't have to keep re-configuring the Jobo roller base; it being made of plastic, I was concerned the pieces would eventually break.

And so last week I went to the hardware store and looked for some caster wheels. I noticed there were three kinds, two of which were unusable because the wheels swiveled on bearings. I wanted wheels that rolled on a fixed support mount but didn't swivel. I found what I was looking for, and went immediately to my workshop to begin fashioning the roller base.

I first had to figure out how to properly space the four wheels. So I used an old scrap piece of plywood as a test base and, using clamps, tried various configurations with the wheels and steel tank until I found an optimal configuration where the tank easily rolled on the wheels. I then measured the positions of the wheel brackets and transferred those measurements to the nice piece of plywood, that I had prepared ahead of time by spray painting a metallic silver color.

I countersunk flathead screws through the bottom of the base, with the holes tapped to fit, and used nylon locking nuts to secure the wheels. The bottom I covered in a sheet of rubber matting material via a hot glue gun, making for a nonskid, water-resistant surface.

The result is a roller base custom fitted to my stainless steel developing tank, with which I can continue in earnest creating more small-gauge, silver gelatin, direct positive prints.

I also created a video about this project, which I encourage you to watch.


I've always been intrigued by small-format black & white prints. I can recall a time, about 15 years ago, when I saw an exhibit of Edward Weston prints at the Portland Art Museum. I was absolutely stunned by the quality of the work, the physical appearance of the prints and their intimate, diminutive size. You needed to get in close to them, in order to properly appreciate their beauty. In turn, that physical intimacy allowed one to perceive them as real objects, with real physical attributes such as surface finish and tone, rather than mere image files.

I believe in this age of media over-saturation that we need to reconnect to the tangible reality of the physical art object itself. Direct positive prints, made on a gallery-quality substrate of Ilford's best double-weight, fiber-based photographic paper, represent just such a medium, ripe for further exploration.

I'm hoping that projects such as these will provide you with the inspiration and tools necessary for you to pursue your own exploration of the world of direct positive photographic prints. I'd like to hear about you work, so leave a comment if you can.

Saturday, January 30, 2016

Pin Holga

Two001a
Fuji Acros 120, printed onto Ilford MG RC WT paper

I don't always create pinhole images with handmade cameras and photo paper, though most of my pinhole history has involved doing just that. But there was a time, a few years ago, when my curiosity got the better of me and I plunked down money for a commercially-made pinhole camera, Holga's 120-format Pin Holga.

It seems natural that Holga would have eventually released a pinhole version of their ubiquitous plastic camera, since they already had the bulb-mode necessary for the lengthy exposures required of pinhole cameras. However, what I found necessary to make the camera a bit more practical was purchase of the optional shutter release cable accessory, a plastic bracket that clamps around the lens housing and positions a threaded metal insert directly above the camera's plastic shutter button; without this accessory you'll find yourself having to hold down the shutter button for the duration of the exposure, introducing unnecessary motion blur to the image.

As for the quality of the pinhole itself, I found it to be a reasonable compromise between sharpness and practically short exposure times. The biggest issue for me is that the position of the pinhole, in what would be the camera's lens mount, precludes it from offering a truly wide angle of view, and thus the resulting images lack that corner vignetting so common with their other cameras. I suspect this was made necessary by them having to use their standard leaf shutter mechanism from the lens cameras, whose position is simply too far forward to permit wide angles of view.

I would assume that a resourceful person, needing a wider angle of view, could hack a Holga with a simple lens cap shutter, dispensing with the lens housing and leaf shutter protruding from the front of the camera body altogether, and mount the pinhole inside the camera body closer to the film plane.

I found the Pin Holga simple and practical to use, with its tripod bushing, reasonably modern film advancement mechanism, window-style viewfinder and shutter release bracket in place. One modification I did make (Holgas seem to invite customized improvements) was the application of some hook-and-loop tape around the rear door area, to prevent the flimsy clips, that serve as both door locks and strap lugs, from moving and risking the door falling off with a roll of film inside. I also have a piece of tape over the film counter window, as a just-in-case measure against light leaks; because you just never know.

While I do enjoy the lightweight, compact size of the Pin Holga, something about it just doesn't draw me to using it all that often; perhaps it's because of its more narrow angle of view, or the cost of medium format film and processing, or having to, in the case of black & white film, print each frame individually in my darkroom. Yes, the convenience of Harman's Direct Positive Paper has spoiled me, somewhat.

In comparison, using the 2" square-format brass plate camera, discussed in the last article, seemed much more enjoyable, and the results more pleasing.

I suspect that part of the reason is because, for me, working with various paper media is more enjoyable and convenient, the results easier to scan than film. And I've been working with paper negatives for several decades (and more recently Harman DPP) and have become more accustomed to the process.

One thing I have done (not with the Pin Holga but with lensed Holgas), demonstrated in one of my You Tube videos, is to load individual sheets of the Harman paper, via my darkroom, and use the bulb shutter to make timed exposures; perhaps I should break out the Pin Holga once again and try that out.

Sunday, January 24, 2016

The Rediscovery of New Beginnings

P1110608a
It might seem almost a cliché to say this, but sometimes one has to lose something in order to gain something else. Or, to paraphrase another adage, out of loss comes new beginnings.

No, I'm not referring to some personal tragedy; I've lived a rather sedate life, if truth be told. No, this has more to do with the idea of lost opportunity, of the promise of unlimited creativity squashed by life's inertia, perhaps.

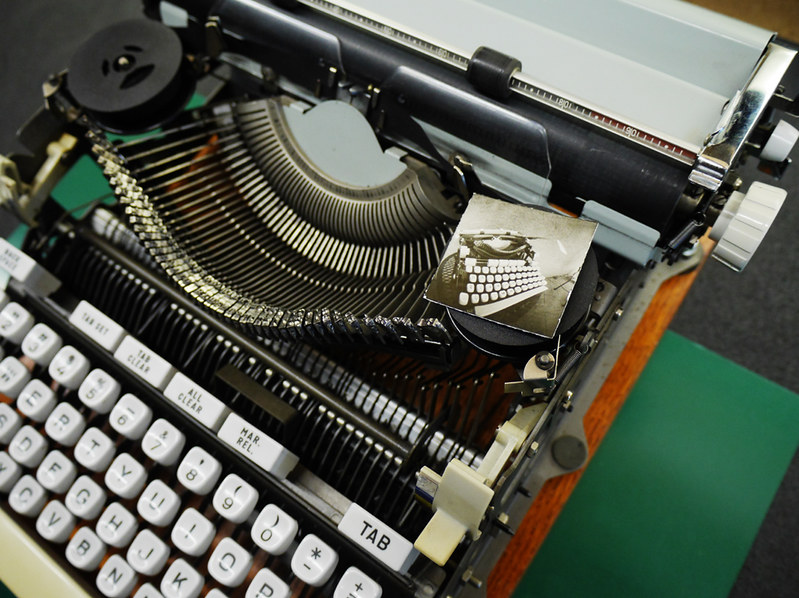
Some time ago I had created a 
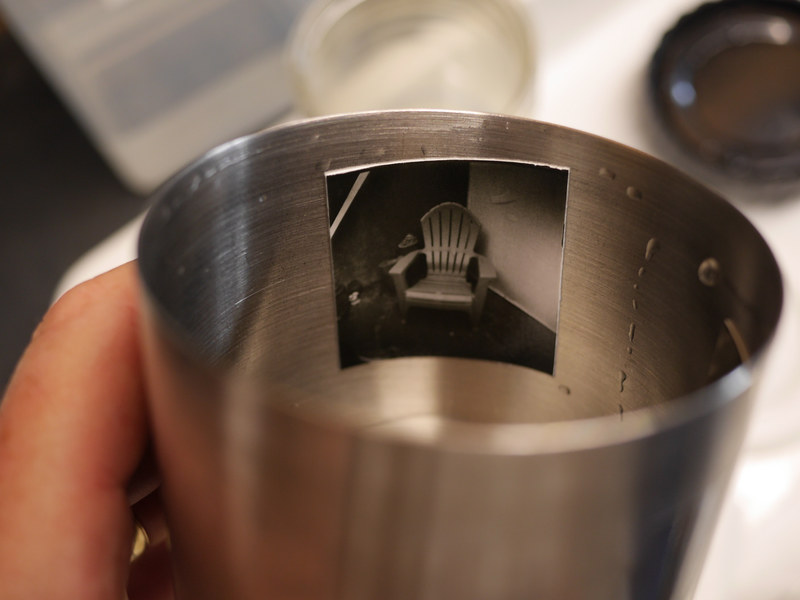
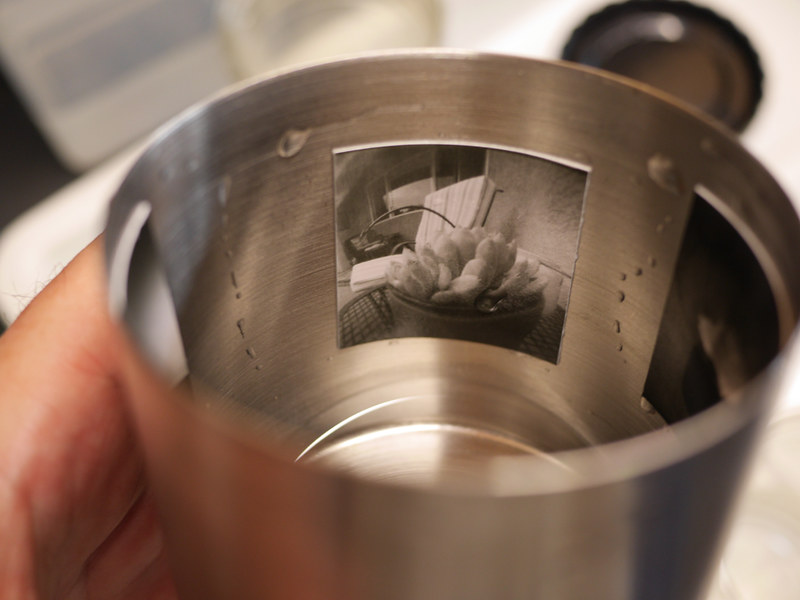
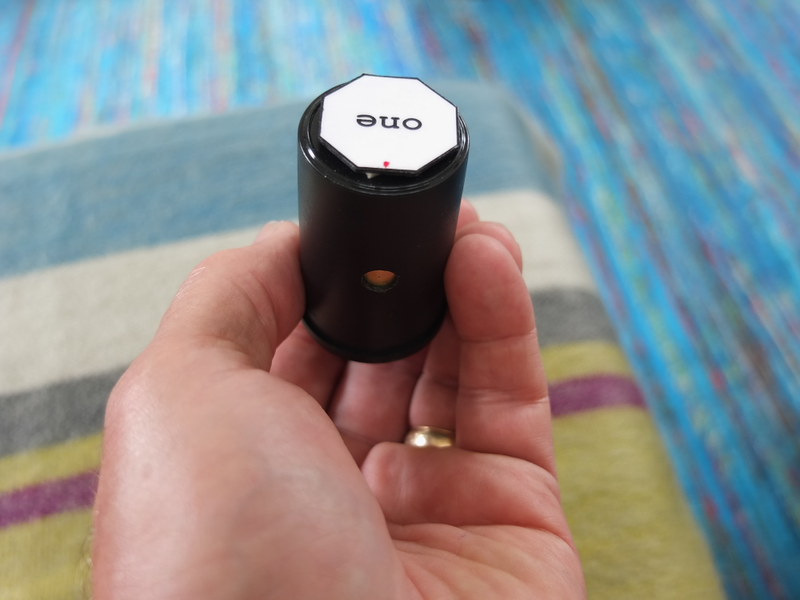
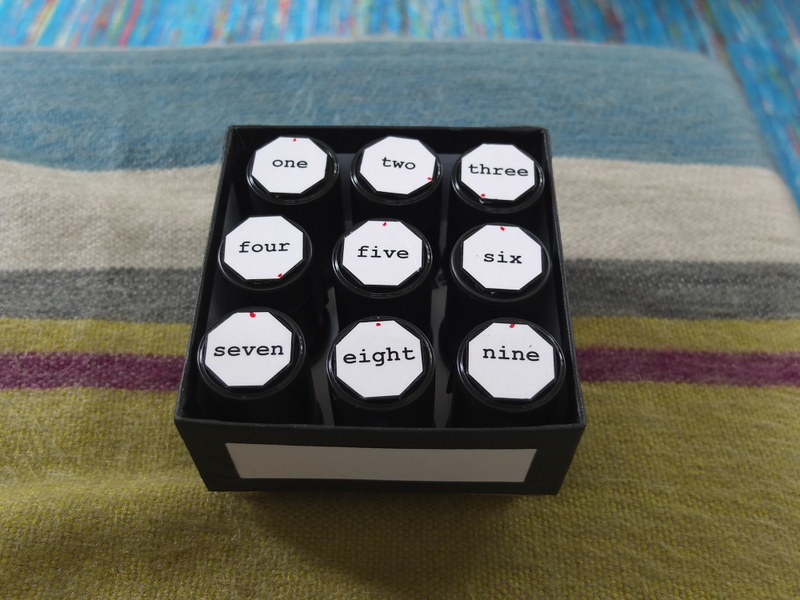
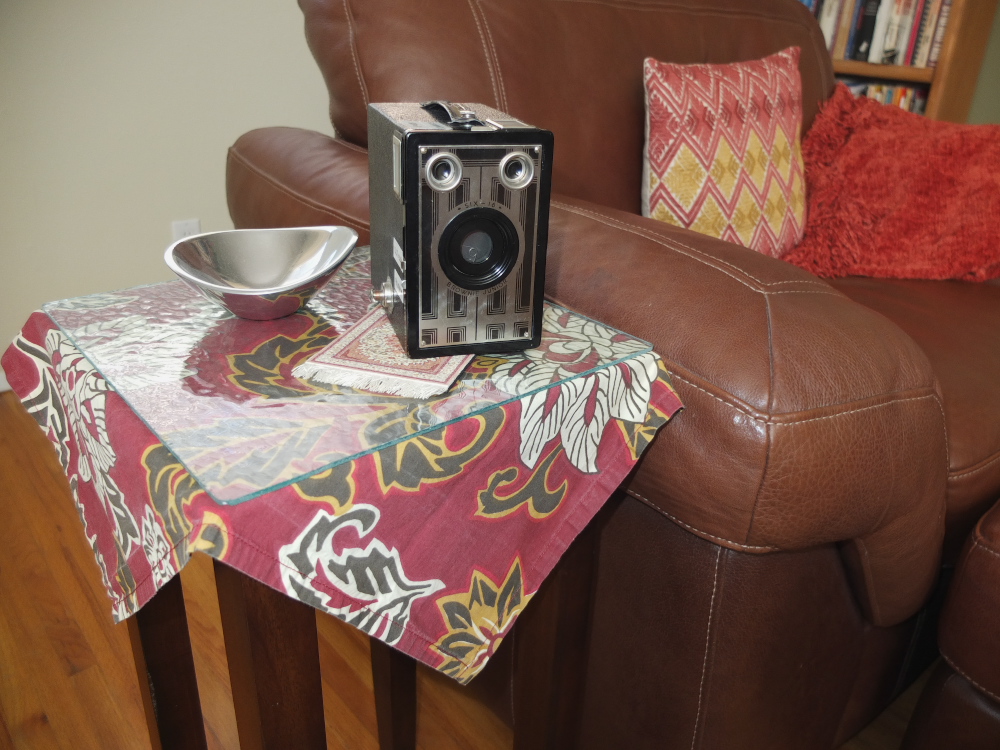
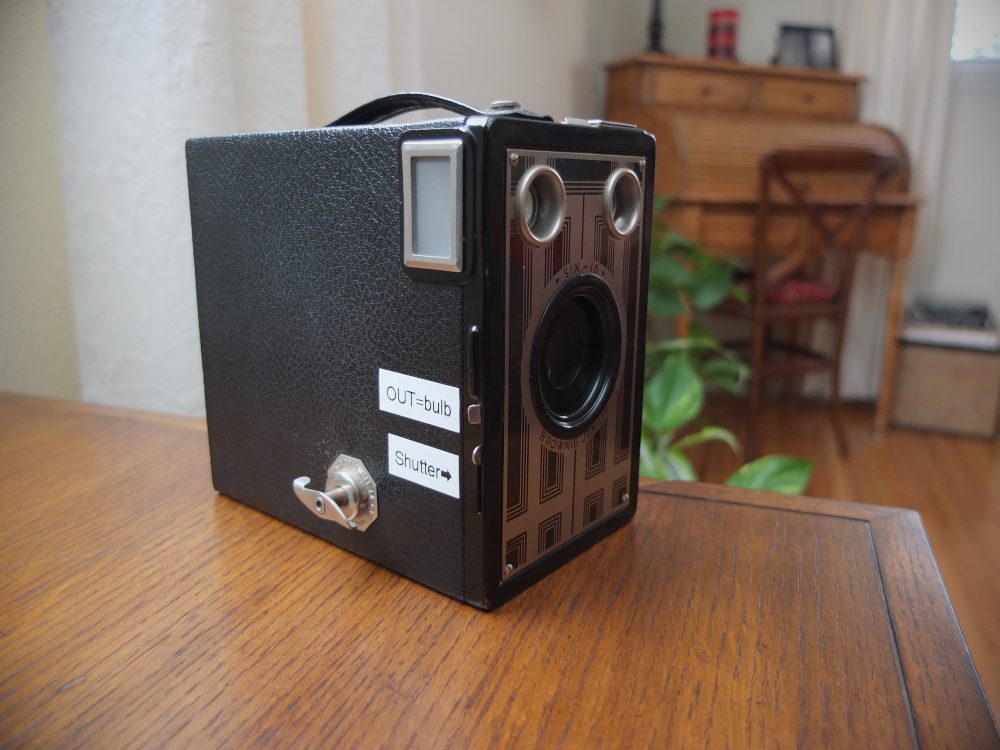
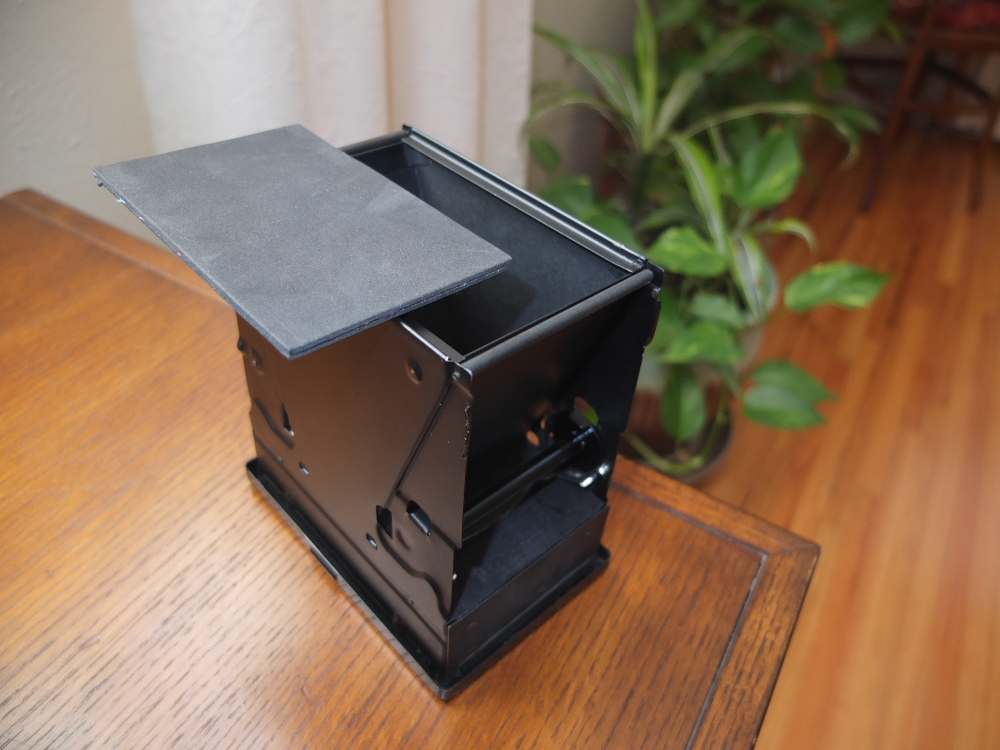
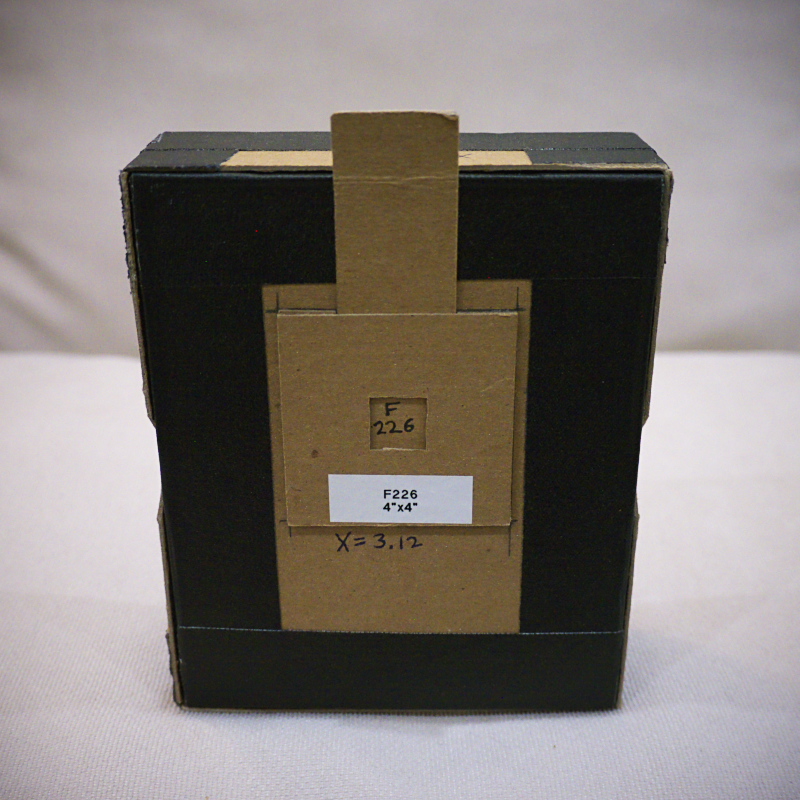
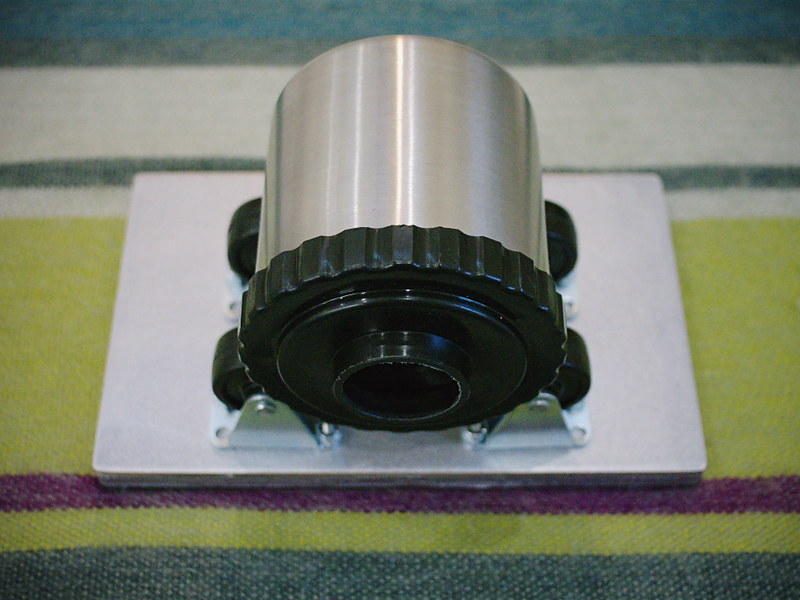
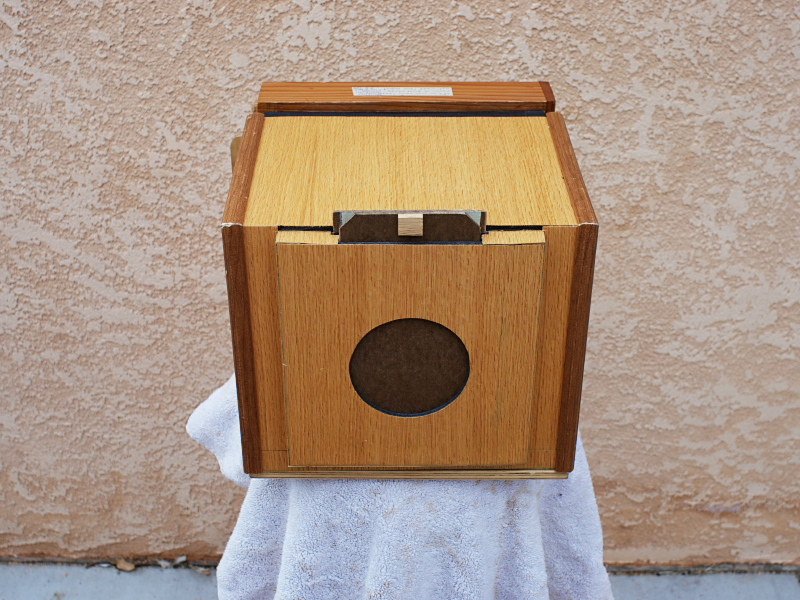
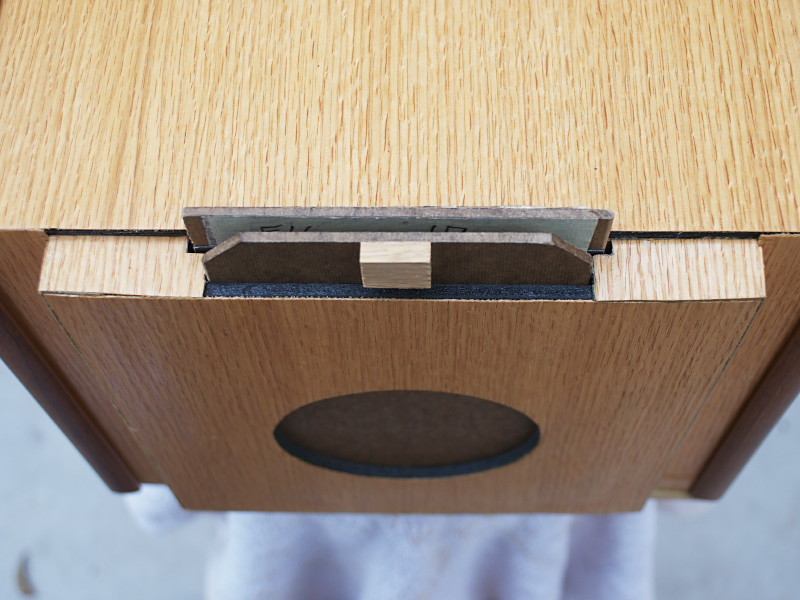
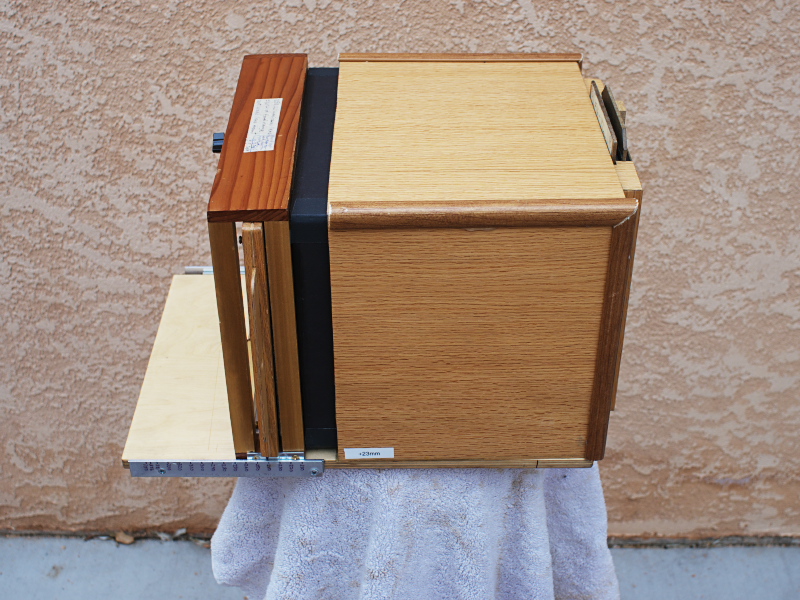
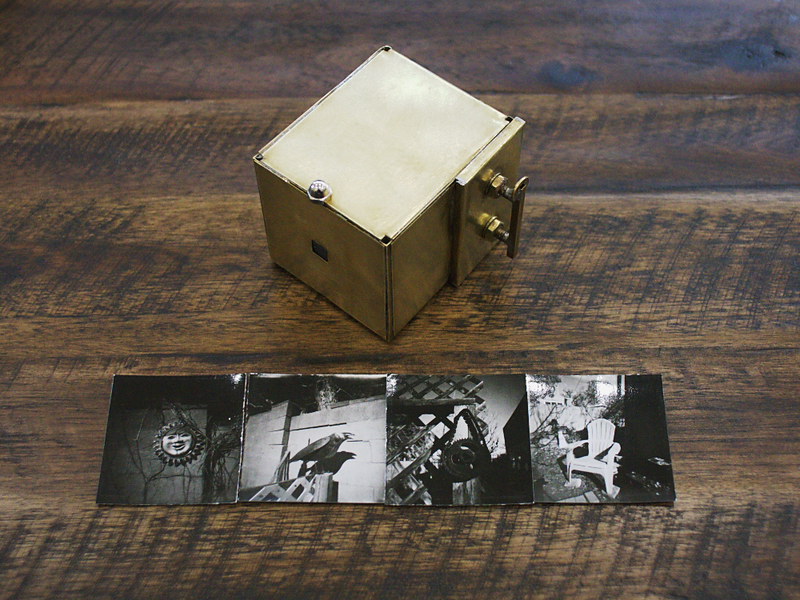
video for my You Tube channel, within which I made mention of, and demonstrated, a small, brass pinhole box camera, designed to make small images onto two inch square pieces of photo paper or film, taped to little brass film plates that fit into the camera via a changing bag. A humble little camera, it had seen much use about a decade ago, and promised much more, but since then has been relegated to the storage bin, acquiring the patina of disuse. Alas, such is life, so full of opportunities missed or squandered.

But then something curious happened. One of my video's viewers had recently contacted me, inquiring about possibly purchasing a copy of said camera. Thinking it over for a day or two, I finally decided that, rather than try to recreate a one-off camera design, why not just sell this very same camera? After all, it wasn't getting much use any more, being stowed away for all of these years, its last use only a distant memory in the back of my mind. I had recently been thinking about what to do with this sizable collection of pinhole cameras I've assembled over the years, that are no longer getting regular use, thinking of perhaps giving them away to some local school's darkroom program, if they'd have them, but never made any progress on the idea. In this newfound opportunity, I sensed that perhaps something better could come of it than what I would ever have accomplished on my own; the person wanting to buy it is a graduate photography student and aspiring artist, and so I am flattered to see this little gem of handiwork get a second lease on life in the hands of someone much more creative than myself.

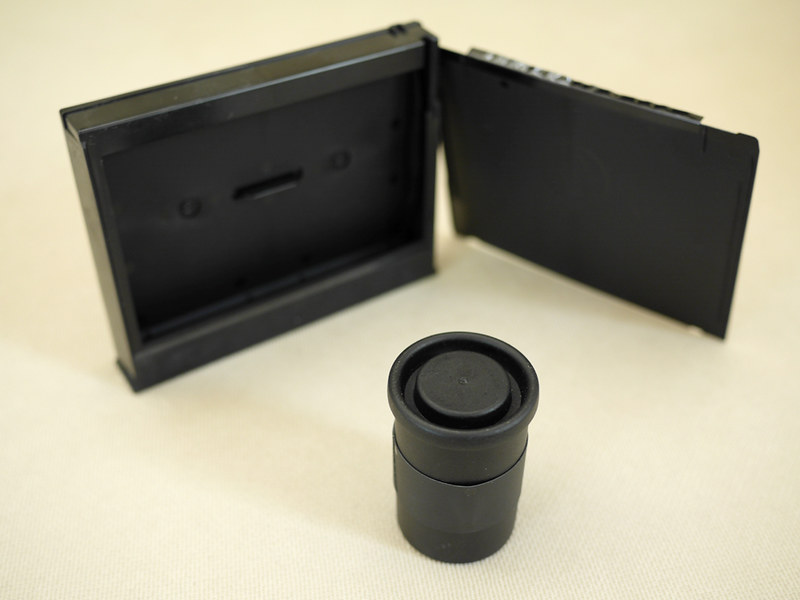
But first I had to clean up the camera a bit, it being spotted and blotched from years of misuse; a thorough cleaning would prepare the brass surfaces for growing a fresh new patina, representing a true second lease on life. But also, I wanted to test out the camera a bit, to make certain that it indeed still worked as advertised, and also for the opportunity to include a few sample images along with the camera when I shipped it; I had never before used it with Harman Direct Positive Paper, and was anxious to try it out. I also wanted to experience working with it one last time.

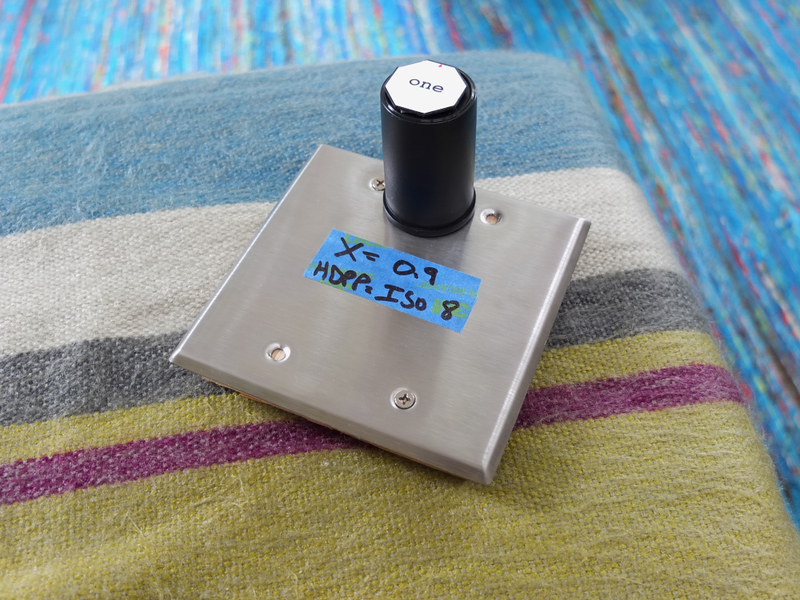
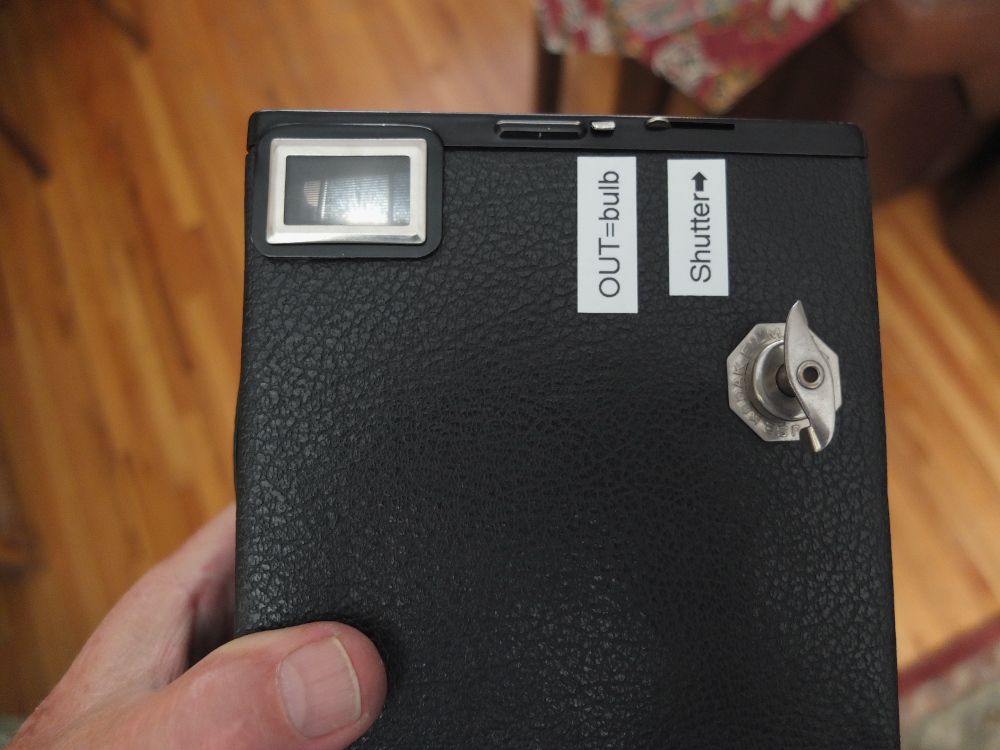
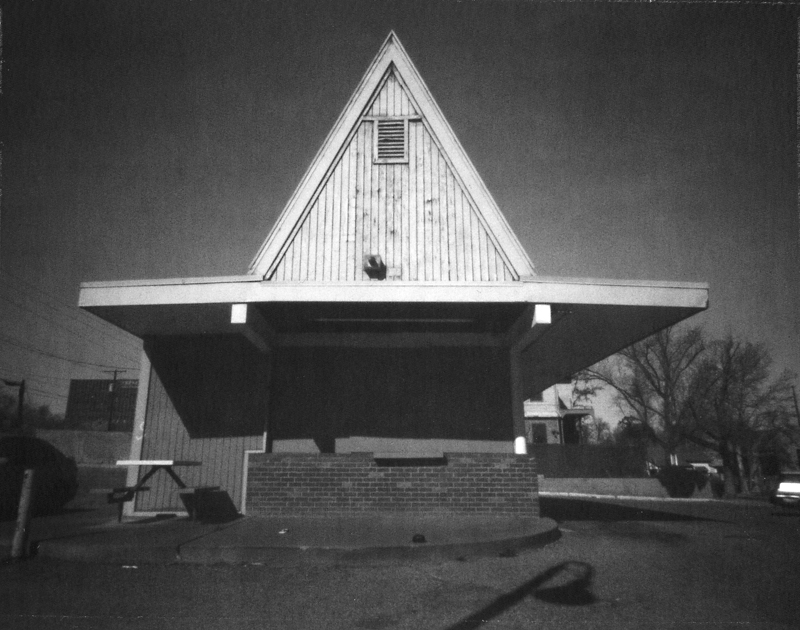
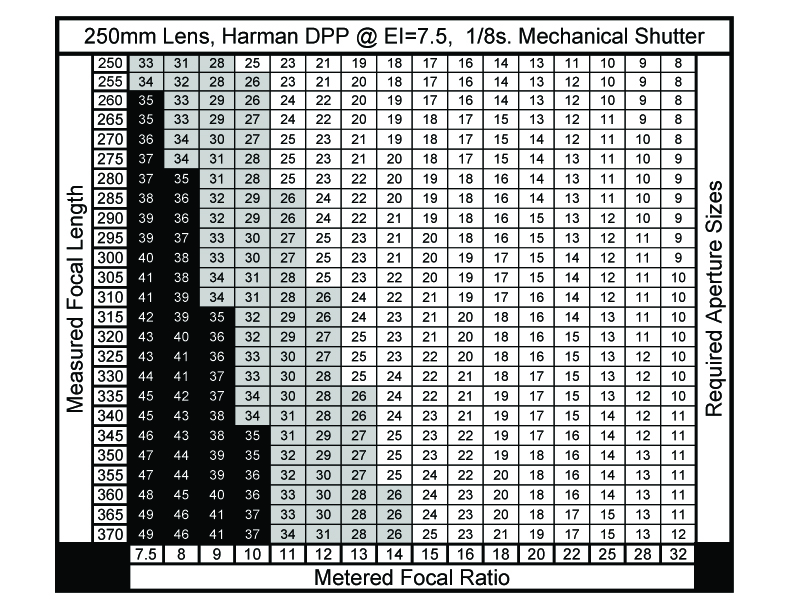
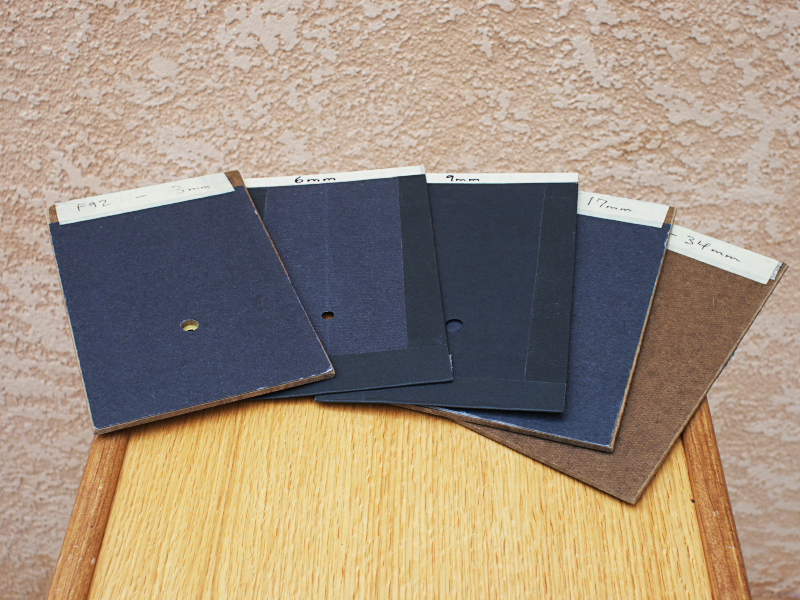
In deciding to make these test images using the Harman paper, I was reminded that normally I wouldn't use this paper in a pinhole camera, due to its extremely slow speed in cameras whose focal-ratios might be well into the hundreds, which in my past experience has required extended exposure times, even in bright sun, of well over a minute or two. But this little camera has a focal ratio of only F/140, sufficiently fast to permit an exposure time of only 15 seconds or so in bright winter's daylight.

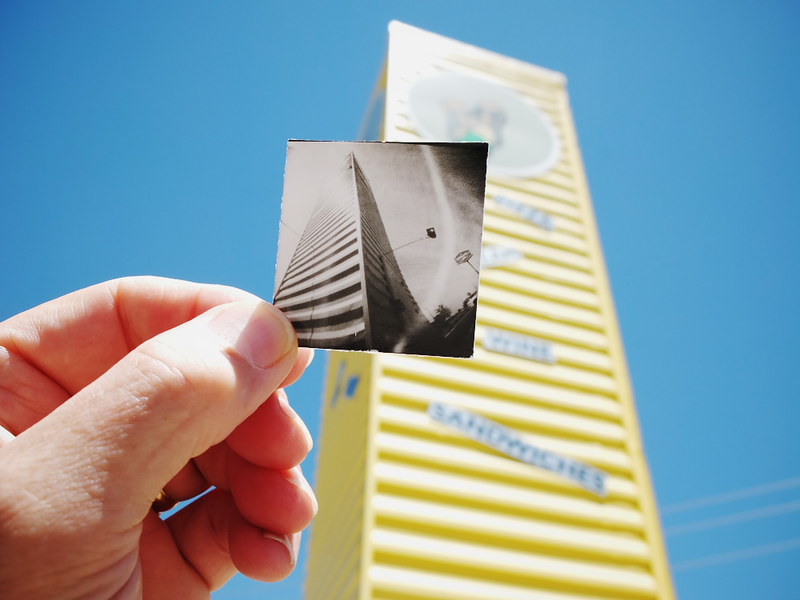
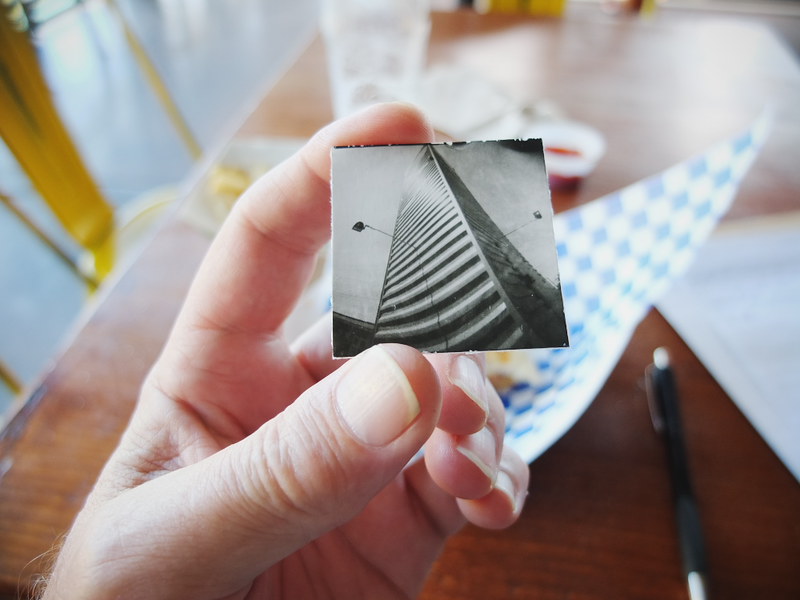
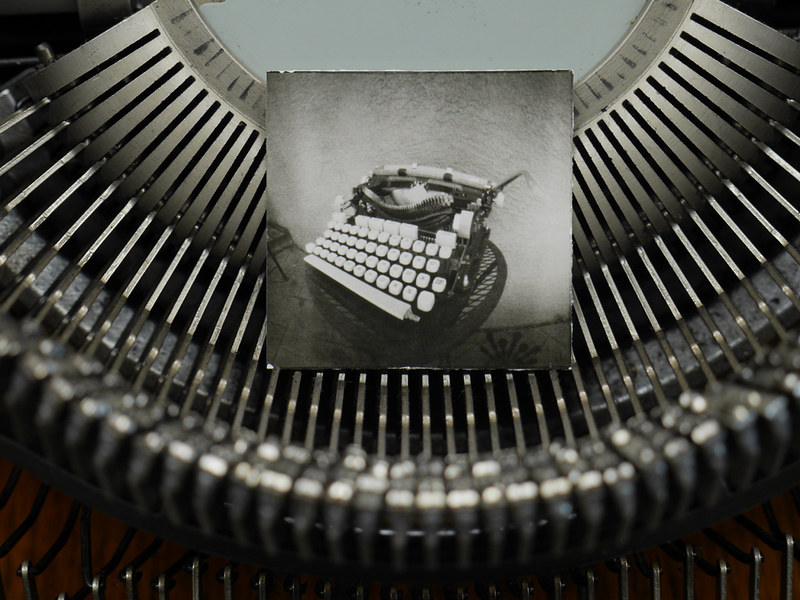
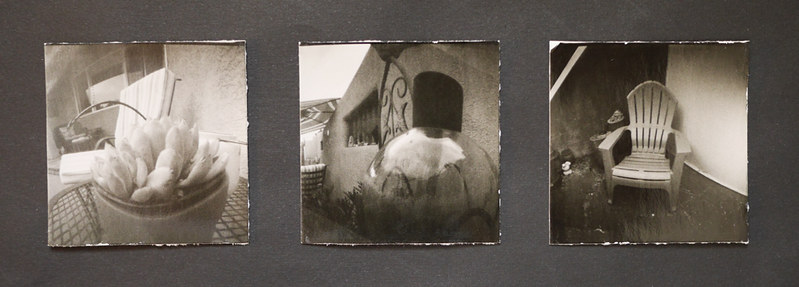
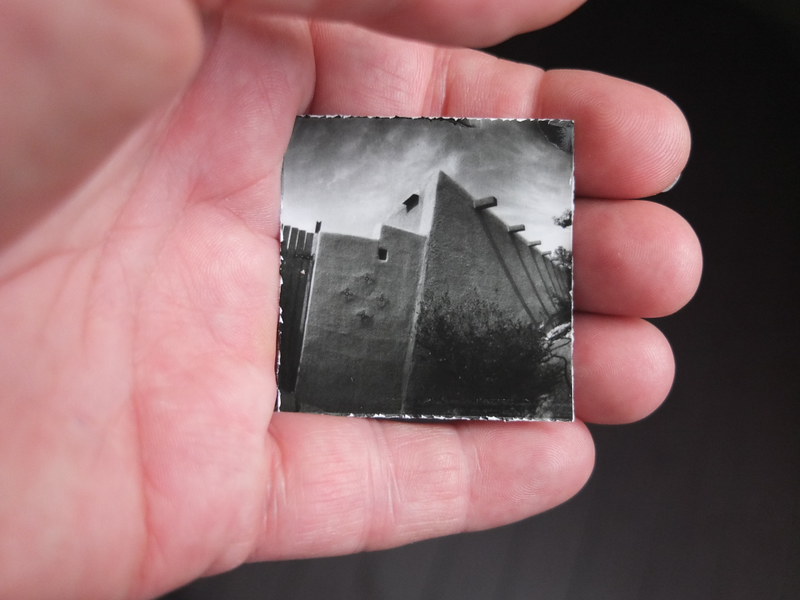
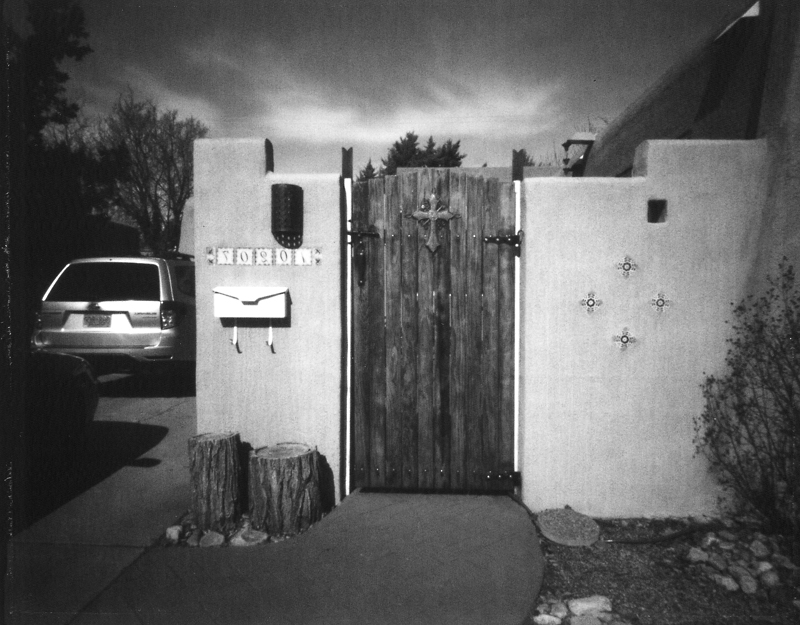
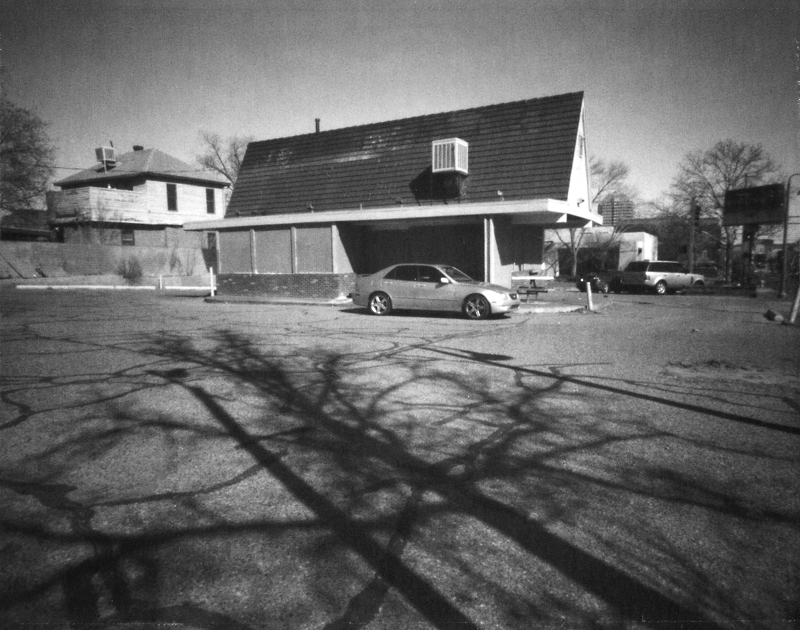
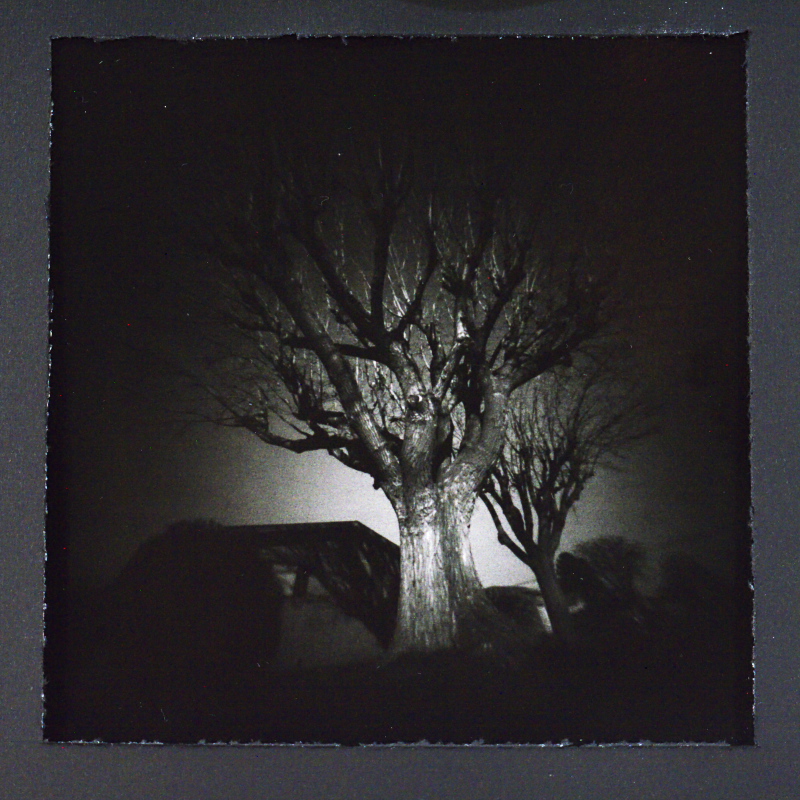
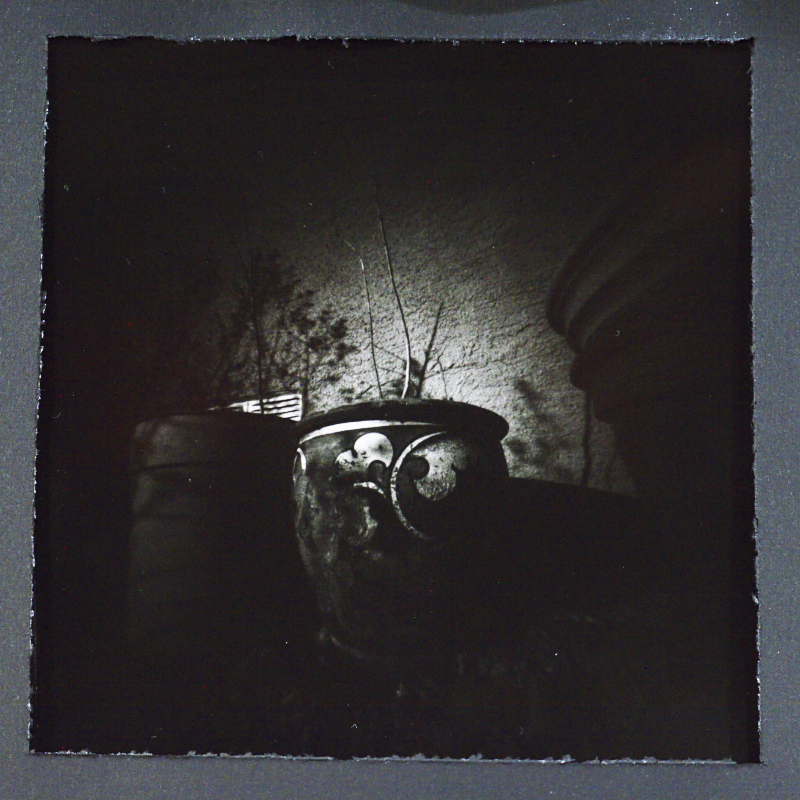
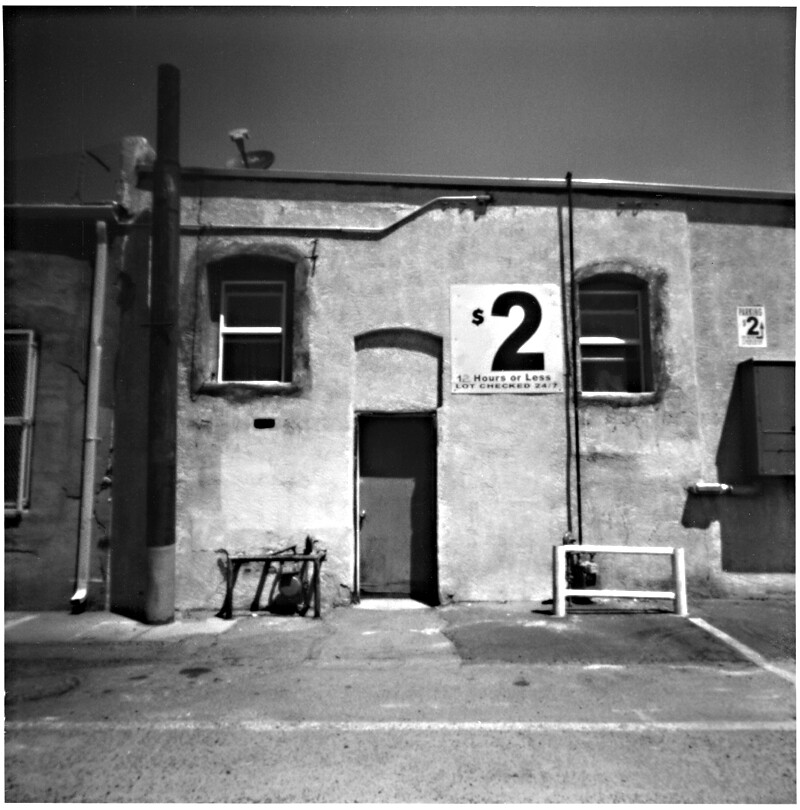
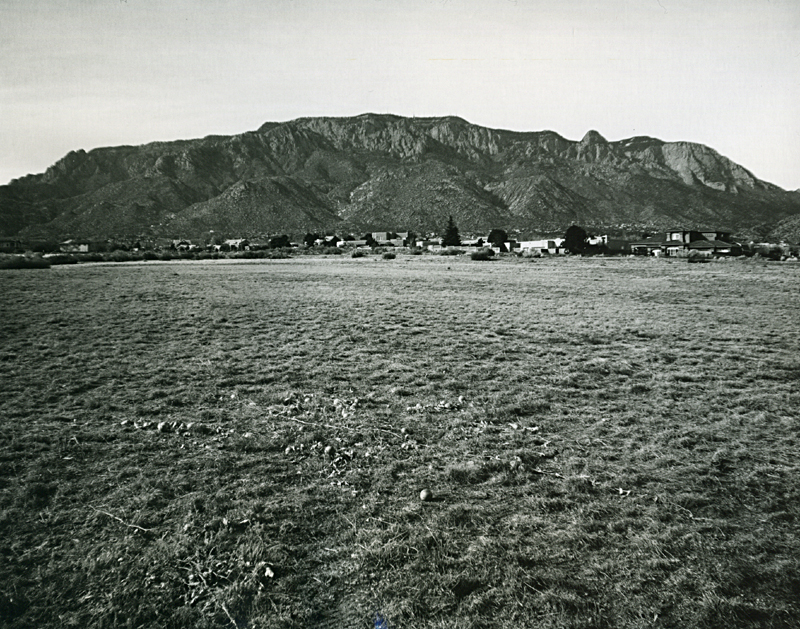
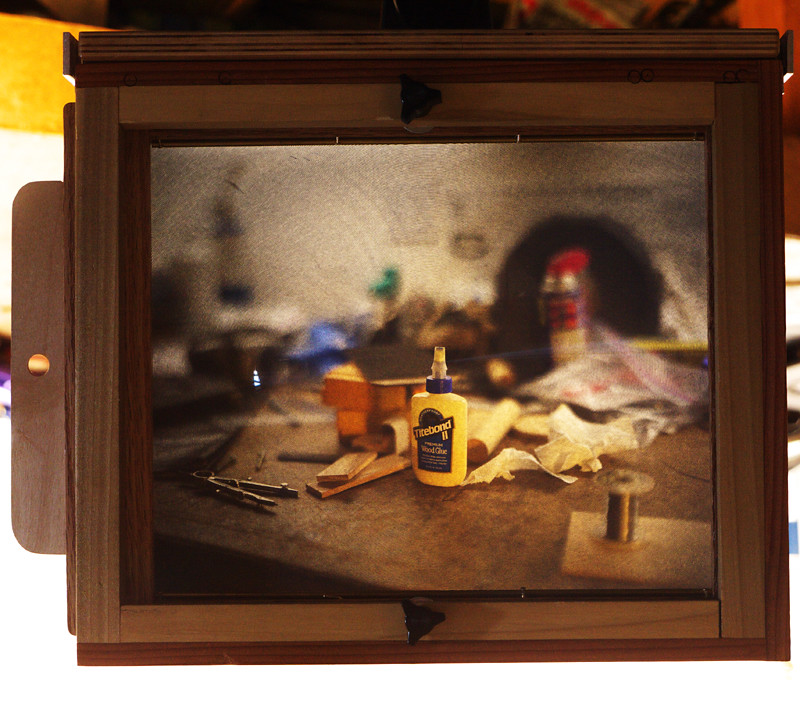
The resulting prints startled me in their quality, I must admit. No, I don't really have seller's remorse; I'm happy to see this camera go to a better home, where it will, at long last, see its purpose in life fulfilled. But in the process of letting go of it, I had gleaned a newfound appreciation for how beautiful a small, well-crafted direct positive pinhole print can be. These images are small, certainly, but also sharp - startlingly so; enough so that one would be hard pressed to tell that they had been exposed in a pinhole camera at all.

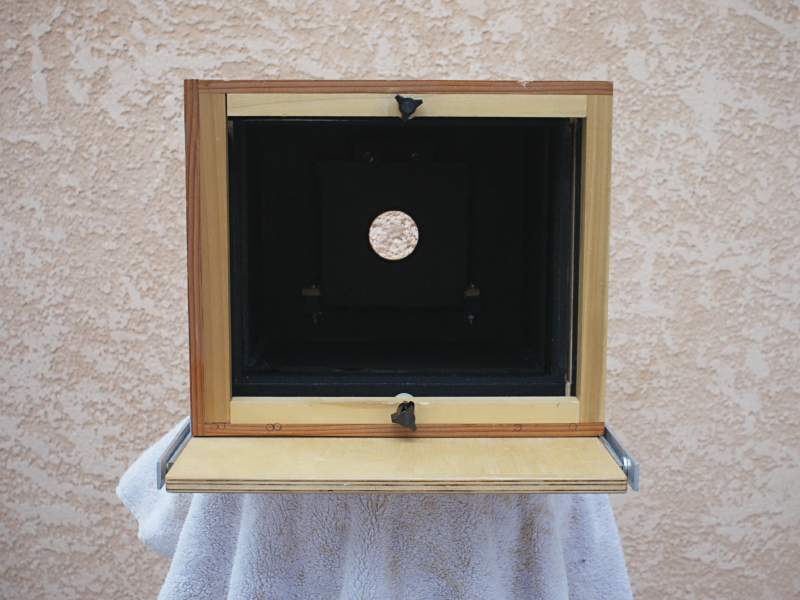
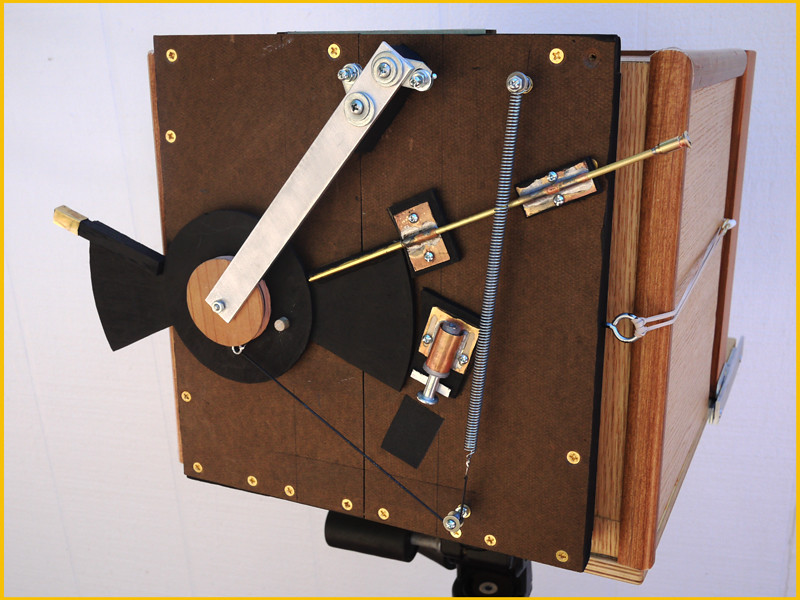
This last week I've been preparing the camera for shipment to its new owner, including making a wooden base upon which the camera can be mounted securely to a tripod, and through this process I began thinking deeper about these pristine little prints produced by this humble brass box, thinking that perhaps I need to dig out of the storage bin another small-format pinhole camera (or, dare I say it, make yet another?) and try my hand again at more of these diminutive direct positive prints. There's something intimate and personally familiar about these small, 2" square images; they don't cry out for attention with some ostentatious artistic pretension, like mural-sized prints in today's photographic galleries might; they're smaller than what one might view on one's own smartphone, even. You hold them in your hand, nestled in your palm ever so delicately, like a dried leaf or dead insect, and peer into them in wonder, like artefacts of some lost archaic process, up front and held close to one's self. They're small enough that you have to expend some effort in comprehension, but not so small that you need a magnifying glass.

I can see displaying these little prints matted to an oversized frame maybe eight or ten inches square, big enough to isolate them from their surroundings, to give each one the space they might need to breathe their own life and find their own context, with the help of the viewer's participation.

By the end of this week, this little camera will be forever out of my hands, hopefully in better charge of someone more intent on photographic creation than I; but what I've gained in exchange is a newfound appreciation for the power of small, pristine quality pinhole prints, and for that I'm grateful, considering myself richer for it.

A technical side note might be in order, pertaining to how I develop these little prints. Yes, one could easily do so in open trays in one's darkroom. But my darkroom these days is chilled by winter's cold, being located in an unheated garage, and so I prefer the convenience of using a developing tank in the comfort of my warm kitchen.

Those of you who've seen my You Tube videos might know how I do this, but for these small prints it involves taking a small metal 35mm developing tank and adapting it for use as a makeshift rotary processor. For one or two prints, I will keep the metal reels inside the tank and insert the paper, emulsion side facing inward, in the gap between the outer edge of the reels and the inside surface of the tank. Two such prints can be thus positioned, opposite each other so any potential movement won't cause them to overlap and interfere with their processing.

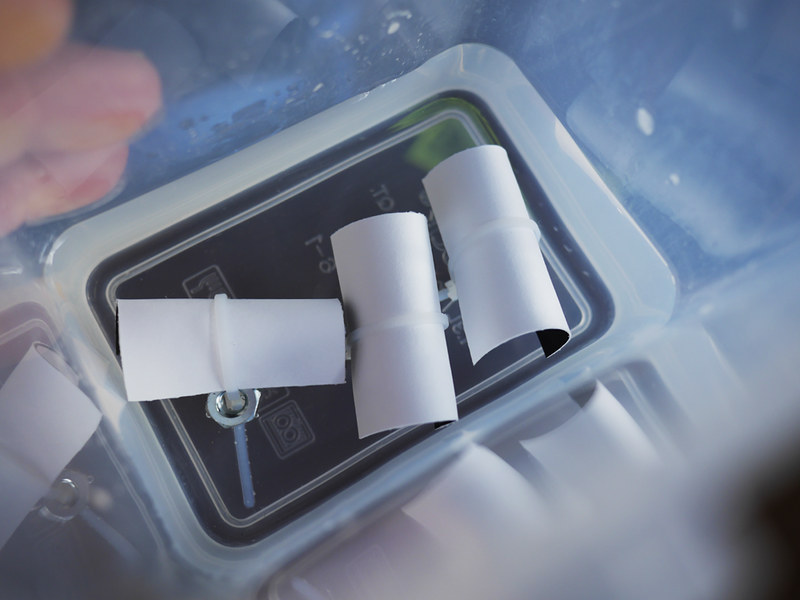
For three or four prints at once, I will remove the reels and apply little loops of painter's masking tape to the inner side wall of the tank, which will hold the prints into position, evenly spaced for processing.

Only 110 milliliters of chemistry are required for processing; I will typically use Ilford Multigrade or PQ paper developer concentrate, diluted "1+10," meaning 10mL of concentrate into 100mL of water. Once the prints are mounted in the tank and the lid installed (requiring a changing bag or darkroom), the chemistry is poured in through the lid of the tank, which is then positioned on its side and gently but continuously rotated for the duration of the processing time. This particular volume of chemistry is more than adequate to process four prints at once, while being insufficient to cause the liquid to slosh out of the lid while being oriented sideways and rotated. In a rotary process, instead of the tank being completely filled with chemistry, as you would with roll film, you only need this small volume, enough to just periodically submerge the paper as the tank is continuously rotated.

It helps to have a roller base upon which to spin the tank; while automated systems can cost thousands of dollars, and you can purchase a manual Jobo roller base for upwards of $50 or more, it's possible to make such a manually-operated base yourself, using parts readily available from the hardware store, which I'll cover in a subsequent article and/or video. But even without a roller base, you can simply lay the tank on its side and slowly rotate it on your kitchen countertop; use a cutting board or other thin piece to elevate the body of the tank far enough above the work surface so that the lid of the tank overhangs the edge of the board, with the opening pointed over the edge of the sink in case of spills, permitting it to rotate easily, while remaining level. Also, a terry cloth or similar dish rag on the cutting board can often help the tank rotate easier.

I have three such stainless developing tanks, and have noticed that two of them leak slightly from the edge of the lid when placed on their sides and rotated, and so I only use the third tank as my dedicated mini-rotary processor; if yours leaks, just take the necessary precautions.

I should mention, when working with fiber-based print paper such as Harman Direct Positive, of the need to adequately rinse the paper after processing, in order for it to be considered archival; otherwise the fixer chemicals will remain within the paper fibers and, over time, degrade the paper; because of their plastic coating, RC papers have less of an issue with this, but Harman Direct Positive only comes in a fiber paper version. For this reason it is advisable to use a rinse aid after the fixer and initial rinse, to help shorten this required archival rinsing time and conserve water.

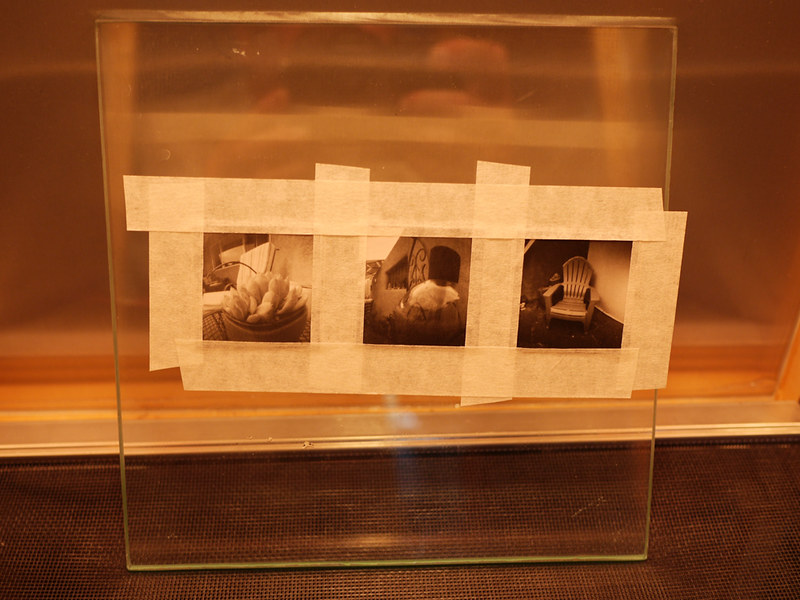
After the final rinse, the paper needs to be squeegeed off so its front and back surfaces are just damp, then use a hair dryer to dry those surfaces; the inner paper will still be wet, however, and thus the paper will need to be thoroughly dried. When doing so, fiber-based paper has a tendency to severely curl toward the front side of the paper, due to emulsion shrinkage. To prevent such curl I will, after squeegeeing and blow drying, tape the prints face-up to a sheet of glass, using drafting or artists tape along the very edges, then place it in a warm, clean area for several hours. Periodically check on the paper and, if needed, reattach the tape if it starts to peel up from the glass due to the paper's curling. If done properly, you can get fiber prints to dry very flat using this method, without the added expense and bulk of a dedicated print drying machine. Making do and improvising is the secret to success with these legacy processes.

It's difficult to adequately describe the joy I experience when I open up the developing tank after one of these short 10-minute processing sessions and behold these pristine little gems still wet in my hand. It's something about their diminutive size and unexpectedly sharp appearance that gets me every time. I invite you to experience the joy of pinhole photography for yourself, the rediscovery of new beginnings.

Wednesday, January 6, 2016

More Mechanical Shutter Stuff


I was anxious to do some testing of the mechanical shutter for the 8" x 10" lens box camera, that I had wrote about in the previous article, but due to the cloudy, snowy weather this last week I didn't have enough light. The mechanical shutter has a speed of about 1/8 second; combined with the slow speed of the Harman Direct Positive paper (I rate it's Exposure Index at around 7.5), that means you need a relatively wide aperture to get sufficient exposure, or find bright daylight.

But last week I did have a chance to eke out one test, in my front courtyard, under a sky streaked with high clouds, barely enough light to get sufficient exposure, but the test did come out fine, indicating that my measurements of the paper's sensitivity and the shutter's speed were fairly close.

I was also anxious to complete part two of the video series about this shutter, initially hoping to find bright, sunny conditions where I could simultaneously shoot more tests while also recording some video. But the weather didn't cooperate, it remaining cloudy and stormy this week, and so yesterday I decided to just do a speaking video about the shutter, describing in detail how I control exposure using the choice of aperture plate, rather than actually demonstrating it live under real-world conditions.

In the course of preparing for this second video, I had to figure out in more detail how I was going to manage exposure control with this shutter. It finally struck me that, with a fixed, single speed, I'd be operating the camera as if it were set to "shutter speed priority" mode - you have one shutter speed, and the paper's sensitivity is also fixed. So the only control one has over exposure is choice of aperture plates. But I only had a handful of such plates made, a choice of 34mm, 17mm, 9mm, 6mm and 3mm. I had to figure out how many other apertures I'd need, and of what sizes.

Thinking further about this, I finally realized that there are two "inputs" that determine the choice of aperture size: the camera's focal length, and the meter's recommended exposure.

In practice, as with any camera, these large format cameras require you to know the actual focal ratio of your lens, in order to properly determine the required exposure. But with these cameras, as you focus the lens by sliding the rear part of the box in and out of the front portion (or expand or contract a bellows, with a commercially-made large format camera), the focal length of the lens changes as you focus. Since focal ratio is focal length divided by aperture size, this means that with large format cameras, changes in focus will affect changes in exposure.

My camera is primitive enough that its lens doesn't have an f-stop control with a scale indicating focal ratio; even if it did, as with my Graflex Speed Graphic, you need to know the real aperture ratio, that takes into account the real focal length of the lens after it's been focused, especially when doing close-up work where the bellows might be extended out rather far from the default infinity focus distance. This hand made camera does include a measuring scale that indicates this actual focal length, however, and that should be sufficient.

Mechanical_Shutter_Aperture_Table

So I finally figured out that it would be most helpful to have a chart, attached to the camera, that gives me the needed aperture sizes for any combination of real focal length and required focal ratio from the meter. I sat down and made such a chart using spreadsheet software, with the vertical axis being focal length and the horizontal axis being needed focal ratio. I rounded off the values in each cell to whole numbers, in keeping with the accuracy given in real-world conditions of reading the dial of an analog light meter.

The table yields all the required sizes of aperture plates needed to cover the range of exposures given by the meter, for the entire range of focal lengths of the camera. But I wasn't certain that I wanted to make all those additional aperture plates. For one, the values given in the lower left quadrant are hypothetical sizes, actually larger than the diameter of the lens currently in place, and so I blackened those cells out. Second, from 34mm down to about 26mm I figured the image would be noticeably blurry around the edges and corners, in keeping with the way meniscus lenses operate at nearly wide-open apertures, and so I grayed out those cells; I do have a 34mm plate, while if I choose to, more of these larger sized plates in the range from 26mm-34mm can be made later on, perhaps for making portraits.

The main body of the table gives aperture sizes from 25mm down to 8mm. Instead of making plates with every one of these sizes, I chose to make plates for every value in the top 250mm (infinity) focal length row. As I show in the video, there are now sufficient plates for virtually any required exposure within the range given.

I made these eleven additional plates using heavy black craft paper, reinforced with black gaffers tape, as I had done previously with some of the other plates. I cut the holes using a compass cutter, a craft tool that operates like a draftsman's compass but uses a thin knife blade in place of the lead point. All nested together in one stack, bundled with an elastic band, they can easily be stored inside the camera during transport.

More work is required, of using this system to make real-world images in various kinds of light, before I can say it's entirely practical. But my initial courtyard test image shows promise.

Going forward, it would be nice to have a more sophisticated shutter, with actual variable (and accurate) speeds to choose from; but that will have to wait for another day.

Wednesday, December 23, 2015

Improvised Camera Building - 8 x 10 Tailboard Box Camera

Sandias_8x10001a
"Sandia Mountains," Harman Direct Positive Paper in 8" x 10" tailboard camera

Though most of the handmade cameras I've fashioned have been of the pinhole variety, years ago I began experimenting with what could be termed "improvised optics," at first using the objective lens from a 7x50 binocular, which projected an image circle big enough to cover a 5" x 7" film format, though I usually employed it in my 4" x 5" Speed Graphic camera - mainly because of the convenience offered by the camera's curtain shutter.

Eventually, the time came when I wanted to try my hand at building an 8" x 10" camera, mainly because of my preference for working with paper negatives, which can easily be contact printed to good effect, and wanting to work in larger sized images, encouraged by the low cost of large format photo paper as compared to sheet film.

But I was never attracted to the ability of a large format bellows camera to twist itself, pretzel-like, into all kinds of contortions, as is the tradition of architectural and product photography where geometry correction or manipulating the plane of focus might be important. I'm more of a documentary photographer in the tradition of the 19th century forefathers, and thus a simple box camera was more to my liking, but one that could be easily focused.

P1110259a
And thus I came up with the notion of a nested box tailboard camera, so-called because of the rear half of the camera that slides in and out of the front half for focusing, resting upon a baseplate for support. I had been inspired by images of historic cameras seen at the George Eastman House online museum, and figured I could cobble together something functional, if not visually appealing.

P1110265a
So I found a sturdy, flat wooden board as the basis for the camera, and built upon it a foam core front box structure, that houses the shutter slot and aperture plates. The foam core board surfaces are covered with thin countertop laminate that provides a faux wood-like appearance, while the edges are reinforced by wood-printed foam trim molding.

P1110261a
The rear, sliding half of the box is built around a frame made from scrap wood that provides a slot to insert a film holder or view screen frame, which is attached to the rear of the foam core box that slides snuggly in and out of the front half. What provides the light-tight seal between front and rear halves of the box is due to the interior of the camera being flocked with adhesive black craft felt, and that light leaking inward through the gap between box halves has to travel up to the front of the box, then reflect back toward the film plane, in order to fog the film. This is due to the rear half sliding inside the front half; had it been built the other way around, light could easily leak in between box halves and directly hit the edges of the film holder.

Though the camera initially lacked a mechanical shutter, I figured with the slowness of paper negatives and a small enough aperture stop, exposure times could be long enough (>=1 second) as to be accurately timed by hand with a simple guillotine-style shutter.

The length of the camera was initially designed around a meniscus lens salvaged from an industrial semiconductor stepper machine (think of it as a reverse enlarger: a reducer; and made by Nikon), that was mounted to the inside of the front of the box via a bracket and bolts that made it easy to remove and replace with other lenses.

P1110264a
The opening in the front of the box provides for a clear aperture of 2 inches, but meniscus optics are rarely very sharp operated that wide, and so to aid in focusing I made an aperture plate stopped down to 17mm, which clears up the view of these single-element lenses sufficiently to enable a distinctly clear image while still being adequately bright. Unless sunlight is directly striking the view screen, I can often make out a distinct image without the aid of a dark cloth.

P1110267a
I also made a number of other aperture plates, the smallest being 3mm, that cuts the light down sufficiently to permit hand-timed exposures in bright sunlight. Some of these plates are cut from masonite board, while others are fashioned from sturdy black craft paper. In the case of these latter plates, their edges are reinforced with black gaffers tape and when inserted into the camera the excess slop in the aperture slot is filled in with a masonite spacer.

P1110260a
I had fashioned a focal length scale along the lower right edge of the camera, initially calibrated for this first meniscus lens, that enables the camera's working aperture to easily be determined, by dividing focal length by aperture diameter. This method automatically compensates for any "bellows extension factor" caused by close-focusing. Additional lenses are used with an offset number that's added to or subtracted from the scale reading, depending on the lens.

I did experiment with the 7x50 binocular lens, mentioned earlier, that actually makes a very nice 8" x 10" image, with just a bit of vignetting, but its focal length (150mm) is too short, and the box halves too long, to permit that lens to be focused at infinity. However, with the box halves pushed together as close as they will go, that lens operates as a close-up lens for tabletop dioramas and still-life scenes.

P1080878
P1080865
Another lens I acquired with the intention of using in this camera was a multi-element lens cell from a Xerox copy machine; however, such optical designs cannot be used with external aperture stops without severe vignetting, which I only discovered after purchase of the lens. Yes, it does operate nicely wide open, but the resulting image is too bright for an exposure to be made with a hand-time guillotine shutter. That lens was later repurposed in my Speed Graphic (since it has its own focal plane shutter), using a special bracket I constructed for the heavy lens, which reminds me somewhat of a Kodak Aero Ektar.

DSCF1660a
So, I used this camera, on and off, during the last few years with the single element meniscus lens, but wasn't entirely satisfied with the image quality. Then last year I was given a close-up lens, intended to be threaded over the front of a 35mm SLR lens, and found its 275mm focal length and optical quality to be ideal for this camera. This has now been the standard lens I use, of pretty good quality when stopped down, as was done with the top image, taken in far northeast Albuquerque near the Sandia Mountains, exposed onto Harman Direct Positive Paper (which is why the image appears reversed, for those of you familiar with this terrain).

P1110262a
P1110263a
DSCF1655a
I would be remiss not to describe the view screen itself. Rather than employ a built-in view screen with spring hinges, as is the case with conventional large format cameras, I built a laminated wooden frame that slides into the side of the camera, just like a sheet film holder. The viewing screen is a plastic fresnel magnifier, purchased from a local office supply store, whose smooth side (facing toward the lens) was sanded down with 600 grit emory using a random orbital sander, offering a surface of sufficient quality for composing an image, while the rear fresnel ridges help to focus the image direct rearward, making for a brighter image.

I built the wooden frame such that the distance from the front of the frame to the front of the screen is (nearly) the same as from the front of a sheet film holder to the film plane.

The camera is not nearly as heavy as it looks, due to its construction of layered foam core and countertop laminate, but the biggest challenge in carrying it in the field is its bulk. I've rigged up a makeshift camera strap to help carry its weight, which has helped.

P1110268a
I like that the interior of the camera serves as a storage compartment for spare aperture plates, and that it's rather weather resistant. There are times when I dream of building another version, a bit shorter, enabling me to use that binocular lens, but I have not yet done so. This camera has served as a real workhorse for experimenting with adapted optics as makeshift camera lenses, and is a real hoot to use.

P1080492a
One feature I have not mentioned is that I eventually made my own mechanical shutter, that fits over the front of the box, but that's a subject for another day.